Supervisor
Overview
The aim of the supervisor is to group all the needed applications to build and manage the motors.
Supervisor is the first dialog the user comes across, and it displays all applications used to build, test and compare motors.
The supervisor enables easier and faster viewing and access to projects and rotating electrical machines.
- “New”: To create a new motor from a default topology.
- Rotating electrical machines are classified according to the families to which they belong: synchronous, induction and DC machines. Within each family, a further classification is used to distinguish between different types of machines, e.g., for synchronous machines, one finds permanent-magnets machines, variable-reluctance machines, machines with wound field, etc.
- The topology of the selecting machine is displayed with a brief introduction.
- Double clicking on the icon of the machine or clicking on the button “Open in Motor Factory” edits the machine in the Motor Factory design environment.
- “Recent”: To edit a recent project. Up to 100 projects can be stored
on this list.
A brief description of the project is done with the Catalog name, the type of machine and the Created + Modified date.
- “Edit”: To select and edit a project from the catalogs, standard and
user catalogs, like what can be done when using Motor Catalog.
This allows the user to access past studies quickly directly from the supervisor.
Double clicking on the icon of the machine or clicking on the button “Open in Motor Factory” edits the machine in the Motor Factory design environment.
- “App”: To access the FluxMotor satellite applications like Motor Catalog, Part Library, Materials, Units, Script Factory, etc.
- “Connect“: A dedicated section to give access to external software
that is needed and complementary forFluxMotor: Flow
SimulatorTM, Flux®, HyperStudyTM,
PSIMTM, SimLab®, Twin Activate®, and Siemens Simcenter
Amesim.Note: For each solution, a picture and a text help to introduce it. There are also the following three links:
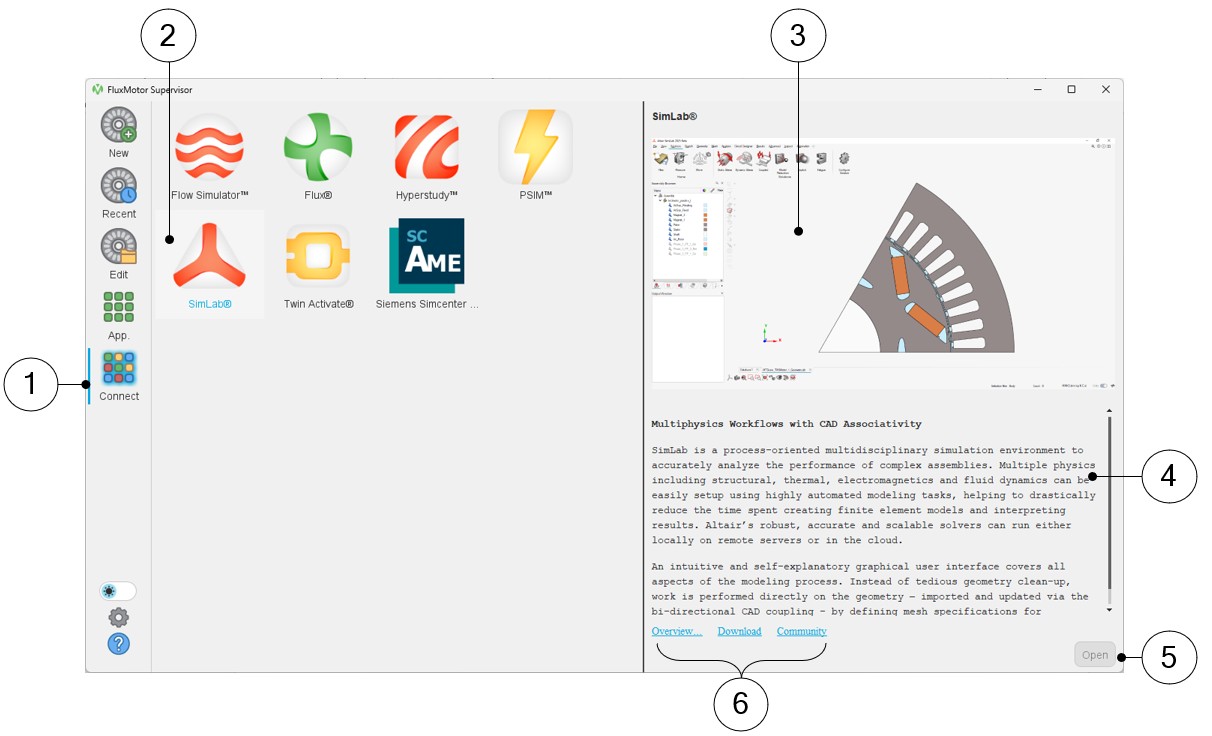
- “Overview” (link to get into the corresponding altair.com web page)
- “Community” (link to get into the corresponding Forum – Community)
- “Download” (link to the corresponding download area or marketplace)
- Other functions
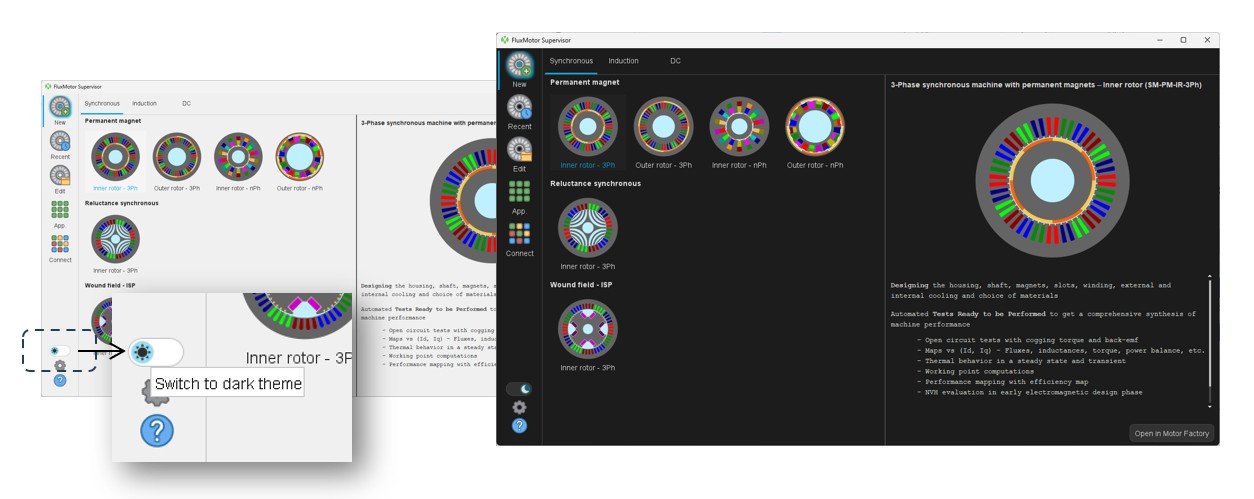
- Choice of the dark or light themesNote: The theme (Dark or Light ) can be selected directly from the front end of the supervisor. A dedicated button allows you to switch between modes.
- Access to user’s preferences
- Access to the online user help information
- Choice of the dark or light themes
 |
|
|---|---|
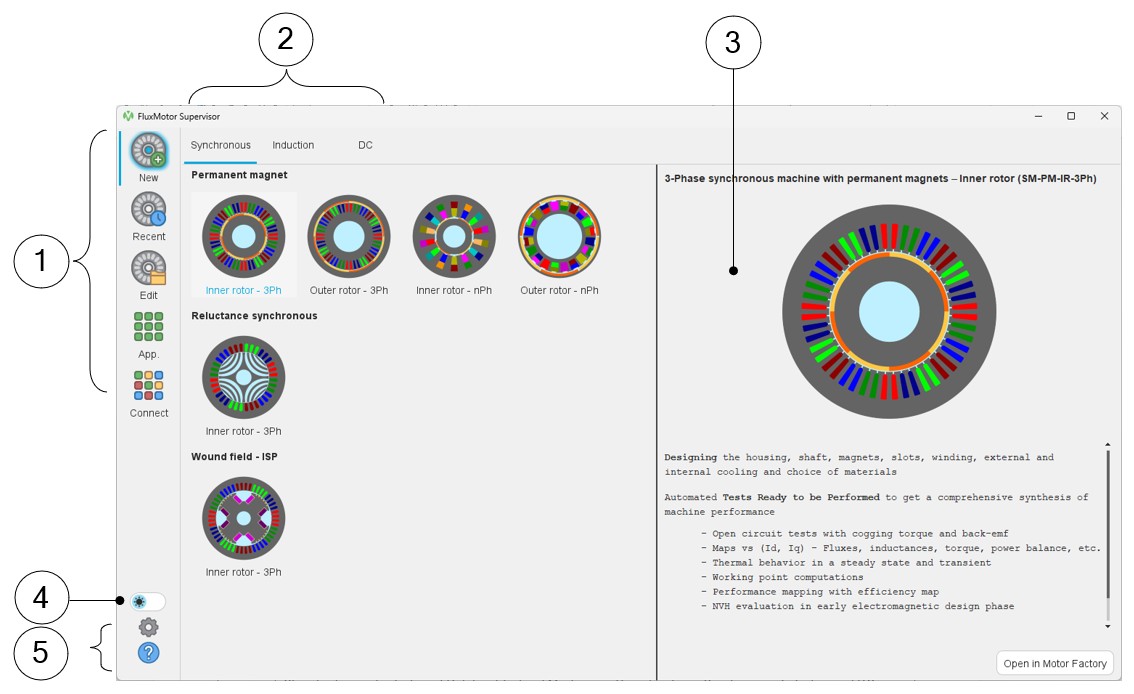
| 1 | Main entry points of the supervisor – New motor in Motor Factory, edit a Recent motor, Edit a motor from catalogs, Open FluxMotor satellite Applications, and Open Altair® solutions. |
| 2 | Classification and selection of Rotating Electrical Machines – Three families – Synchronous, Induction and DC machines. |
| 3 | The topology of the selecting machine is displayed with a brief introduction. |
| 4 | Button to switch between Light and Dark modes. |
| 5 | Access to user’s preferences and help information |
The next sections give deeper description and illustrations about these functions.
Application to access motors
Introduction
- The dedicated design environment helps user define machines within minutes. Then, using a step-by-step process, a dedicated interface will help users to fully design the machine, the rotor, the stator, the cooling topology, and the materials.
- The dedicated test environment enables users to assess motor performance.
- A standard and relevant test portfolio is available, and predefined tests are ready to be performed.
Several ways allow us to get into the Motor Factory from the supervisor. The buttons “New”, “Recent” or “Edit” or the “Motor Catalog” application, which can be opened from the Button FluxMotor Applications.
Create a new motor
 |
|
|---|---|
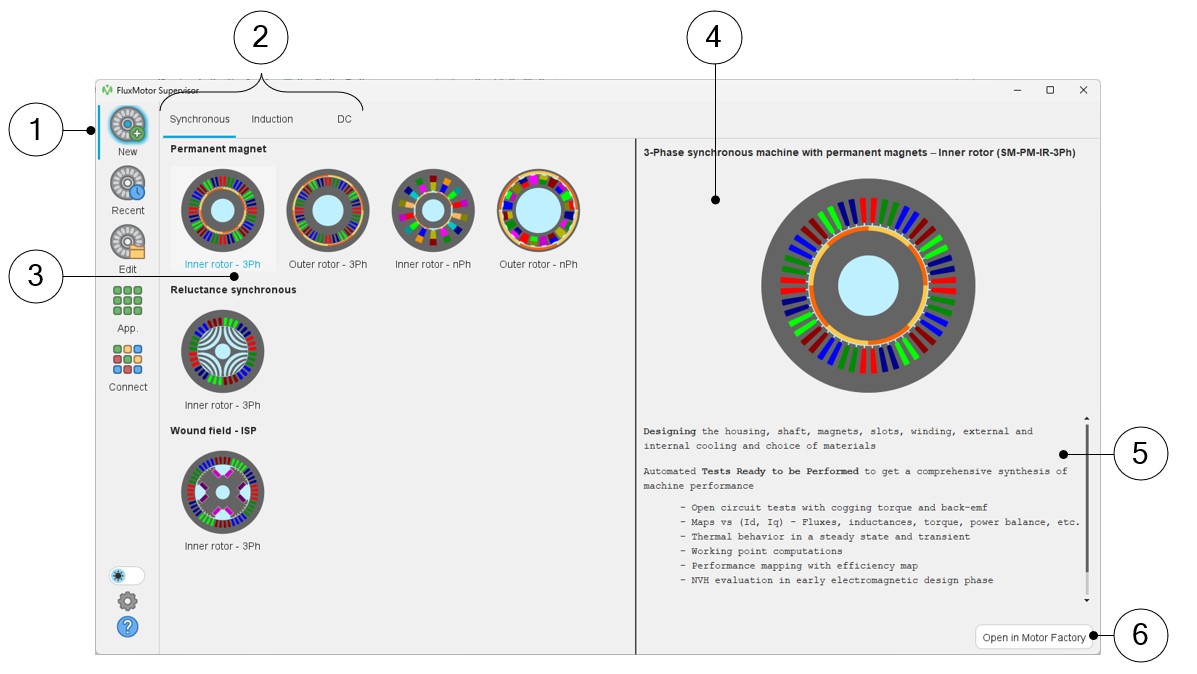
| 1 | Click on the button “New” to create a new motor in Motor Factory |
| 2 | From the supervisor, select the machine family:
|
| 3 | and then the motor type to be designed from the list of the types
of available machines
|
| 4-5 | Illustration of the selected type of machine: picture (4) + general description (5). |
| 6 | Once selected, the motor can be opened in Motor Factory either by double clicking on the corresponding icon or by clicking on the button “Open in Motor Factory”. |
- SM_PM_IR_3Ph: 3-Phase synchronous machines with permanent magnets – Inner rotor
- SM_PM_OR_3Ph: 3-Phase synchronous machines with permanent magnets – outer rotor
- SM_PM_IR_nPh: n-Phase synchronous machines with permanent magnets – Inner rotor
- SM_PM_OR_nPh: n-Phase synchronous machines with permanent magnets – outer rotor
- SM_RSM_IR_3Ph: 3-Phase Reluctance Synchronous Machines – Inner rotor
- SM_WF_ISP_IR_3Ph: 3-Phase Wound Field Inner Salient Pole Synchronous Machines – Inner rotor
- IM_SQ_IR_3Ph: 3-Phase induction machines with squirrel cage – Inner rotor
- IM_SQ_OR_3Ph: 3-Phase induction machines with squirrel cage – outer rotor
- DC_PM_IR: DC permanent magnet machines – Inner rotor
Open a recently used motor
 |
|
|---|---|
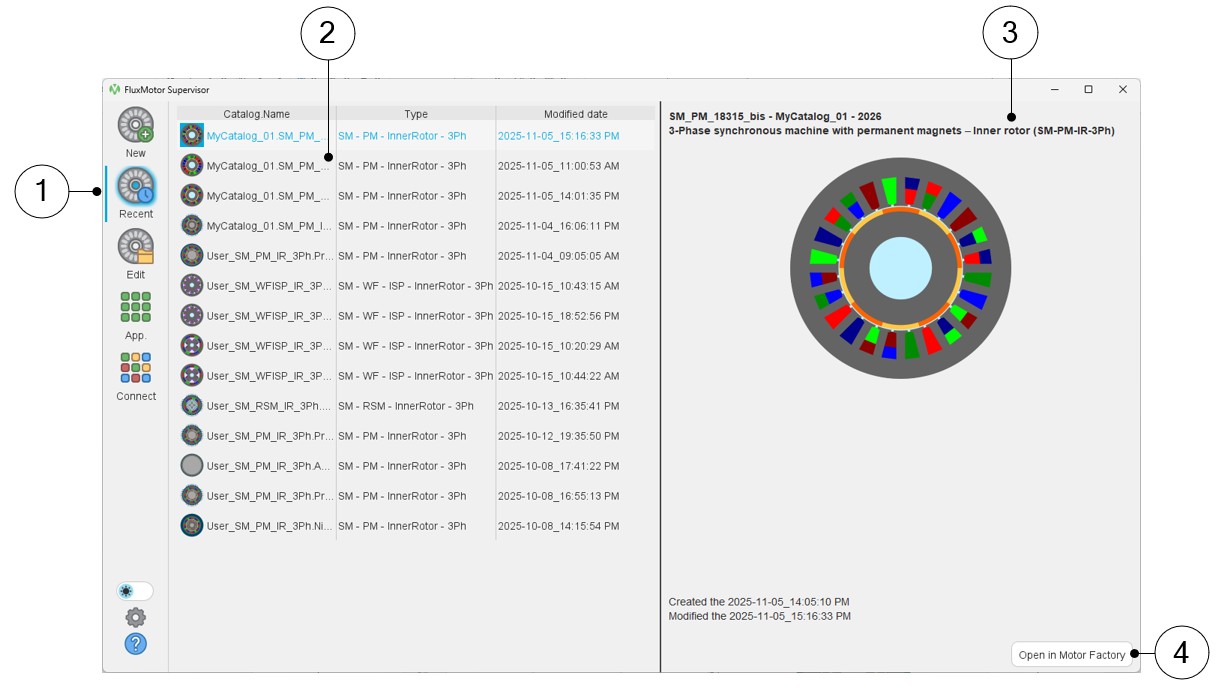
| 1 | Selection of the recent motor list |
| 2 | Select the targeted recent motor. Once selected the recent motor can be opened in Motor Factory by double clicking on the corresponding line. |
| 3 | Illustration of the selected project (motor): Short and full
label of the motor and the catalog in which the motor is
stored. Created and modified dates. |
| 4 | Once selected, the motor can be opened in Motor Factory either by double clicking on the corresponding line or by clicking on the button “Open in Motor Factory”. |
Edit an existing motor via Motor Catalog from the supervisor
 |
|
|---|---|
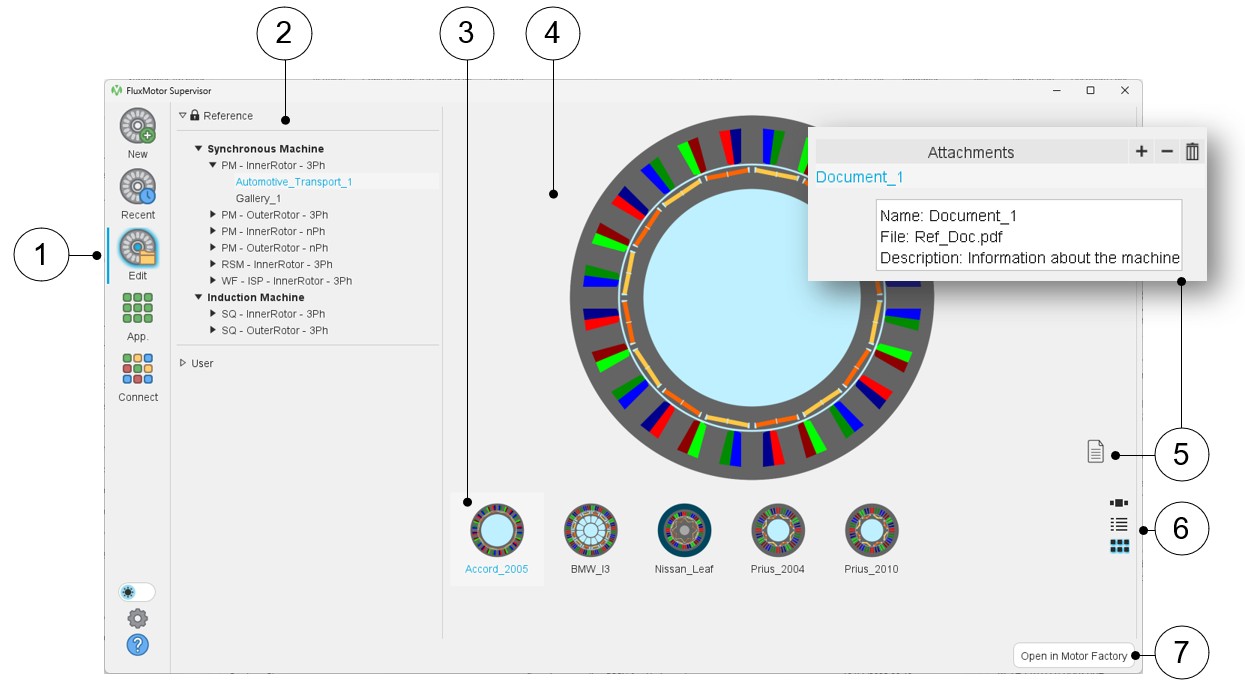
| 1 | Select the button “Edit an existing motor via Motor Catalog” |
| 2 | Selection of the catalog type: Reference or User catalog, in which are available catalogs of motors. |
| 3 | List of motors stored in the selected catalog. |
| 4 | Picture of the selected motor. |
| 5 | Button to visualize the attached documents (if there are). Note: Documents can be attached only from the
Motor Catalog application and for the user
catalogs. |
| 6 | Button to display thumbnails as a slide show, as a list, or as a matrix view of pictures. |
| 7 | Once selected, the motor can be opened in Motor Factory either by double clicking on the corresponding line or by clicking on the button “Open in Motor Factory”. |
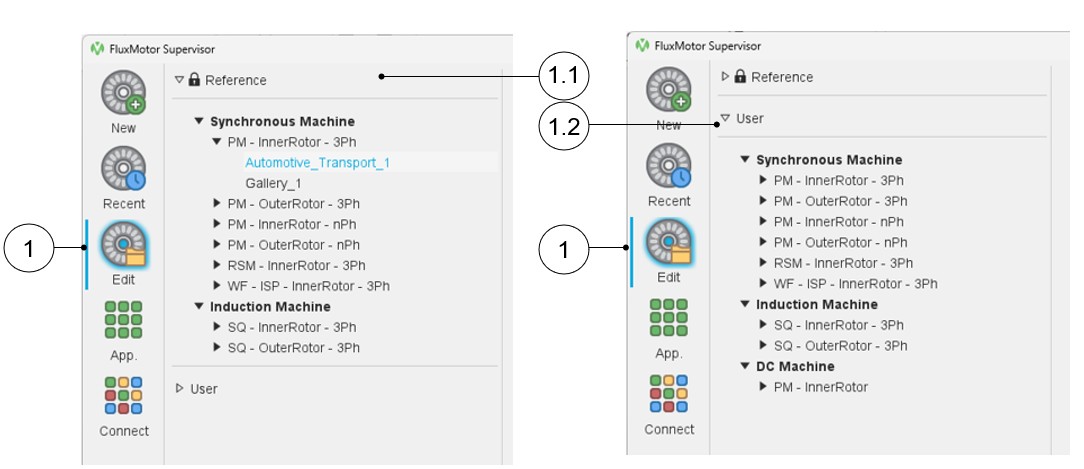
A selection tree allows visualizing the machines and selecting them in a more user-friendly way.
Hence, once the type of catalog is selected, either Reference or User, the user can display all the available catalogs in the whole area for more visibility, as illustrated below.
 |
|
|---|---|
| 1 | “Edit”: To select and edit a project from the catalogs, standard and user catalogs, like what can be done when using Motor Catalog. |
| 1.1 | The reference catalogs have been selected and are deployed, and others (User) are folded. |
| 1.2 | The user catalogs have been selected and are deployed, and others (Reference) are folded. |
Edit an existing motor from the application Motor Catalog
 |
|
|---|---|
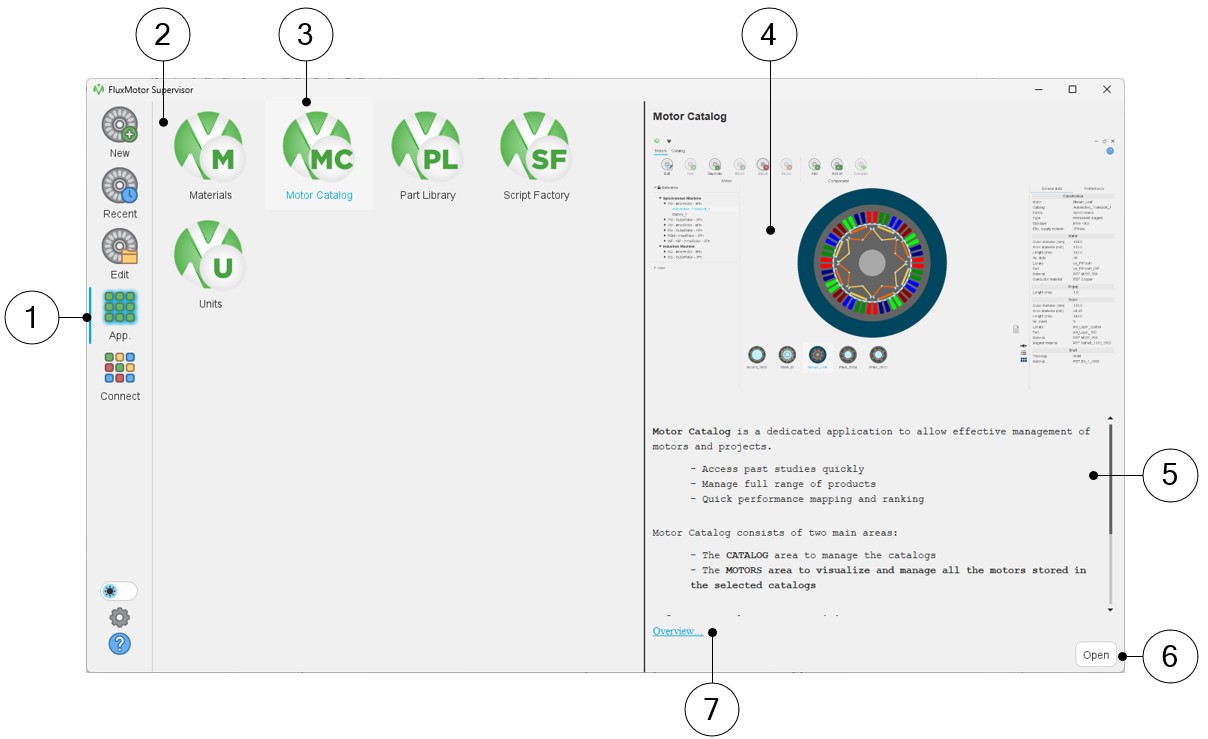
| 1 | Select the button to access FluxMotor applications. |
| 2 | Icons of FluxMotor applications:
|
| 3 | Selection of the application “Motor Catalog” |
| 4 | Picture of the selected application: Motor Catalog in our example. |
| 5 | A short description of the selected application. |
| 6 | Once selected, the application can be opened either by double clicking on the corresponding icon or by clicking on the button “Open”. |
| 7 | A link “Overview” to access the online user help guide which describes the selected application. |
An embedded comparator is available. The general data and performances of several machines can be compared, thus simplifying the process to choose a machine.
For more information, refer to Motor Catalog user guide.
Building blocks of machines
From the supervisor, access to FluxMotor applications allows us to open Part Library, Materials.
Part Library
- In Part Library area, libraries are provided containing standard parts.
- Many slots, magnets and bars are available, and all the topologies are parameterized.
For more information, refer to Part Library user guide.
Part Factory
- Customization of parts (slots, magnets)
- Standard parts, slots and magnets are provided, which can be edited and customized for various configurations.
For more information, refer to Part Factory user guide.
Materials
- Many typical materials are provided: Lamination, Solid, Magnet, Electrical Conductor, Electrical Insulator and Fluid.
- Users can also create their own materials.
For more information, refer to Materials user guide.
Miscellaneous functions to manage FluxMotor
From the supervisor, access to FluxMotor applications allows us to open Script Factory and Units.
- Write a FluxMotor script
“Script Factory” is a dedicated application to create and manage python FluxMotor scripts.
- Choice of units
Refer to and choose the units available in FluxMotor.
- Set the user preferences
Choose user preferences.
- Online user help guides
This gives access to Online help, Licensing system and information about FluxMotor and Altair® HyperWorks®.
Connect to external software
- Flow SimulatorTM
- Flux®
- HyperStudyTM
- PSIMTM
- SimLab®
- Twin Activate®
- Siemens Simcenter Amesim
 |
|
|---|---|
| 1 | Select the button to access FluxMotor applications. |
| 2 | Icons of external software:
|
| 3 | Illustration of the selected external software. |
| 4 | Short description of the selected software. |
| 5 | Once selected, the software can be opened either by double clicking on the corresponding icon or by clicking on the button “Open”. |
| 6 | Additionally, the following 3 links are available:
|
Dark or Light themes
If applications such as Motor Factory or others were already open during the switchover, their theme will not be changed.
These applications must be closed and reopened for the themes to be applied to them.