Troubleshooting: Addendum Surface Issues
Condition
- No addendum surface is created.
- There are missing surfaces and a partial addendum is created. Red indicates locations where the addendum surface failed to propagate.
- There aren't enough ribs.
Step 1: Fix Overlapping Ribs
Overlapping ribs is the most common issue, so we suggest starting off by fixing them manually.
-
Rotate the ribs so that they don't overlap by doing one of the
following:
- Hover over the rail to display handles. Drag the lower arrow to change the angle of the rib plane.
- Select a handle and enter an Angle in the microdialog.
Note: If a rib can't be rotated, select the rib, and in the microdialog turn off the constraint Tangency G1 to the part so that you can rotate it.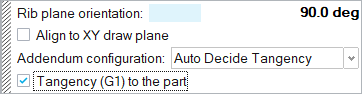

Figure 1. Issue: Overlapping Ribs
Figure 2. Remedy: Rotate Overlapping Rib
Step 2: Delete Excess Ribs
Check for ribs that are too close together or lie on the same plane, and then manually delete excess ribs.
- Adjust the view as necessary to locate ribs that are too close together or lie on the same plane.
-
Delete ribs as necessary to smoothen the flow.
-
In the guide bar, select Edit Ribs.

-
To delete a rib, select it and press
Delete.
Note: If the rib is essential for maintaining the desired addendum shape, instead of deleting it, you can rotate it as described above.
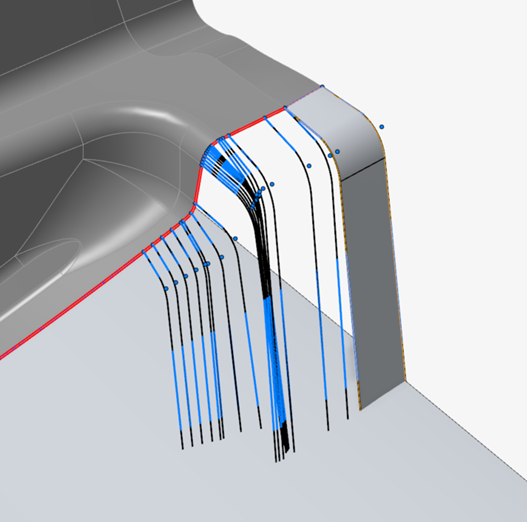
Figure 3. Issue: Excess Ribs
Figure 4. Remedy: Delete Excess Ribs
-
In the guide bar, select Edit Ribs.
Step 3: Add Ribs
You can add ribs automatically and manually. Once you've added ribs, you can edit them to adjust the addendum.
Step 3A: Add Ribs at T-Intersections

Figure 5. Issue: Not Enough Ribs Created with Default Auto Create Rib Location Option

Step 3B: Add Ribs at All Vertices
Still not enough ribs were created automatically when you selected T-intersection vertices.

Step 3C: Restore Missing Ribs at Discontinuity Vertices
Check for missing ribs at discontinuity vertices and add ribs there.
- Adjust the view to locate discontinuity vertices where there are missing ribs.
- Hold down Alt while hovering over an addendum start edge, looking for green dots (discontinuity vertices) where there are missing ribs, and click these green dots to add ribs there.
Step 3D: Add Ribs at Custom Locations
You can add ribs at custom locations (for example, at long stretches without ribs or at corners to help the surface make a turn).
| To | Do this | Notes |
|---|---|---|
| Create a copy of a rib |
|
|
| Add new ribs |
|
|
| Copy some parameters of a source rib to target ribs |
|
The following parameters are passed on:
See Rib Options for parameter definitions. |

Figure 6. Issue 1: Long Stretch Without Ribs

Figure 7. Remedy 1: Add Ribs at Custom Locations to Build Addendum Surfaces All Around

 Figure 8. Issue 2: Addendum Wall Doesn't Follow the Part
Edge
Figure 8. Issue 2: Addendum Wall Doesn't Follow the Part
Edge
 Figure 9. Resolution 2: First Add Ribs at Corners To Help Addendum
Surface Turn Properly
Figure 9. Resolution 2: First Add Ribs at Corners To Help Addendum
Surface Turn Properly

 Figure 10. Resolution: Then Add Adjacent Ribs to Align the Addendum
to the Part Edge
Figure 10. Resolution: Then Add Adjacent Ribs to Align the Addendum
to the Part EdgeStep 3E: Relax the Tangency to Propagate the Addendum
-
In the microdialog, for Addendum configuration,
select Auto Decide Tangency. This uses G0 when G1
is not feasible.
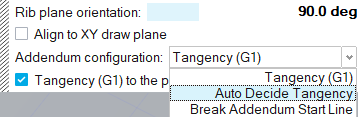
When Auto Decide Tangency is set, the rib is displayed in yellow. -
The default Tangency (G1) is the ideal addendum
configuration, so you can try turning G1 back on for earlier ribs if it
doesn't break the surface.

Figure 11. Issue: Addendum Surface Fails to Propagate with Tangency (G1)
 Figure 12. Remedy: Turn On Auto Decide Tangency to Propagate Addendum
Surface
Figure 12. Remedy: Turn On Auto Decide Tangency to Propagate Addendum
Surface