User Defined Excel Format
Step 1
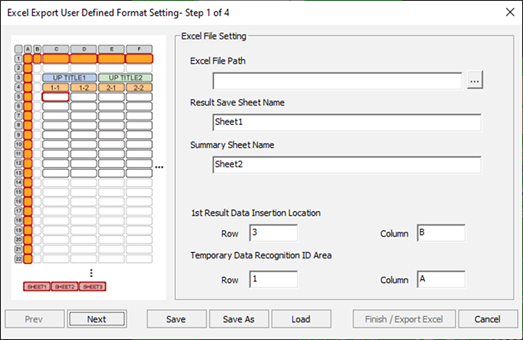
Figure 1.
- Excel File Path: This section defines the path where the Excel file to be used for saving the result is. You must create the file beforehand.
- Result Save Sheet Name: Select the sheet to use with the selected file from Excel File Path.
- Summary Sheet Name: Select the sheet name to write the summary information.
- 1st Result Data Insertion Location: Select the cell where the result data from the first category is to be saved.
- Temporary Data Recognition ID Area: The history of the tests are provided in the user defined format, so you should select a cell for the program to use for this feature. Generally, you should select 1-A.
- Click Next.
Step 2
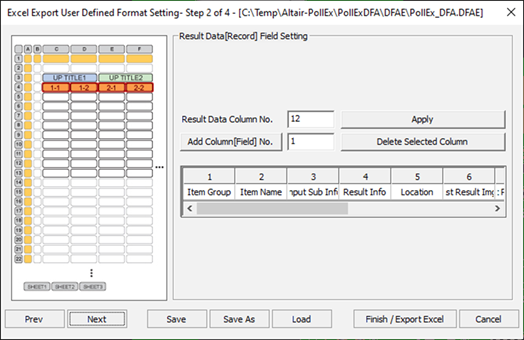
Figure 2.
- Result Data Column No.: This section shows the columns corresponding to the test result. You should remember the contents of the report to record and predict the type and number of results. For example, If you need 10 columns, enter 10 and click Apply.
- Add Column [Field] No.: If the predicted number of columns exceeds 5, enter the number of columns that exceed 5 and click Add Column[Field] No. If you want to delete a column from a total number of 5 or less columns, click on the column and Delete Selected Column.
- Table: Describe the comment that contains some information on each Column in Excel.
- Click Next.
Step 3
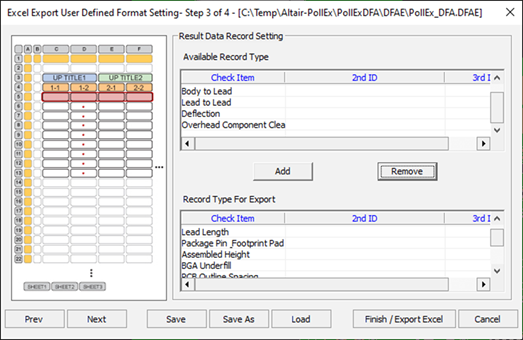
Figure 3.
- Available Record Type: This section is used to select the available type to be recorded. You can choose the needed categories. You can create a more efficient report by eliminating items, such as components that are not managed.
- Add/Remove: To select, click on each item and select/deselect.
- Record Type for Export: This window shows the test types to be recorded. To cancel a selection, select the item with the mouse and click Add.
- Click Next.
Step 4
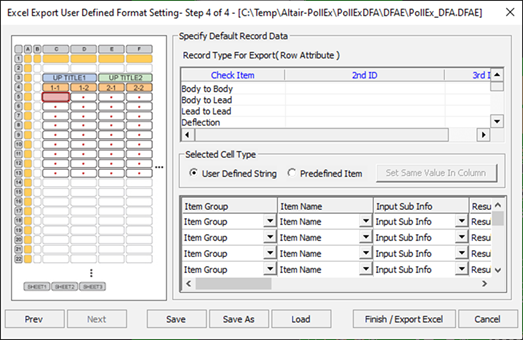
Figure 4.
- Record Type For Export(Row Attribute): Shows the selected categories from Step 3. The above window is used to confirm the contents that will be included in the final report. This is done in concert with 3, so you must be knowledgeable of the selected contents and order. The correlation is described in 3.
- Selected Cell Type: When you select a category from Record Type For Export, it is activated in the table above. When you select this activated category, the selection in 2 will be activated as well. You can select the categories in 1. 2 can be accessed by selecting one of the provided formats.
- The same number of columns you selected in Record Type For Export appears here. Select the columns you want and choose or define the contents you wish to provide initially. With Record Type For Export of Selected Cell Type, you directly enter the category you want to use. With Selected Cell Type, a combo box appears as seen below, and you should select and use the category, by recording the required category determined by the information gained from ECAD interface and DFA. Therefore, using Selected Cell Type is useful in terms of convenience and accuracy.
- When defining Item Group of the above picture, if the contents provided on each category is identical, use the ○abutton to select them as identical contents. You can also define other categories separately for convenience.
- After completing Steps 1 to 4, click Finish/Excel Export
to create a report.
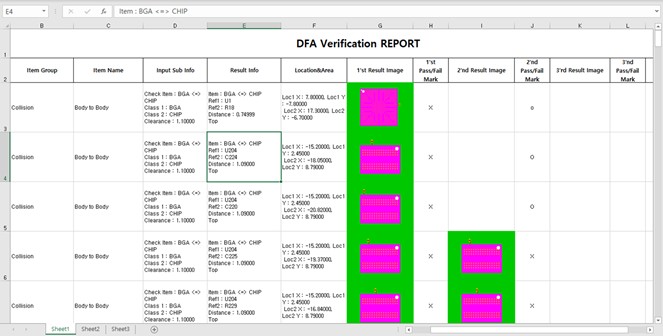
Figure 5. - Enter the content or title of the column selected in Step 2 of 4 and save the file. The saved file becomes the selected file in 1 of step 1 of 4. Therefore, you should predict the number of columns and their positions beforehand to use them appropriately.
- As mentioned in step 3 of 4, a column is provided for each test subject. Each column is provided with the contents that you defined in step 4 of 4.
- The DFA verification results can be accumulated up to 10 times. The column G displays the 1st DFA verification result image and the column I displays the 2nd result. If the Column I is empty, it means the violation is resolved.