
Revolve
Revolve one or more faces, sketches, lines, or 2D edges about an axis.
-
On the Geometry ribbon, select the
Revolve tool.

Note: The tool may be hidden in the dropdown menu. To access the dropdown menu, you can do one of the following:- Select
 at the lower right corner of the
currently displayed tool.
at the lower right corner of the
currently displayed tool. - Click and hold the currently displayed tool.
The guide panel appears.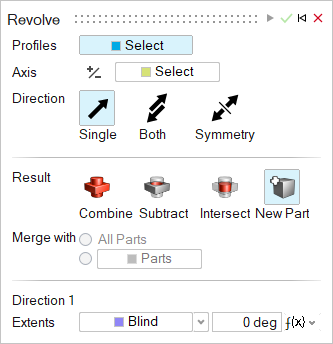
- Select
-
Designate the Profiles:
Select one or more faces, sketches, lines, or edges. To deselect, hold down Ctrl while clicking.Tip: Select a sketch in the Model Browser to quickly select all of its entities. If you add sketch entities after you revolve, the new entities will also be revolved.

-
Designate the Axis of rotation:
- In the guide panel, select the Select Axis button.
- Select the axis that you’d like to revolve around. An axis can be a line or a straight edge.
-
Choose a Direction:
- Single (default): Revolve in one direction.
- Both: Revolve in both directions.
- Symmetry: Revolve symmetrically in both directions.
-
Choose a Result type:
- Combine: Combine the revolved shape with the existing parts.
- Subtract: Carve out the revolved shape from the existing parts.
- Intersect: Retain only the intersecting portions of the revolved shape and the existing parts.
- New Part: Create a new part from the revolved shape.
-
Choose a Merge method:
- All Parts (default): Merge the revolved shape with all parts that touch the revolved shape.
- Selected Parts: Select the radio button to merge the revolved shape with selected parts. Then select the parts that you’d like to merge the revolved shape with.
-
If you selected Combine, choose how to combine the
revolved shape:
- Target: Select the checkbox and use the collector
to select the part you want to merge into.Note: When the Selected Parts radio button is selected, the target part must be one of the selected parts before you can apply the change. When All Parts is selected, you can select any part as the Target.
- Target: Clear the checkbox to merge parts automatically.
- Target: Select the checkbox and use the collector
to select the part you want to merge into.
-
Adjust the revolved shape along Direction 1 or
Direction 2:
To Do this Notes Adjust the angle of revolution Do one of the following: - Drag the colored arrow on the compass.
Figure 1. Revolving a Part 
- In the microdialog, enter the Angle.
- In the guide panel, for Extents, select Blind, and enter the Angle.
Revolve up to a selected point Do one of the following: - In the guide panel, for Extents, select Up to Point, and then select the vertex.
- Drag the arrow up to the desired point and let the revolution snap in place.
Change the direction In the microdialog or guide panel, select one of the following: - Single (default): Revolve in one direction.
- Both: Revolve in both directions.
- Symmetry: Revolve symmetrically in both directions.
To reverse the direction of the revolved shape, in the microdialog click Reverse Direction  .
.Change the result type In the microdialog or guide panel, choose a Result type: - Combine: Combine the revolved shape with the existing parts.
- Subtract: Carve out the revolved shape from the existing parts.
- Intersect: Retain only the intersecting portions of the revolved shape and the existing parts.
- New Part: Create a new part from the revolved shape.
- Drag the colored arrow on the compass.
- Click Apply.
- Right-click and mouse through the check mark to exit, or double-right-click.