Mounter Library
Export mounter library for various mounting machines.
-
From the menu bar, click File > Export > Mounter Library.
The Manufacturing Library Extractor dialog opens.Note: Before using this feature, you must to set up the Mounter Library section in Setting Environment.
-
Edit Mounter Library Mapping Table: Edit the mounter library mapping table of
the part.
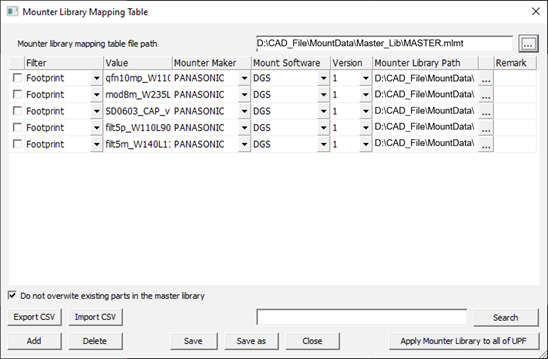
Figure 1. - Mounter library mapping table file path: Select the mounter library mapping table file, *.mlmt.
-
Table options:
- Check: Check to use the configuration for creating the mounter library.
-
Filter: Select the filter to recognize the part.
Footprint, Part Number (MPN), Company Part Number, and Package Name are available.
- Value: Define the value of the part which will be exported.
- Mounter Maker: Define the maker of the mounter machine.
- Mount Software: Define the software name of the mounter machine.
- Version: Define the version of the mount software.
- Mounter Library Path: Define the path of the mounter library file.
- Remark: Write a note of the mounter library file.
- Do not overwrite existing parts in the master library: When checked, do not overwrite the mounter library file if the same part already exists in the master library.
- Export CSV: Export current setting to CSV format file.
- Import CSV: Import an existing CSV format setting file
- Search: Search a configuration by keyword.
- Add: Add a new configuration.
- Delete: Delete the selected configurations.
- Save / Save As: Save current mapping table.
- Apply Mounter Library to all UPF: Apply current mounter library mapping table to all parts in the UPF library.
- Use Master Library to Export: When checked, use master library information to export instead of current mounting information of the part.
- Export: Export mounter libraries to the defined output path.