Define User Information Setting
Set the default PollEx Cross Probe usage environment.
From the menu bar, click Option.
Global
- Language: Select the language to be used for the menu and manual in PollEx Cross Probe.
- Menu (Dialog) Language: Select the proper language from the list for the program menu.
- Manual Language: Select the proper language from the list for the manual.
- Default Directory to Open: Set the opening directory path.
- Same Type–Auto Run to Compare Automatically compare running when you import data.
- Result Report Option (MS Excel): Set while extracting results into the MS/Excel sheet.
- Images: Comparing results are extracted with the image.
- Maximum Number of Images: Large images make the file size too big. You can define the maximum number of images. (default: 500)
- Select Object for Result Report: Select results for reference, routing pattern, net and non-electrical board geometries comparison.
- Include Image in Summary: The images of Top and Bottom will be included in the exported Excel file’s Summary Sheet.
- Contents Include Reference Property: Results will include reference properties.
- Report View Column Setting: Define the column index for exporting the Excel report.
- Save As: Save the setting into the file. (File extension will be *.Cross Probeenv)
- Load: Upload the saved environment file.
Same Type Option
Same Type Option: Option for checking between same type data such as PCB design to PCB design or Schematic to Schematic.
- Reference: Set the parameter to be used while comparing components.
- Reference (Location Angle): Compare reference’s location and angle.
- Reference Name (Location Angle): Compare reference name string’s location and angle.
- Part Identifier (Part Name): Compare part information, such as: part name, package name, and footprint name.
- Pin: Compare the pin’s location, angle and used pad shapes.
- Silk Screen: Compare the part’s silkscreen data.
- Figure: Compare the part’s figure data.
- Except same Part Name, same Location and same Net Name but having different.
- Reference Name: In the case of the same Part Name, same Net Name, different Reference Name, and same location, exclude them.
- Consider same Part for different Part Names but same geometries: In the case of the same Reference and different Part Name, if Footprint’s geometry is different, it fails.
- Compare Nets based on each Reference: Compare the net connected to reference.
- Net: Compare net information (net composing components and their pins).
- Recognize as the same net if the connection of part compositions is the same.
- In Net’s Composition, the same Part may be treated as the same Reference.
- Except same Part Name but having different Reference Name: In case of the same Part Name and different Reference Name, exclude them.
- Route: Compare routing pattern’s differences.
- Except same Part Name and same Location but having different Reference Name: In the case of the same Part Name, different Reference Name and same location, exclude them.
- Figure: Compare board figures.
- Property: Compare part’s properties. Activate the checkbox and click menu to open the Property Selection dialog to select target properties to be compared.
Allowed Tolerance: Apply the tolerance for comparing PCB to PCB.
Same Type Option - Target Definition
- Comparison Target Definition: Define the comparison condition for components and nets.
- Components: Select the components. You can select target components with part names or reference names.
- Part Name Filter: The following image shows the part name selection dialog. Select parts and add them into the item list.
- Prefix: Define proceeding strings of the part name.
- Mid-String: Define strings in the part name.
- Suffix: Define strings at the end of the part name.
- After providing strings and selection types among Prefix, Mid-String and Suffix, click the ADD String to add the selection into the string item list. To delete the item among the added list, select the item and press Delete.
- Reference Name: The following image describes the component selection with reference name.
- Un-Selected List: Displays reference lists in design.
- Selected List: Displays the selected item.
- Add to List: Move the selected item to the Selected List item.
- Remove: Delete the item in the Selected List.
- You can search the keyword using the wild card *, ?, #, and “”. The keyword
search is case-insensitive. The search list will automatically update as you
enter the keywords.
- *: perform a multiple character wild card search (String)
- ?: perform a single character wild card search (One Character)
- #: perform single character wild card search (One Number)
- " ": perform search matching the string
A*: Reference name starting with string A.
*B: Reference name ending with string B.
A*B: Reference name string starting with A and ending with B.
Except Component: Select the components.
You can select the component for the excepting component using Reference, Part and Package Name. To set the component, use the filtering menu.
Reference, Part and Package Filter: Select the Reference, Part and Package Name and then add them to the item list.- Prefix: Define proceeding strings of Reference, Part and Package Name.
- Mid-String: Define strings in Reference, Part and Package Name.
- Suffix: Define strings at the end of Reference, Part and Package Name. After providing strings and selecting the Prefix, Mid-String and Suffix, click ADD String to add your selections to the string item list. To delete the item among the added list, select the item and then press Delete.
- Nets: Selecting the nets. You can select target nets with the net name.
- Net Name Filter: Use the net name filtering box to select nets and add them to the item list.
- Net Name: The following image describes component selection with the
reference name.
Figure 1. 
- Net lists shown in design.
- Un-Selected List: The selected items.
- Selected List: Move the selected item to the Selected List item.
- Remove: Delete the item in the Selected List.
- Search: Net name searching menu.
- You can search the keyword using the wild card *, ?, #, and “”. The keyword
search is case-insensitive. The search list will automatically update as you
enter the keywords.
- *: perform a multiple character wild card search (String)
- ?: perform a single character wild card search (One Character)
- #: perform single character wild card search (One Number)
- " ": perform search matching the string
A*: Net name starting with string A.
*B: Net name ending with string B.
A*B: Net name string starting with A and ending with B.
Block Design Definition: You can define the main IC device and passive device. For defined devices, if there is net between them, PollEx Cross Probe checks the nets difference between two designs. (* if routing patterns in two designs have different rotation but the same topologies, PollEx Cross Probe decides that they are the same.)
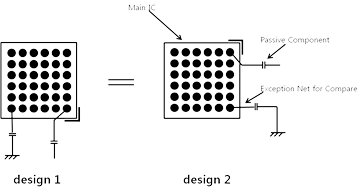
- Main ICs: Select main devices with part name. For example, CROSS PROBEU and DDR chipsets.
- Passive Components: Select passive device with part name.
- Except Nets for Comparison: Select exception nets from the list. For example, GND and Power.
Link and Search Option
Link and Search Option: Check between different data types, such as PCB design, Schematic and BOM or PCB design to Schematic.
- Setting for Reference Comparison Option
- Use Reference Property: Activate or deactivate the checkbox for components
during component comparing. You can decide to checking or un-check certain
components (reference designator) that have specified properties. Click
Add to open the filter window.
Figure 3. 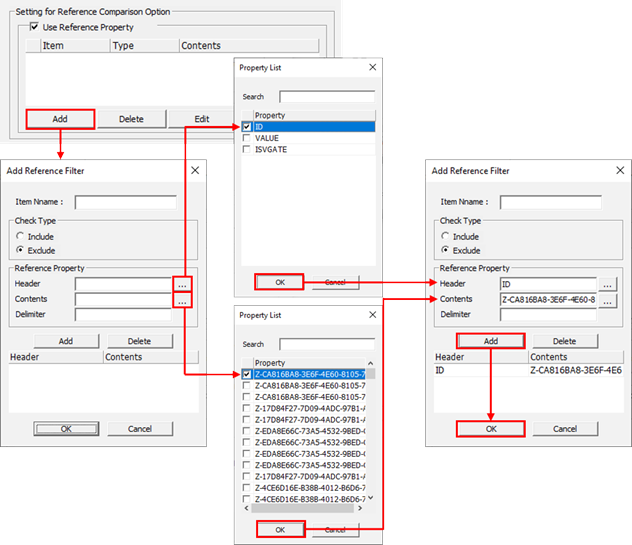
- Setting for Net Comparison Option: Compare net.
- Recognize as the same net if the connection of part compositions is the same.
- Compare with property on Schematic: Select the property name to compare schematic to schematic.
- Except Component from PCB Layout and Schematic: This is the option for component excluding during comparing design. Click Add to add part names that you want to exclude during comparing design.
- Select the name of the target component classification between part name and
reference name. Provide a string filter among one of following:
- Prefix: Name starting with the given string.
- Middle-String: Name containing the string.
- Suffix: Name ending with the given string.
- Except Net Filter: Select the net to exclude from the comparing target.
- Ignore Character String in Reference Name: During comparison, ignore character
strings in the reference name. For example, if you provide the string,
$for this field, the reference name,$R1will be treated withR1. - Ignore Character String in Net Name on Schematic: During comparison, ignore
character strings in schematic net name. For example, if you provide the string,
$$for this field, net name in schematic,$$SIGN7895will be treated withSIGN7895. - Ignore Character String in Net Name on PCB Layout: During comparison, ignore
character strings in PCB design’s net name. For example, if you provide the
string,
$$for this field, net name in PCB design,$$SIGN7895will be treated withSIGN7895. - Case insensitive in Part Name: If you select this, the part name will be case insensitive.
- Display only the differences: Only the results with a difference will be displayed.