Defining Filters in the Prepare Window
Use this functionality to trim the records displayed on a table so that you can work with only the data that you need. Columns that have been filtered show the filter icon to the left of the column name.
This page discusses how to:
Filtering Text Values
-
In the Prepare Window, select a table, right-click on a column you want to filter on, and select Filter > Define Filter. The Define Filter dialog displays.
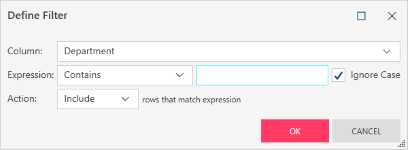
The column you selected automatically displays in the Column field of the dialog. If you wish to change this column, you can use the drop-down that displays to the right of the field to do so. If you select a cell value and then start a new filter, the field to the left of the Expression field is pre-populated with this value.
-
Select a filter operator using the drop-down provided to the right of the Expression field. You can choose among the following operators:
-
Contains - This filter operator allows you to filter records with field values that contain a specific set of characters.
-
Multiple Selection - This filter operator allows you to filter records of one or more unique string.
-
Equals - This filter operator returns records containing a specific string.
-
Does Not Equal - This filter operator returns all records except those containing the specified string.
-
Starts With - This filter operator allows you to select records with column values that start with a specific set of characters.
-
Ends With - This filter operator allows you to select records with column values that end with a specific set of characters.
-
Is Null - This filter operator returns all records with nulls in the selected field.
-
Is Not Null - This filter operator returns all records without nulls in the selected field.
-
-
In the field provided to the right of the Expression field, enter your filter criteria.
Note: When Multiple Selection is selected in Step 2, the Filter sub-panel displays a list of all possible values that can be selected for your filter criteria.
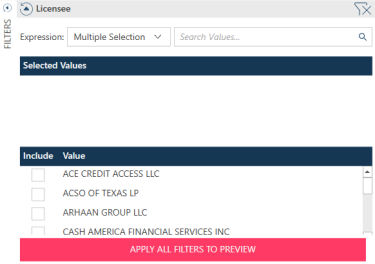
Values selected from the lower pane display in the upper pane.
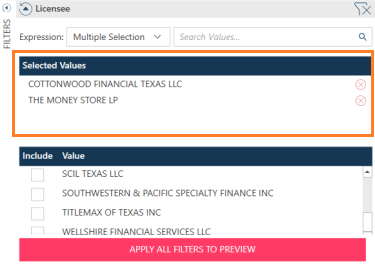
If the list of values is long, you can use the field labeled Search Values to search for and select the desired value to include in your filter. Clicking on the Delete
 icon beside a selected value removes this value from the filter criteria and returns it to the list of possible values.
 -
If applicable, tick the box for Ignore Case to instruct Data Prep Studio to ignore case when searching for possible records to return.
-
If applicable, use the drop-down provided to the right of the Action field to either include or exclude the filter criteria you specified in Step 3 in the resulting table.
-
Click OK when you are finished.
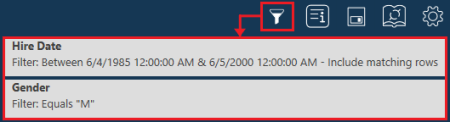
When a filter is defined in the Prepare window, a filter icon displays in the toolbar. Selecting this icon displays the filters applied to a table.
Filtering Numeric Values
Filters for numeric fields in the Prepare Window are created in the same way as filters for text fields.
The following operators may be applied when creating numeric filters:
|
Operator |
Description |
|
Equals |
This filter operator returns records containing a specific date/time. |
|
Does Not Equal |
This filter operator returns all records except those containing the specified date/time. |
|
Multiple Selection |
This filter operator allows you to filter records of one or more unique dates/times. |
|
Less than |
This filter operator allows you to filter for records earlier than a specified date/time. |
|
Greater than |
This filter operator allows your to filter for records later than a specified date/time. |
|
Less than or Equal to |
This filter operator allows you to filter for records less earlier than or equal to a specified date/time. |
|
Greater than or Equal to |
This filter operator allows you to filter for records later than or equal to a specified date/time. |
|
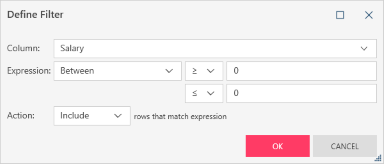
Between |
This filter operator allows you to define date/time ranges; when this operator is selected, you must also select one from each of two sets of operators (i.e., greater than/greater than or equal to and less than/less than or equal to) to identify the range to filter for. |
|
Is Null |
This filter operator returns all records with nulls in the selected field. |
|
Is Not Null |
This filter operator returns all records without nulls in the selected field. |
Filtering Date/Time Values
You can filter date/time values and to view only records with column values that contain a specific date or fall within a date range:
You can select between two filter types:
-
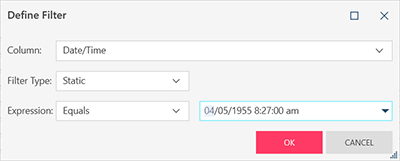
Static Date Filters allow you to set a filter value that does not change.
-
For instance, you can set to filter on BillDate = May 12, 2024 and the filter value stays the same when you open the report several days after.
-
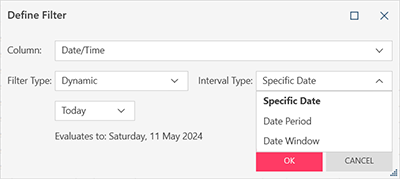
Dynamic Date Filters allow you to to set a filter that changes each time you open the report.
-
For instance, you can set to filter on BillDate = TODAY and the filter value adjust to the current date when you open the report.
-
You can also use dynamic date filters to filter using accounting periods. For instance, you can filter on BillDate = first day of the fiscal quarter.
Static date filters
To define static filters, select an operator and then set the date/time value.

Select the following operators from the Expression drop-down.
|
Operator |
Description |
|
Equals |
This filter operator returns records containing a specific date/time. |
|
Does Not Equal |
This filter operator returns all records except those containing the specified date/time. |
|
Multiple Selection |
This filter operator allows you to filter records of one or more unique dates/times. |
|
Less than> |
This filter operator allows you to filter for records earlier than a specified date/time. |
|
Greater than |
This filter operator allows your to filter for records later than a specified date/time. |
|
Less than or Equal to |
This filter operator allows you to filter for records less earlier than or equal to a specified date/time. |
|
Greater than or Equal to |
This filter operator allows you to filter for records later than or equal to a specified date/time. |
|
Between |
This filter operator allows you to define date/time ranges; when this operator is selected, you must also select one from each of two sets of operators (i.e., greater than/greater than or equal to and less than/less than or equal to) to identify the range to filter for. |
|
Is Null |
This filter operator returns all records with nulls in the selected field. |
|
Is Not Null |
This filter operator returns all records without nulls in the selected field. |
To enter a date/time value you can:
- enter the date and time directly, or
- click on the drop-down button beside the date/time field and select the values on the calendar and the clock beside it.
Dynamic date filters
To define a dynamic filter, select the Interval Type (i.e., Specific Date, Date Period, or Date Window) and then build the filter expression by selecting an operator and the date value as required.
The interval types are discussed below.
Specific Date
Select Specific Date to filter by a specific day within a date period.
|
Operator |
Description |
|
Today |
The date today. As a dynamic filter value, this means: the date on the day the report is viewed. |
|
Yesterday |
The date today minus one day. As a dynamic filter value this means: the date on the day the report is viewed minus one day. |
|
Tomorrow |
The date today plus one day. As a dynamic filter value this means: the date on the day the report is viewed plus one day. |
|
First Day of |
The first day of the date period you wish to filter on. Example: First day of the calendar year. Notes:
|
|
Last Day of |
The last day of the date period you wish to filter on. Example: Last day of the fiscal quarter. Notes:
|
| <nth> Day of |
Specific day of the date period you wish to filter on. Example: Fourth day of the fiscal quarter. Notes:
|
|
First Weekday of |
First weekday of the date period you wish to filter on. Example: First weekday of the fiscal quarter. Notes:
|
|
Last Weekday of |
Last weekday of the date period you wish to filter on. Example: Last weekday of the fiscal quarter. Notes:
|
|
<nth> Weekday of |
Specific numbered weekday of the date period you wish to filter on. Example: Fourth weekday of the fiscal quarter. Notes:
|
|
First <dayname> of |
First dayname (Sunday, Monday, Tuesday, Wednesday, Thursday, Friday, Saturday) of the date period you wish to filter on. Example: First Sunday of the fiscal quarter. Notes:
|
|
Last <dayname> of |
Last dayname (Sunday, Monday, Tuesday, Wednesday, Thursday, Friday, Saturday) of the date period you wish to filter on. Example: Last Sunday of the fiscal quarter. Notes:
|
|
<nth> <dayname> of |
Specific numbered dayname (Sunday, Monday, Tuesday, Wednesday, Thursday, Friday, Saturday) of the date period you wish to filter on. Example: Fourth Wednesday day of the fiscal quarter. Notes:
|
Date Period
Use Date Period to filter according to dates within a date period.
For instance, you can use this option to filter all records for one calendar month.
|
Operator |
Description |
|
Calendar Year |
One full calendar year from Jan 1 through Dec 31. |
|
Calendar Half-year |
One-half of a calendar year. The six calendar months from Jan 1 through Jun 30 or from Jul 1 through Dec 31. |
|
Calendar Quarter |
One-fourth of a calendar year. Three calendar months starting Jan 1, or Apr 1, or Jul 1, or Oct 1. |
|
Calendar Month |
One calendar month. |
|
Calendar Week |
One calendar week. See Calendar Intervals for more information. |
|
Day |
A single day. Starts at midnight (00:00:00) and goes to the following midnight. |
|
ISO8601 Year |
An ISO8601 year, i.e., the 52-53 ISO8601 weeks associated with a particular calendar year. |
|
ISO8601 Week |
An ISO8601 week. See ISO8601 Intervals for more information.. |
|
Fiscal Year |
One full fiscal year. There are two types: month-based and week-based. See Fiscal Intervals for more information. |
|
Fiscal Half-year |
One-half of a fiscal year, defined as two fiscal quarters. |
|
Fiscal Quarter |
One-fourth of a fiscal year. See Fiscal Intervals for more information. |
|
Fiscal Period |
One fiscal period. Either one month or one 4- or 5-week period. See Fiscal Intervals for more information. |
|
Fiscal Week |
One fiscal week. See Fiscal Intervals for more information. |
Date Window
Use Date Window to filter records based on a range of date values, combining two specific dates.
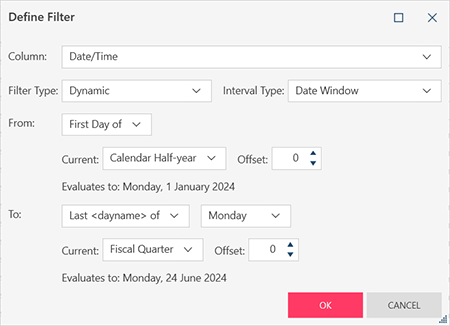
Set the From and To date values as you would Specific Dates.
Editing Filters
Filters can be edited in two ways:
-
via the Data Prep Studio toolbar
-
via the Change History panel
Editing filters via the Data Prep Studio toolbar
-
Click the Filter
 icon located in the Data Prep Studio toolbar to display the list of active filters applied to the table.
 -
Select the filter definition you wish to edit.
-
Specify your desired changes in the Edit Filter dialog that displays.
-
Select OK when you are finished.
Editing filters via the Change History panel
-
Display the Change History List panel.
-
Select the Edit icon beside the Filter entry you want to review to edit:
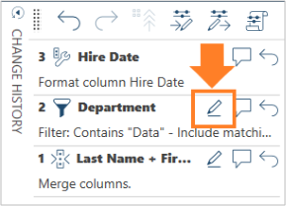
-
Use the options provided in the Edit Filter dialog that displays to modify the filter definition and then select OK.
Discarding All Filters
All of the filters applied to a table may be discarded simultaneously by right-clicking on any column in the filtered table and then selecting Discard All Filters from the options that display. Note that this operation only displays when at least one filter has been applied to the table.
The image below, for example, displays a table to which two filters have been applied.
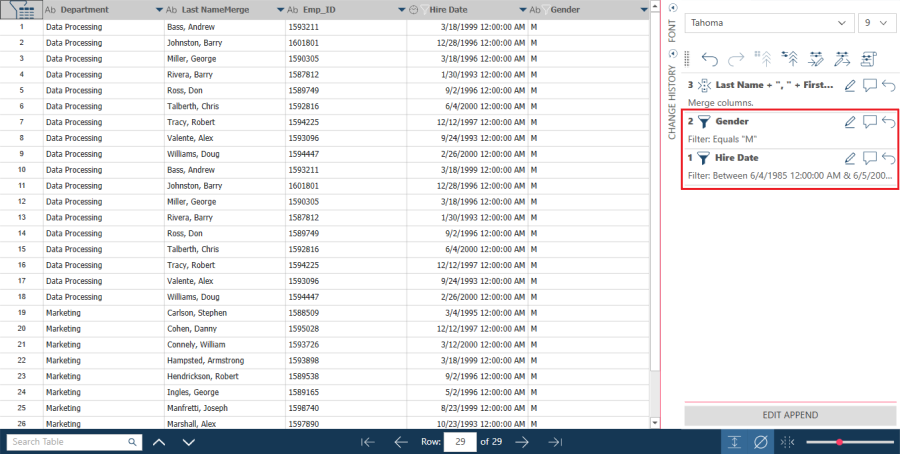
When the Discard All Filters operation is applied to this table, the original table is restored.

Related Links
© 2025 Altair Engineering Inc. All Rights Reserved.