Animate Models
View your model in motion using animation controls.
The Animation toolbar is located at the bottom of the modeling window.
-
Click the drop-down menu on the right side of the Animation toolbar and select
an animation type.
Animation Type Description  (Transient)
Transient animation displays the model in its timestep positions as calculated by the analysis code. Transient animation is used to animate the transient response of a structure.  (Modal)
Modal animation creates and displays an animation sequence that starts and ends with the original position of the structure. The deforming frames are calculated based on a sinusoidal function. Modal animation is most useful for displaying mode shapes.  (Interpolation)
Interpolation (formerly Linear static) animation creates and displays an animation sequence that starts with the original position of the model and ends with the fully deformed position of the structure. An appropriate number of frames are linearly interpolated between the first and last positions. Interpolation animation is usually selected when results are from a linear static analysis. -
Animate the model.
Option Description Rewind Rewind the animation to the beginning of the sequence by clicking
 .
.Rewind the animation in increments by clicking
 .
.Play Start the animation by clicking
 .
.Pause Pause the animation by clicking  .
.Fast forward Forward the animation play in increments by clicking
 .
.Forward the animation to the end of the segment by clicking
 .
.Select a frame To select a precise frame, do one of the following: - Left-click on a point in the animation sequence or drag the
slider.The corresponding time step displays above your cursor.
Figure 1. 
- Click the current time step, enter a new value, then press
Enter.
Figure 2. 
Note: The animation will be paused whenever you try to rotate the model. This is to facilitate smoother view manipulation. There is a preference option to control this behavior.Known Limitation: The animation does not pause while manipulating the view using the keyboard on Linux machines.
- Left-click on a point in the animation sequence or drag the
slider.
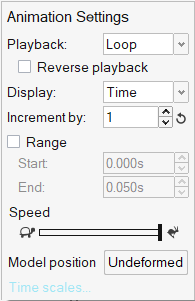
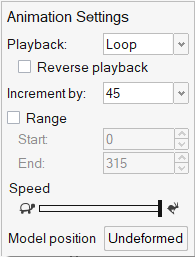
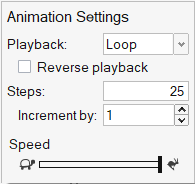
Animation Settings can be accessed by clicking ![]() on the Animation toolbar.
on the Animation toolbar.


| Control | Description |
|---|---|
| Playback | By default, animations play in loop
mode. That is, they run from the start frame to the end frame
and then start over again. When bounce is set, animations play from start to finish and then back again. The play mode can be changed during animation. Once will play through the animation once from start to finish, and then stop. |
| Reverse playback | The direction of an animation can be controlled during playback by selecting/clearing this check box. |
| Display | When set to Time, the time of the animation will be shown; when set to Frame, the frame of the animation will be shown. |
| Steps | Applicable only to Interpolation/Linear static mode. Specify the number of interpolated steps to be generated for animation. |
| Increment by | The value in the Increment by field is either subtracted or
added to the Current time, Animate start, and Animate end fields
each time the forward and reverse buttons are clicked. During
animation, each window displays the timestep that is closest to
the Current time value for the entire page without exceeding it.
Select Time or
Frame from the drop-down menu based
upon the type of increment by which you want to animate. In Modal animation mode, this option refers to angular increment and you have to choose from a menu of available values. In Interpolation/Linear static mode, this increments by interpolated steps. Click |
| Range | The Start and End values specify the first and last timestep
in the animation (based on the display mode selected). If the
starting point is less than the end point, the animation runs
forward. If the starting point is greater than the end point,
the animation runs backward. Reverse automatically exchanges the
start and end points. The animation range can also be changed
by dragging the arrows above the animation progress bar on
the toolbar itself; these arrows are visible when the
Range check box is checked. 
|
| Speed | The speed of the animation can be changed during playback. Move the slider bar to the right to increase the animation speed (increase the frame rate). Move it to the left to decrease the animation speed (reduce the frame rate). The model will animate as fast as possible; however, it will not go beyond the value specified in the Max Frame Rate. Animation speed also depends on the size of the model and the performance level of the hardware in the workstation you are using. |
| Current time | The current time value for the page is displayed in the Current time text box. Each window on the page displays the frame closest to the current value for the page without exceeding it. |
| Default increment | Provides a default animation increment based on the smallest timestep available on the current page. This ensures that every timestep of each file is played during the animation. To use the animation increment determined by the program, click Default increment. |
| Model Position | Undeformed sets all HyperLife windows to the initial or undeformed state in which the model is displayed as if no result had been attached to the model. Model step can be applied only in HyperLife, and has no effect on HyperGraph, MediaView or other applications. It is available in Transient and Modal animation modes only and for Modal animation, it sets the model state at 90 degrees. |
| Time Scales | Time Scales opens the Synchronize Window Animation dialog. |
| Frame Rate | The Frame Rate dialog displays the instantaneous and average frame rate of the current animation. The units are frames per second, fps. This dialog has been moved and can now be found via the Search tool. |