Feasibility Analysis
Perform feasibility analyses to identify thinning, splitting and wrinkling problems during the forming process.
Run a Feasibility Analysis
Run a forming feasibility analysis on a model.
-
On the Feasibility tab, Analyze
icon, click Run Analysis.

-
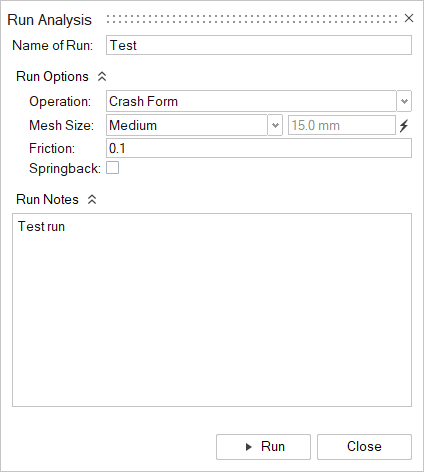
In the Run Analysis dialog, enter a name for the
analysis.

- Select an Operation type: Crash Form or Draw.
-
Select the Mesh Size. Choose from the following options:
Coarse, Medium,
Fine, Custom Nonuniform Mesh
or Custom Uniform Mesh.
Note: Adjust parameters for the Custom Nonuniform Mesh in Preferences where you can define default values for Chordal deviation, Min element size, Max element size, and Feature angle. You can override this value for Max element size in the Run Analysis dialog.Note: Use the lightning bolt
 to restore the mesh size to the default parameters
set in Preferences.
 - Enter a Coulomb friction coefficient. The default value is 0.1
- Optional: Select Springback to perform springback analysis after feasibility. Springback results are available as an Operation type in the Analysis Explorer to view the displacement. You can also publish springback displacement in Inspire Form's generated report.
- Optional:
Enter any Run Notes to distinguish the run.
Note: Hover over the name of a run in the Analysis Explorer dialog to view the notes for that run.
- Click Run.
After the run has successfully completed, view the results in the Analysis Explorer dialog.
Run Options: Local vs. Remote
Choose whether to run jobs locally or on a remote job server.
Click the Run group label to define how jobs are run.

The options to Add a Server and Manual Remote are only available for Tryout analysis, not Feasibility analysis.
- Local Sequential
- Queue run requests on your local computer and run one after the other.
- Local Parallel
- Immediately execute all runs simultaneously on your local computer.
Run Status
View the status of the current run, as well runs for the current model that have not yet been viewed. To see all past runs, you need to view the run history.
-
Hover over the Analyze icon, then select the
Run Status tool.

The run status window is displayed.
-
When the run is complete, review its status.
Status Description Note 
The run completed successfully. This is also indicated by a green flag above the Analyze icon. You can click the green flag to display the results. 
The run was incomplete. If running an analysis, the run was incomplete. Some but not all of the result types may be available. You should run a new analysis to generate complete results.

The run failed and no meaningful results are available. This is also indicated by a red flag above the Analyze icon. -
View one or more runs.
- To view a run, double-click the row.
- To view multiple runs, hold down Ctrl or
Shift while clicking the rows, and then click
the View Now button.Note: If several runs are associated with the same part, the result from the most recently completed run for that part will be activated in the modeling window.
- To open the directory where a run is stored, right-click the run name and select Open Run Folder.
- To view deleted or previously viewed runs, click the History button.
- To delete a run, select the run and press Delete. You can also delete runs using the right-click context menu in the Analysis Explorer and the Model Browser.
Run History
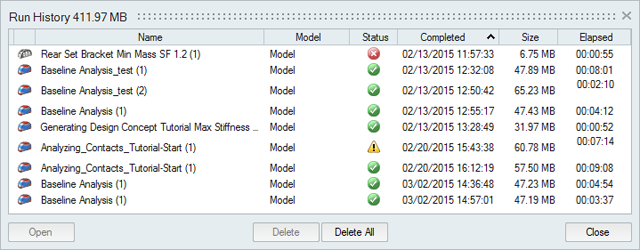
View, sort, open, and delete past runs for the current and previous models.
-
Hover over the Analyze or Analyze
Fluids icon, then select the Run
Status tool.

The run history is displayed.
-
Review the status of the run.
Status Description Note 
The run completed successfully. 
The run was incomplete. If running an analysis, the run was incomplete. Some but not all of the result types may be available. You should run a new analysis to generate complete results.

The run failed and no meaningful results are available. - To view a run, double-click the row.
- To open the directory where a run is stored, right-click the run name and select Open Run Folder. The default directory where the run history is stored can be changed in the Preferences under Run Options.
- By default, you will receive a notification when the run history exceeds a certain size. You can change the size limit or turn off the notification in the Preferences under Run Options.
- To delete a run, select the run and press Delete.