Import
Introduction
- Import of motors from another catalog
- Import of motors from a folder
- Import of motors from a zip file
licking on the icon "IMPORT" opens a dialog box, allowing select one way for importing the motors.
 |
|
| How to import a motor in a catalog (Motor Catalog) ? | |
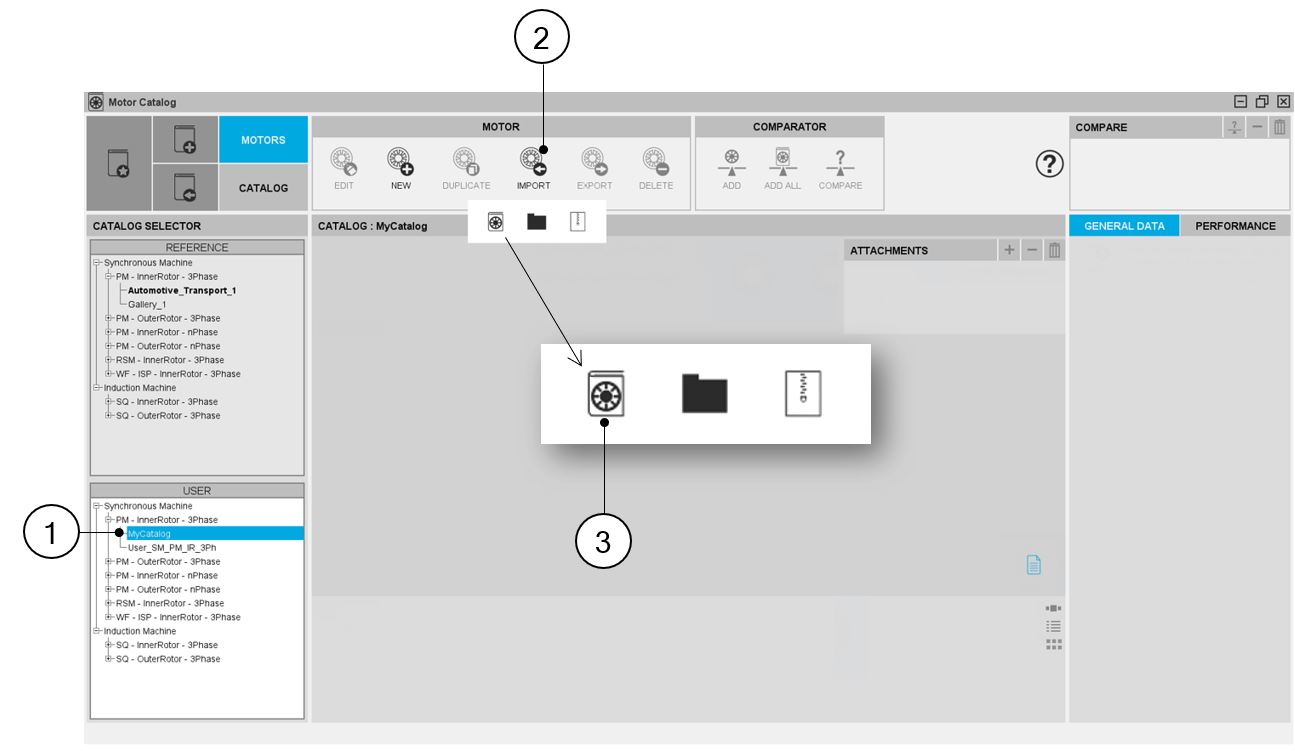
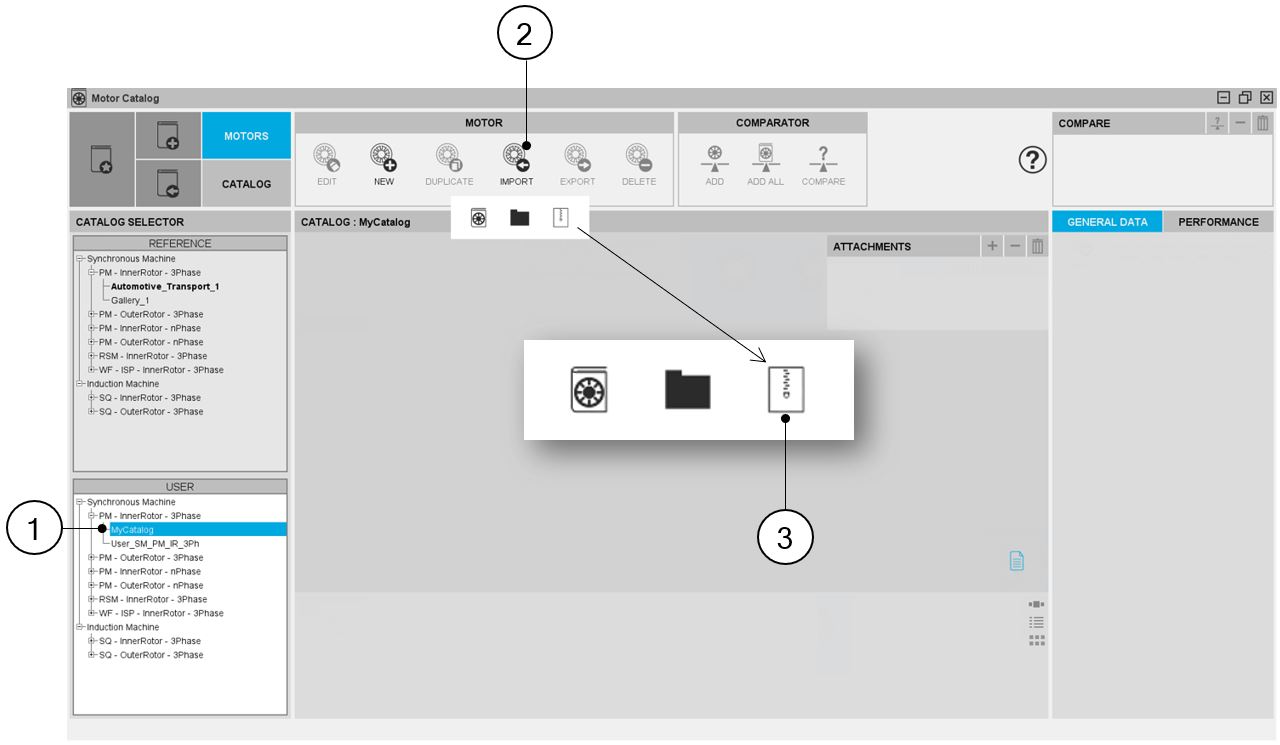
| 1 | Selection of a user’s catalog in which the motors to import will be
stored. Note: In this example, the catalog in which
motors will be imported is currently empty. |
| 2 | Click on the button “IMPORT”. |
| 3 | Clicking on the icon "IMPORT" opens a dialog box, allowing three ways for importing motors. |
| 4 | 1st solution: Import motors from another catalog. |
| 5 | 2nd solution: Import a motor from a folder. |
| 6 | 3rd solution: Import a motor from a zip file. |
These three ways for importing motors in Motor Catalog are illustrated below.
Import of motors from a catalog
 |
|
| How to import a motor from another catalog ? | |
| 1 | Selection of a user’s catalog in which the motors to import will be
stored. Note: In this example, the catalog in which
motors will be imported is currently empty. |
| 2 | Click on the button “IMPORT”. |
| 3 | Clicking on the icon "IMPORT" opens a dialog box, allowing three ways
for importing motors. Select the first one: “import from a catalog. Clicking on this icon allows access to the Motor Catalog. This allows to visualize, compare, choose, and import another motor topology in the selected catalog as illustrated in the next table. |
 |
|
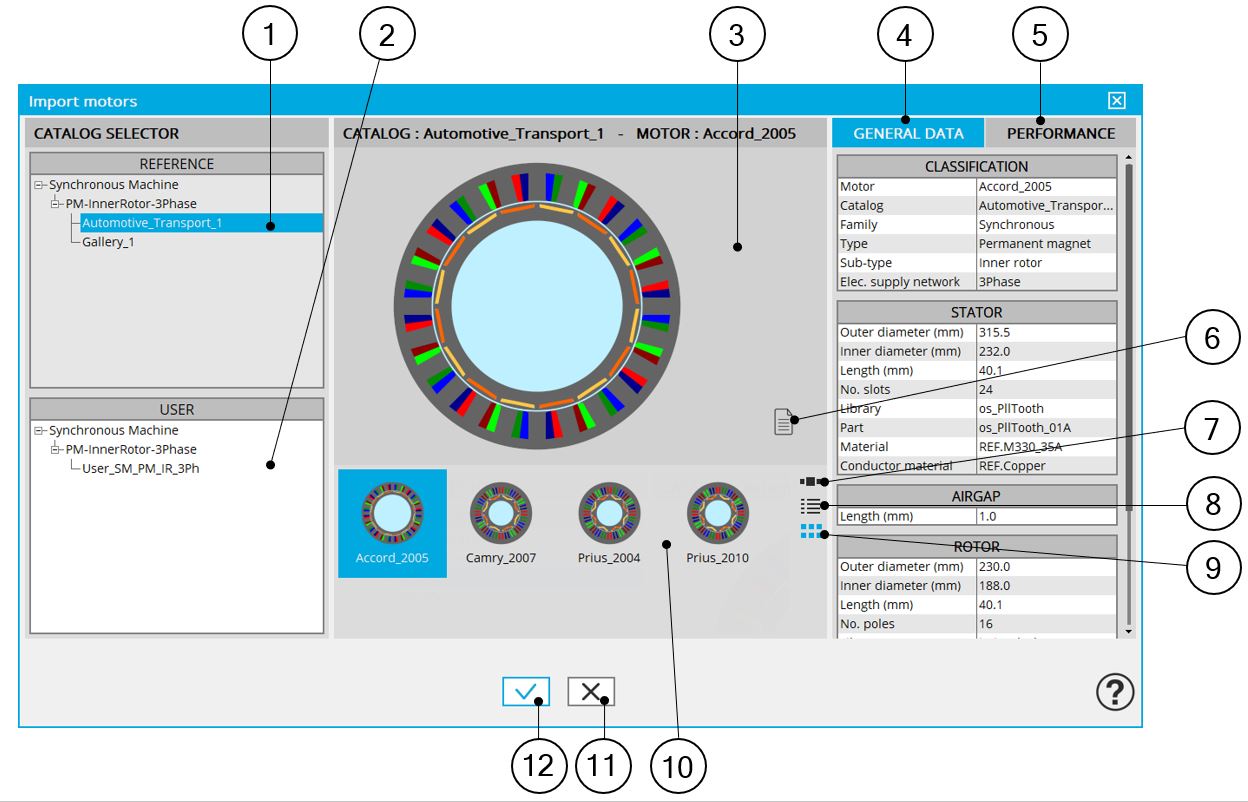
| How to select motors to import? | |
| 1 | Visualization of reference catalog i.e. the catalogs of motor topologies provided with FluxMotor®. Select them to view their contents and choose motors among them. |
| 2 | Visualization of user catalogs. The default user catalog is “UserSynchronous”. |
| 3 | Area where the selected motor is displayed (static picture). |
| 4 | General data of the selected motor. |
| 5 | Performance of the selected motor (available when the datasheet test has been performed. See Motor Factory user guide (TEST environment). |
| 6 | Button to visualize the list of documents attached to the motor. See additional information. |
| 7 | Button to display thumbnails as a slide show. |
| 8 | Button to display thumbnails as a list. |
| 9 | Button to display thumbnails as a matrix view of pictures. |
| 10 | Area to visualize all the topologies of motors from the selected catalog. |
| 11 | Button to close the dialog box and cancel import of motors. |
| 12 | Button to choose and import the selected motors. |
Import a motor from a folder
 |
|
| How to import a motor from a folder ? | |
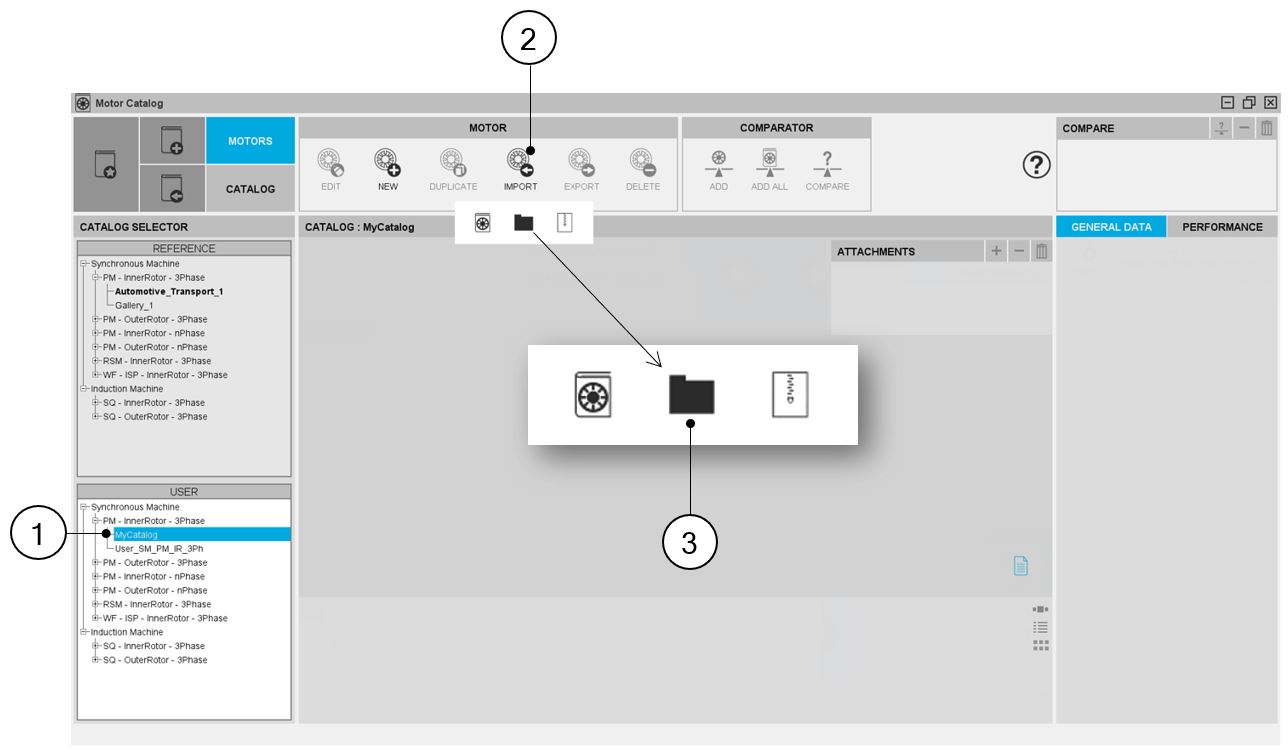
| 1 | Selection of a user’s catalog in which the motors to import will be
stored. Note: In this example, the catalog in which
motors will be imported is currently empty. |
| 2 | Click on the button “IMPORT”. |
| 3 |
Clicking on the icon "IMPORT" opens a dialog box, allowing three ways for importing motors. Select the second one: “import from folder. Clicking on this icon opens a dialog box to browse and find the folder to be considered. |
 |
|
| How to select motors to import? | |
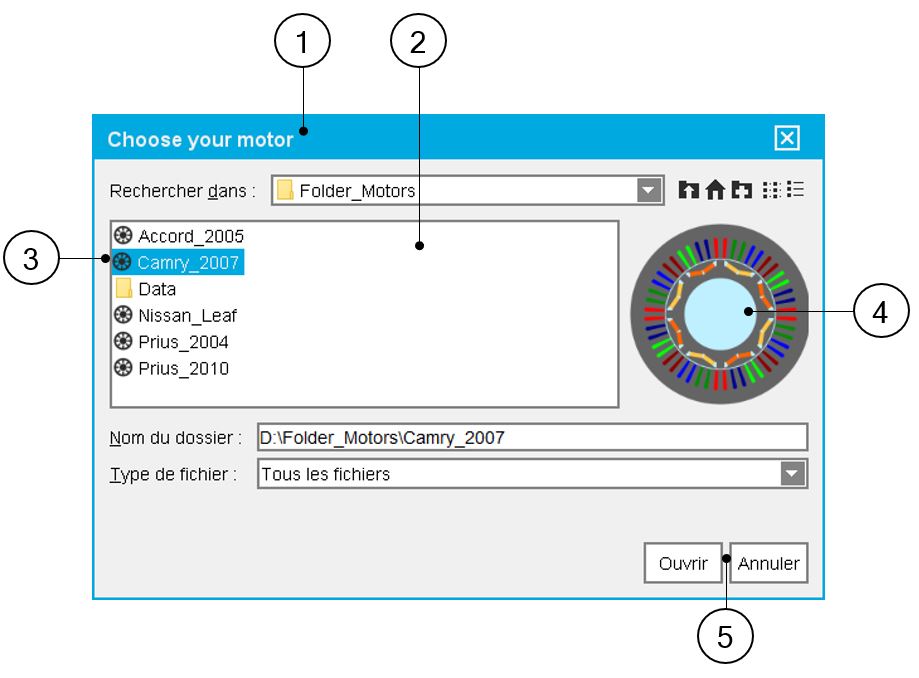
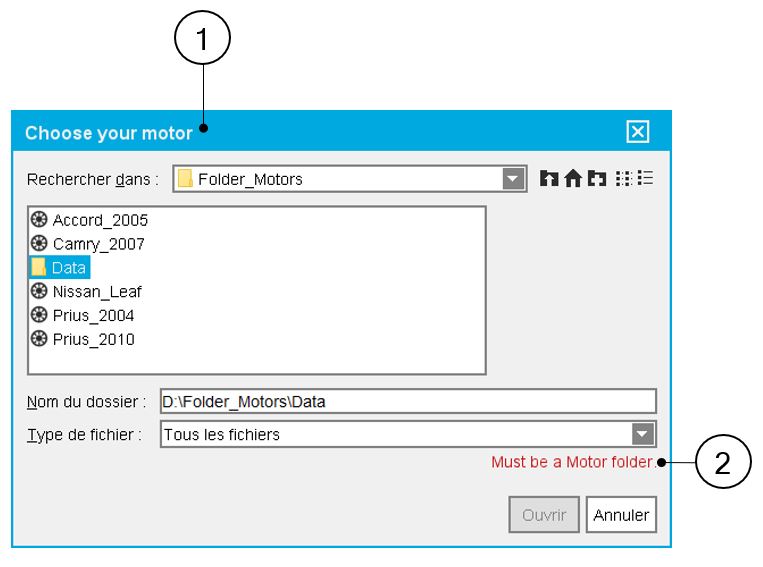
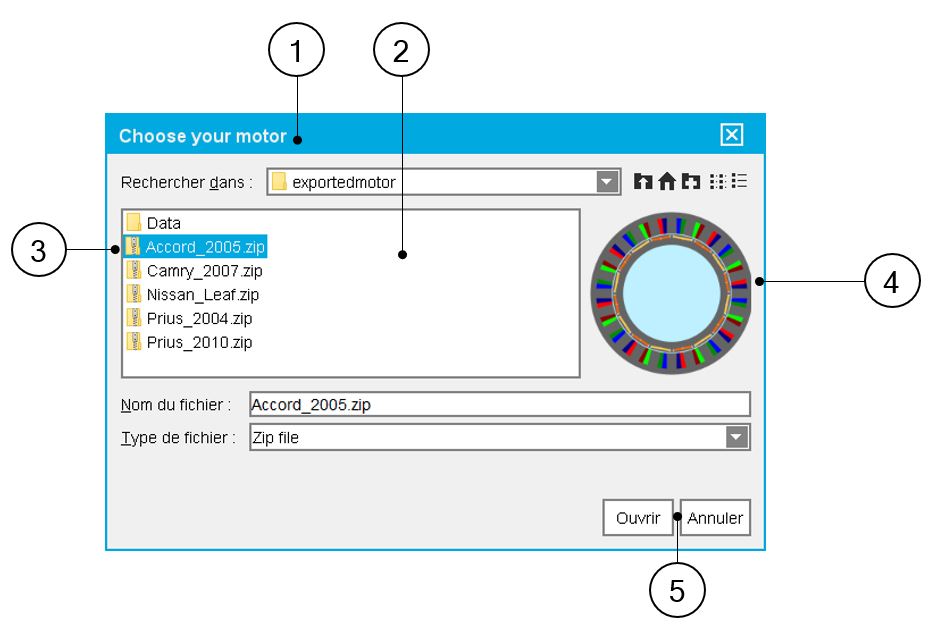
| 1 | Dialog box to browse and find the folder to be considered. |
| 2 | Visualization of the folder content. |
| 3 |
Select the motor to be imported. When the selected folder corresponds to a motor, an icon representing a motor is displayed before the motor name. When the selected folder is not identified as a motor, a warning message is written in red (Must be a motor folder). Please see the following illustration |
| 4 | When a motor is selected, its picture is displayed on the right side of the dialog box to facilitate the selection of the right motor. |
| 5 |
Two button allows confirm or cancel the selection. The “Open” button will be enabled only if a valid motor is selected. |
 |
|
| How to select the right motor to be imported? | |
| 1 | Dialog box to browse and find the folder to be considered. |
| 2 |
When the selected folder is not identified as a motor, a warning message is written in red (Must be a motor folder). The “Open” button will be disabled if the selected folder is not a motor. |
Import of a motor from a zip file
 |
|
| How to import a motor from a zip file ? | |
| 1 | Selection of a user’s catalog in which the motors to import will be
stored. Note: In this example, the catalog in which
motors will be imported is currently empty. |
| 2 | Click on the button “IMPORT”. |
| 3 |
Clicking on the icon "IMPORT" opens a dialog box, allowing three ways for importing motors. Select the third one: “import from zip”. Clicking on this icon opens a dialog box to browse and find the zip file to be considered. |
 |
|
| How to select motors to import? | |
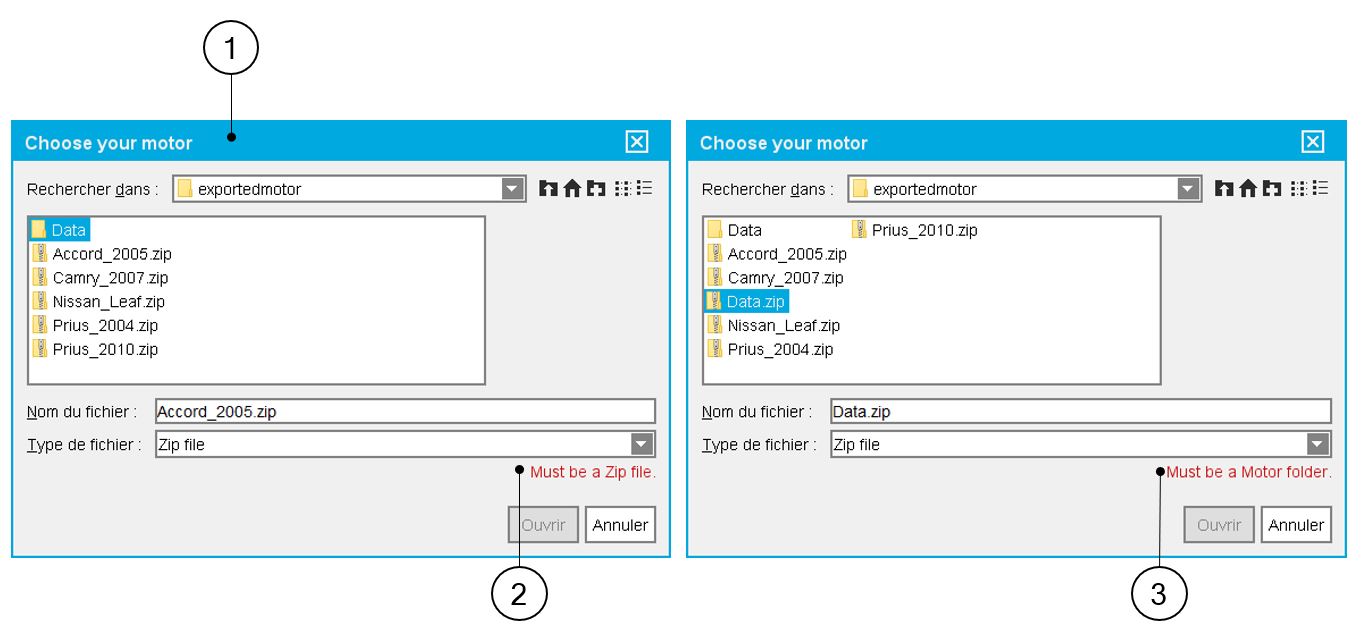
| 1 | Dialog box to browse and find the folder to be considered. |
| 2 | Visualization of the folder content. |
| 3 |
Select the zip file (motor) to be imported. When the selected folder is not a zip file, a warning message is written in red (Must be a Zip file). Please see the following illustration. When the selected zip file is not identified as a zipped motor, a warning message is written in red (Must be a folder). Please see the following illustration. |
| 4 | When a zip file with a motor in it is selected, its picture is displayed on the right side of the dialog box to facilitate the selection of the right motor. |
| 5 |
Two button allows confirm or cancel the selection. The “Open” button will be disabled if a selected folder is not a zip file containing a motor. |
 |
|
| How to select the right motor to be imported? | |
| 1 | Dialog box to browse and find the zip file to be considered. |
| 2 |
When the selected folder is not a zip file, a warning message is written in red (Must be a Zip file). The “Open” button will be disabled if a selected folder is not a zipped motor |
| 3 | When the selected zip file is not identified as a zipped motor, a warning message is written in red (Must be a folder). The “Open” button will be disabled if a selected folder is not a zipped motor. |
 |
|
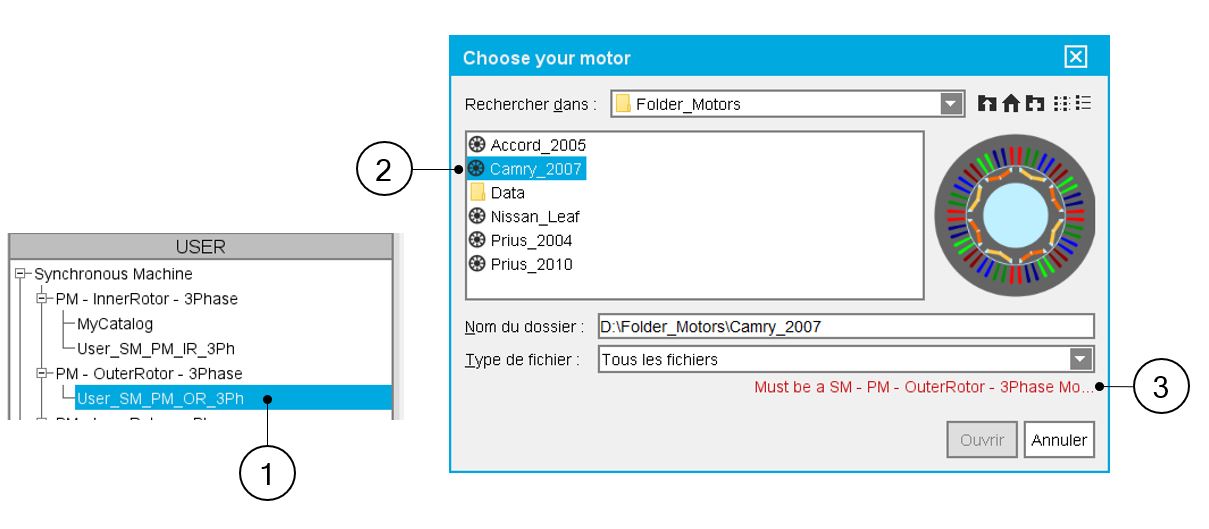
| Compatibility between selected user’s catalog and the motor to be imported? | |
| 1 | Selected user’s catalog in which the motor must be imported: in that case outer rotor synchronous machine with permanent magnets |
| 2 | Selection of the motor to be imported: in that case inner rotor synchronous machine with permanent magnets. |
| 3 | As the two previous selections are not compatible an error message is written in red to explain why it is not possible to finalize the operation. |