
MV-1040: Build Models Using Tcl
Tutorial Level: Advanced In this tutorial, you will learn how to work with the application's Tcl interface and how to build a simple model using Tcl commands.
- Tcl
- Tool Command Language or Tcl (typically pronounced as "tickle" or "tee-see-ell") is a scripting language that is commonly used for quick prototyping, scripted applications, GUIs, and testing.
- Tcl has a simple and programmable syntax.
- Tcl is open source.
- HyperWorks Desktop has an inbuilt Tcl interpreter which has libraries to help end users.
- Tcl can be used as a standalone or embedded in applications like HyperWorks Desktop (including MotionView).
- Unlike C which is a complied language, TCL is interpreted. Tcl programs are simple scripts consisting of Tcl commands that are processed by a Tcl interpreter.
- Tcl is extensible. New Tcl commands can be implemented using C language and integrated easily. Many people have written extension packages for common tasks and are freely available on the internet.
- Engineering teams use different resources and application. Tcl can be used to glue those resources together. This greatly helps in automating the work flow.
- Tk is a Graphical User Interface toolkit that makes it possible to quickly create powerful GUIs.
- Tcl/Tk is highly portable, and runs on different flavors of Unix, Windows, Macintosh and more. This proves useful to those who work on various platforms.
- When building huge multibody models in MotionView, you will come across cases where the same steps are repeated multiple times. Such steps, or the set of steps, can be automated suing Tcl in order to save time and effort wasted in performing repetitive and time consuming tasks.
- Like all of the HyperWorks Desktop applications, MotionView has Tcl command layers which help in accessing the various functionalities of the product and utilizing them to write scripts to automate processes.
- The Tcl scripts can be called by Tk applications or tied in to a process manager.
- Tcl scripts can be registered in a preference file and be made a part of product with menu shortcuts.
The HyperWorks Desktop handles and the HyperWorks Desktop database consists of a hierarchy of objects, the root of which is the hwi object which is automatically created. The hwi provides access to the hwiSession object and a few high level utilities. Currently, HyperWorks Desktop supports only one session per run. The session object can be retrieved by issuing the following command at the Tcl command prompt: (System32) 1 % hwi GetSessionHandle sess1.
- (System32) 2 % sess1 GetProjectHandle proj1
- (System32) 3 % proj1 GetPageHandle page1 1
- (System32) 4 % page1 GetWindowHandle win1 1
- (System32) 5 % win1 SetClientType "Animation"
- (System32) 6 % win1 GetClientHandle post1
A window's client type cannot be changed after the client handle has been retrieved. The client handle must be released and retrieved again if the window's client type is changed.
- ListMethods: Displays the method commands which can be performed on an object.
- ListHandles: Lists the names of all command objects of the same type.
- ReleaseHandle: Releases the command object.
The top level hwi command object supports the utility command ListAllHandles (Displays all command objects currently in use).
Build a Simple Pendulum Using Tcl Commands
In this step you will write a Tcl script to build a simple pendulum model.
hwi OpenStack
Obtain All necessary handles
Perform some function
Release All obtained handles individually
hwi CloseStack- Open a new MotionView session.
-
In the menu bar, click .
A TkCon window will appear and display the version of Tcl and Tk installed with the application.
-
In the Command Prompt, type hwi GetSessionHandle sess.
If the command is successful, the prompt prints sess as the command output. This command assigns the Session Handle to the variable "
sess".Note: To view all the option/commands available with the hwi class type in hwi ListMethods at the command prompt. This will list all the options available under hwi. -
Type sess GetProjectHandle proj to assign the Project handle
to the variable "
proj". -
To obtain the Page handle, type the command proj GetPageHandle page
1.
The variable "
page" now points to the page handle of the first page of the session.Note: Please refer the "Programming with Tcl/Tk Commands" online help under the "HyperView, MotionView and HyperGraph" Reference Guide for the explanation on the syntax of these commands. -
Obtain the window handle by typing the command page GetWindowHandle
win 1.
This will assign the window handle of the first window to the variable "
win". -
Obtain the client handle by typing the command win GetClientHandle
mc.
Note: A session has multiple clients (HyperView, MotionView, HyperGraph 2D, and so on). When MotionView is invoked, the default client is MotionView. The GetClientHandle command gets you the access to the MotionView model object through the Client Handle.
-
Obtain the view controls handle with the command win
GetViewControlHandle vch.
This will allow you to set different views and fit the model to the modeling window.
-
Use the command mc CreateBlankModel to start with a new
blank model. Obtain the handle of this model with the command mc
GetModelHandle m.
Now, you can start creating entities for the pendulum model. Use the InterpretEntity and InterpretSet statements. To build this model, you will need 2 points, 1 body, 3 graphic entities, and 1 revolute joint.The following shows the syntax of the InterpretEntity command:
modelHandle InterpretEntity EntityHandle Entitytype EntityVariableName EntityLabel <Parameters>- EntityHandle specifies the handle for the entity.
- Entitytype specifies the type of entity to create (Point, Body, Graphic, and so on).
- EntityVariableName specifies the variable name for the entity to view in MotionView.
- EntityLabel specifies the label for the entity in MotionView.
- Parameters specifies the parameters required to create the respective entity (for Body, you would need a CM point).
-
Add a point entity for the pendulum pivot.
- Use the command m InterpretEntity p Point p_0 "\"Pivot\"" to create the point with a variable name of p_0 and a label of Pivot.
- Set the properties for the point with the command m InterpretSet SetPoint p_0 0.0 0.0 0.0
- Release the point handle (p in Tcl) with the command p ReleaseHandle.
-
Create a point for the location of the pendulum using the following set of
commands:
m InterpretEntity p Point p_1 "\"Mass\"" m InterpretSet SetPoint p_1 p_0.x+100 p_0.y p_0.z p ReleaseHandle -
Add the pendulum body and set its mass and inertia with the following set of
commands:
m InterpretEntity b Body b_0 "\"Pendulum\"" p_1 m InterpretSet SetBodyInertia b_0 0.5 100 100 100 m InterpretSet SetOrientation b_0.cm TWOAXES ZX b ReleaseHandle -
Add the three graphics on the body using the following set of commands:
m InterpretEntity g Graphic gra_0 "\"Graphic_Pivot\"" CYLINDER B_Ground p_0 V_Global_Y 1 1 10 -5 CAPBOTH g ReleaseHandle m InterpretEntity g Graphic gra_1 "\"Graphic_Pendulum_Cylinder\"" CYLINDER b_0 p_0 p_1 1 CAPBOTH g ReleaseHandle m InterpretEntity g Graphic gra_2 "\"GraphicMass_Cylinder\"" CYLINDER b_0 p_1 V_Global_Y 5 5 3 -2 CAPBOTH g ReleaseHandle -
Connect the pendulum to the ground with a revolute joint using the following
set of commands:
m InterpretEntity j RevJoint j_0 "\"Joint_Pivot_Rev\"" B_Ground b_0 p_0 V_Global_Y j ReleaseHandle - Update the database after adding entities with the command m Evaluate.
- Fit the model to the modeling window with the command vch Fit.
- The model is ready to be run. Go to the Run panel, specify a name for the result file and click on the Run button to run the model using MotionSolve. Use the Animate button to view the animation.
-
The handles obtained through the commands in the previous steps now have to be
released using the ReleaseHandle command. Use the following
commands:
m ReleaseHandle; mc ReleaseHandle; win ReleaseHandle; page ReleaseHandle; proj ReleaseHandle; sess ReleaseHandle; -
In a text editor, past all of your Tcl commands and save the file as
pendulum.tcl to your <working
directory>.
This file can be "sourced" and the model can be built in one step. The complete script is provided in the step Register the Tcl in the Preference File for your reference.Note: You can also use the pendulum.tcl file from the automation folder by copying the file to your <working directory>.
Source the Tcl File
In this step you will source the Tcl file of the pendulum model.
- Start a new MotionView session.
-
In the menu bar, click .
Figure 1. 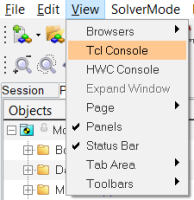
A TkCon window will open at the bottom of the screen.Figure 2. 
- Type the cd command to change the directory to the current <working directory>.
-
Type the command source pendulum.tcl to invoke a Tcl
script.
This will build the complete model by sequentially running the commands in the file line by line.
Register the Tcl in the Preference File
In this step you will learn how to register the Tcl file as a Preference File in MotionView.
- Open a text editor with a new file.
-
Write the following statements:
*Id("HyperWorks vXX.X")
*BeginModelDefaults()
*BeginMenu(scripts, "My Scripts")
*MenuItem(flexprep, "Build Simple Pendulum", Tcl, "<workingdirectory>/pendulum.tcl")
*EndMenu()
*EndModelDefaults()
Note: If necessary, replace <working_directory> with the actual path on your machine to the working directory, using forward slashes for the path.Note: Please refer to online help if you need to know more about the syntax. - Save the file as mypreference.mvw in your <working directory>.
- Start a new MotionView session.
- On the menu bar, click .
-
In the Preferences dialog, click
Register.
Figure 3. 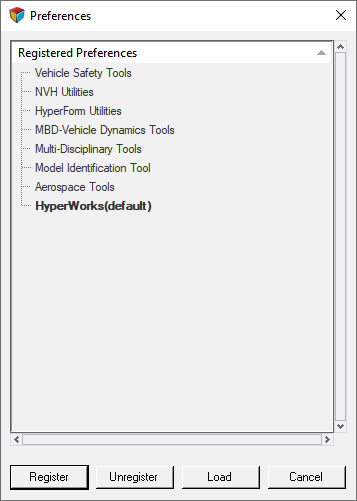
-
Choose the mypreference.mvw file.
This will add the new preference to the list.
- Select the new preference and click Load. Then close the session.
-
Start a new session.
In the modeling client, you should see a new menu item called My Scripts. This will be available every time to open a MotionView session as long as you have the preference file registered.
-
Click . Then run the script.
The complete script is given below for your reference:
## Macro to Build a Simple Model in MotionView ##
## Requesting for the Handles required to Use MotionView ##
hwi OpenStack
hwi GetSessionHandle sess
sess GetProjectHandle proj
proj GetPageHandle page [proj GetActivePage]
page GetWindowHandle win [page GetActiveWindow]
win GetClientHandle mc
win GetViewControlHandle vch
mc CreateBlankModel
mc GetModelHandle m
## Building the Model using the InterpretEntity statements ##
m InterpretEntity p Point p_0 "\"Pivot\""
m InterpretSet SetPoint p_0 0.0 0.0 0.0
p ReleaseHandle
m InterpretEntity p Point p_1 "\"Mass\""
m InterpretSet SetPoint p_1 p_0.x+100 p_0.y p_0.z
p ReleaseHandle
m InterpretEntity b Body b_0 "\"Pendulum\"" p_1
m InterpretSet SetBodyInertia b_0 0.5 100 100 100
m InterpretSet SetOrientation b_0.cm TWOAXES ZX
b ReleaseHandle
## Adding graphics to the pendulum and the Ground to improve result
visualization
m InterpretEntity g Graphic gra_0 "\"Graphic_Pivot\"" CYLINDER
B_Ground p_0 V_Global_Y 1 1 10 -5 CAPBOTH
g ReleaseHandle
m InterpretEntity g Graphic gra_1 "\"Graphic_Pendulum_Cylinder\""
CYLINDER b_0 p_0 p_1 1 CAPBOTH
g ReleaseHandle
m InterpretEntity g Graphic gra_2 "\"GraphicMass_Cylinder\"" CYLINDER
b_0 p_1 V_Global_Y 5 5 3 -2 CAPBOTH
g ReleaseHandle
## Adding the Revolute joint between the Ground and the pendulum body
m InterpretEntity j RevJoint j_0 "\"Joint_Pivot_Rev\"" B_Ground b_0
p_0 V_Global_Y
j ReleaseHandle
m Evaluate
vch Fit
after 1000
## Running the Model ##
mc ExportModel simple_pendu.xml
mc RunSolverScript simple_pendu.xml
## Releasing All the Handles
m ReleaseHandle;
mc ReleaseHandle;
win ReleaseHandle;
page ReleaseHandle;
proj ReleaseHandle;
sess ReleaseHandle;
hwi CloseStack;
## End of Script