Submit a Job
Run a solver by selecting a solver input file and submitting a job in your preferred appliance.
-
To run a solver:
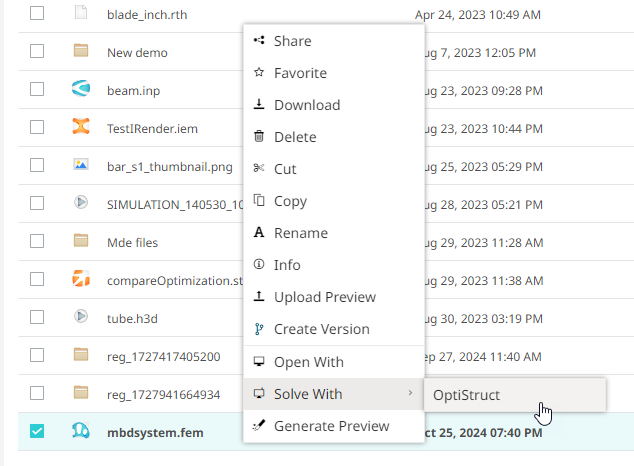
- Right-click the file and click Solve With.
- Hover over the file and click .
- Select the file and click Solve With on the action ribbon menu.
The associated solvers for the selected input file are displayed.Note: If the Solve With option is not present for your input file then reach out to the administrator to update the content type for your input file.Figure 1. Solve With 
-
Select the solver name.
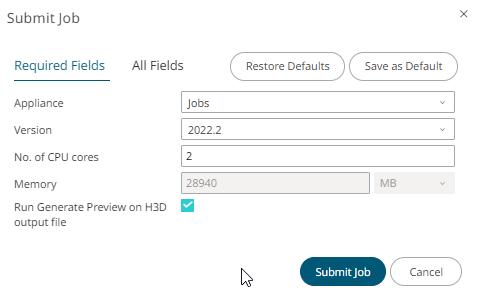
A job submission form is displayed.
Figure 2. Submit Job 
-
Fill the required fields in the job submission form.
- For Appliance, select the appliance where the solver is available.
- For Version, select the required version of the solver.
- Optional:
The chosen Input File is displayed. Click
 to choose a different version of the file
for the same solver.
- Enter Number of CPU Cores for the job.
- Enter Memory and its units.
- Select a Job Directory Path to save your job result files. By default, it uses the same path as your input file.
- Select Run Generate Preview on the H3D output file if you wish to generate a preview of the H3D result file. This enables you to preview the model details when the job is complete.
- Select Run Extract Plot Data on H3D output file if you wish to extract plot data of the H3D result file. This enables you to view the plot data when the job is complete.
Tip: To view more application arguments click All Fields. To reset the form, click Restore Defaults. To save your current inputs as default, click Save as Default.
The latest version of solvers are available in the Altair One default
appliance, Jobs.
-
Click Submit Job.
A folder is created in the current directory. The name of the folder is based on the name of the job input file. Job result files are written to this folder.