API Guide for Users
This guide explains the usage of the plug-in from a user’s perspective. However, the usage for writing and compiling a plug-in is not included in this guide.
-
Copy the compiled API plug-in
.dllfile into either the working directory of an EDEM deck, or into the folder specified in . -
If there is an associated preference file with the plug-in, ensure that the
preference file is available with the
.dllfile. -
Once the
.dllfile (and any supporting files) has been moved into one of these locations, select the relevant Interaction Type for the plug-in (Particle-Particle, Particle-Geometry, or Particle Body Force).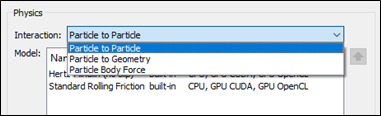
-
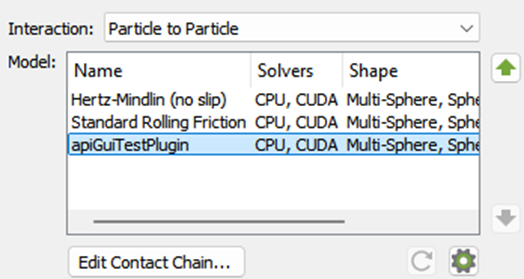
Select Edit Contact Chain.

- In the Select <Interaction Type> Models dialog box, select the checkbox next to the plug-in name in and click OK.
-
Select the Plug-in in the Model section and then click the
 icon.
icon.
- The Test Plugin Parameter Editor dialog box corresponds with the
parameters available for editing within the plug-in.
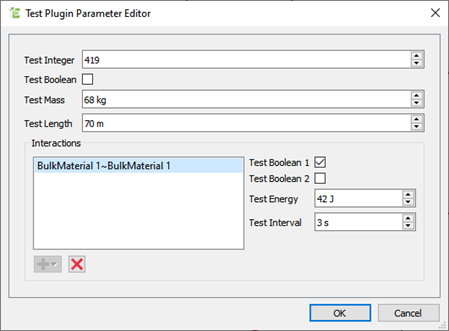
- You can specify certain parameters independently for each Particle/Geometry, or for each Particle/Geometry material pair interaction.
- These parameters will be displayed after adding the desired element by
clicking the
 icon.
icon.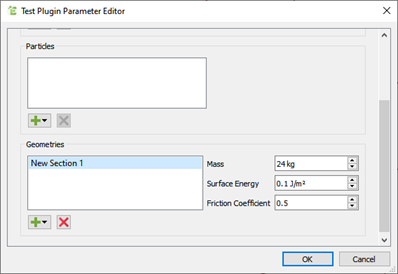
- The Test Plugin Parameter Editor dialog box corresponds with the
parameters available for editing within the plug-in.
-
For certain parameters that may be defined in tabulated format, click the
 icon to add a row, or the
  icon to remove a row.
-
Double-click a parameter value to edit it.
Note:
- You can also copy or paste values can also to and from an Excel spreadsheet.
- Plug-ins may enforce a minimum number of rows.