Default Setting
Remove all UDMS data and set up the options of UDMS functions.
Setting UDMS Environment
- Remove UDMS data: Using this menu, the administrator can remove all UDMS
data. Note: Data cannot be restored once removed.
- Design process setting criteria: When registering a design project, set the process settings as design classification or progress step.
- Using approval process in design project: Set additional options for approval process when creating a design project.
- Use Revise Option Change: Set whether to use project revision information entered by system manager. Revision information cannot be transferred automatically, you must enter revision information.
- Use stack-up: Set whether to use stack-up data created by UDMS.
- Use verification review: Set to ON when reviewing the error list of previous verification results each time design data is checked in.
- PLM Transmission BOM Consistency Check: Set option to ON when performing BOM consistency check when sending PLM
Design Revision Settings
- Design revision definition

Figure 1.- When setting Default, apply to UDE's revision rule (1.00, 1.01.., 2.00..)
- If you select Settings, you will see the option to define the revision and version as shown in the image below.
- Production revision type: This option has two options. The one is
Manualinput. And another one is
Settings.
- Manual input: This option is that the user can define the revision if he wants. If it set, the user can input the revision on each design project revision for displaying his own revision.
- Settings: This option is that the user can define the revision according to some revision rules.
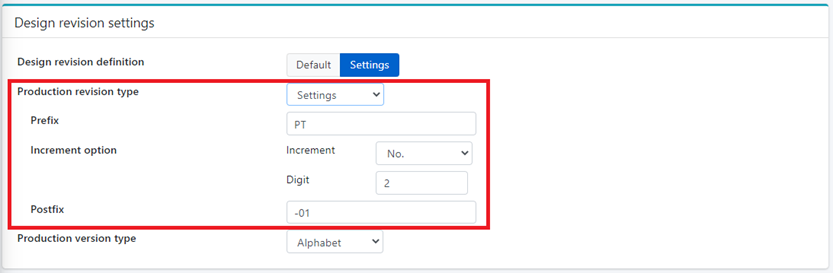
Figure 2.- Prefix: You can input any prefix to display any keyword in front of the revision.
- Increment option / Increment: You can select the increment type
as number or alphabet.
- If you select number, the number will be increased. If alphabet, the alphabet will be increased.
- Increment option / Digit: This option is that the default value (If number, it is ‘0’. If alphabet, it is ‘A’) is appended for matching the digit.
- Postfix: You can input any postfix to display any keyword after the revision.
- Production version type: You can select the number or alphabet as the production version. If you select number, the default value will be displayed as the initial version value. And if you check in the design data, the version will be increased by the production version type.
- Production revision type: Settings
- Prefix: PT
- Increment: Number / Digit: 2
- Postifx: -01
- Production version type : Alphabet
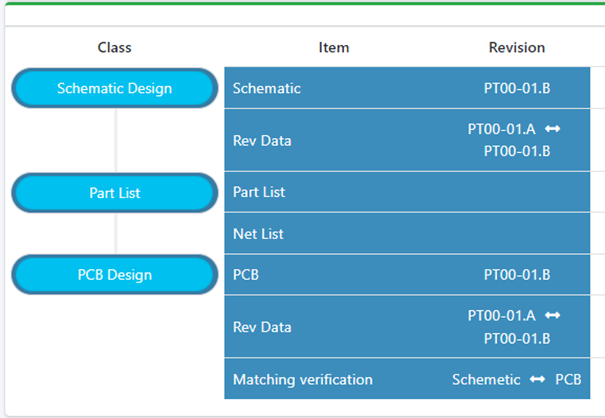
Figure 3.
The design revision is PT00-01 and the default version is ‘A’. If you check in the design data and the version is increased, the version will be ‘B’.
If you revise the design project, the design revision will be ‘PT01-01’. Because 01 is increment and digit is ‘2’.
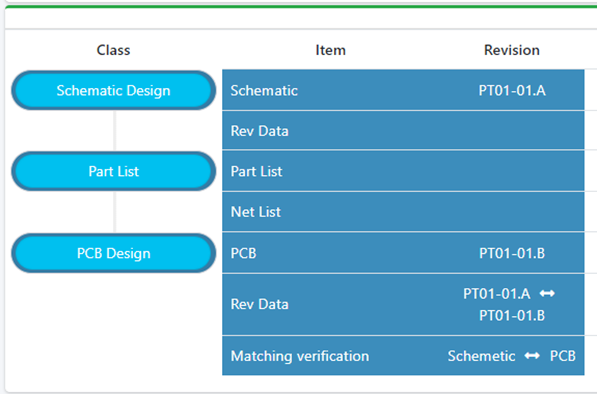
Figure 4.
If the previous design revision is ‘PTT01-01’ (Postfix was changed as ‘PTT’) and the postfix is changed as ‘PT’ again, the next revision will be numbered ‘PT02-01’.
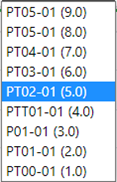
Figure 5.
If the revision pattern is not matched with the current revision, the UDE searches all revisions to find the pattern matched revision. If it is found, the revision is changed by the revision rule. But if not, the revision is changed as the initial revision.
If you want to maintain the design revision when you try to revise the design project, you can choose the option to maintain the version like the below image.
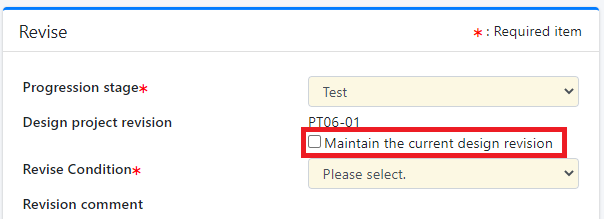
Figure 6.
If you check the option, the design project will be ‘PT05-01’. But if not, the design project will ‘PT06-01’.
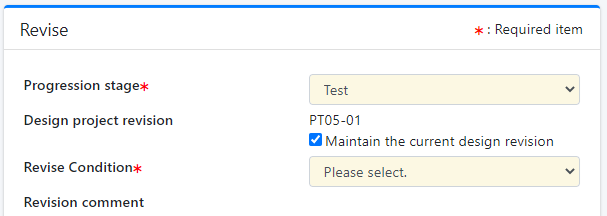
Figure 7.
- Schedule status.
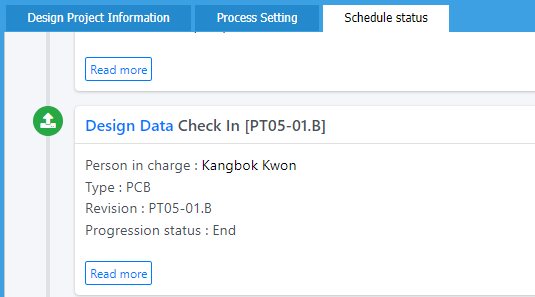
Figure 8. - BOM version history

Figure 9. - Design status

Figure 10. - Write comments or attach files on each version
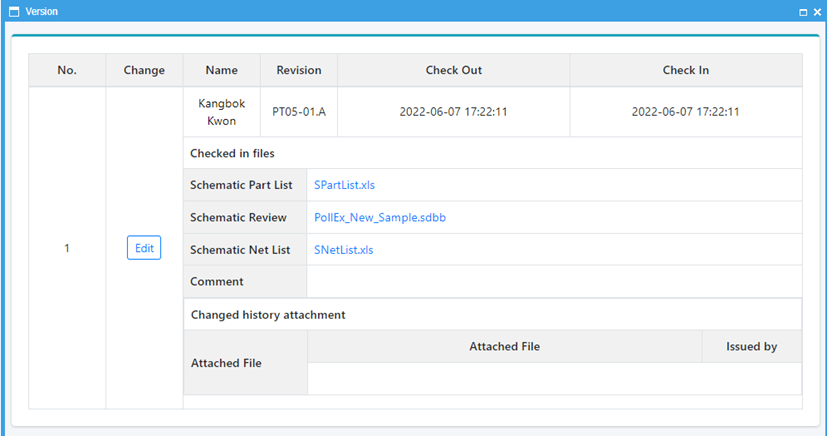
Figure 11.
Auto Verification Settings

Figure 12.
- Update the last UPF When verification is run: The automated verification needs part libraries for running. At this time, it is set whether to use the library created for each design project or the library registered in the server.
- Select auto-verification design process class: Set a function to automatically verify using an external verification tool when a design is checked in.
Production Settings
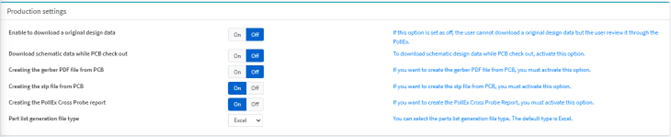
Figure 13.
- Enable to download a original design data: For security reasons, UDE prohibits downloading original design data among the outputs generated through check-in and recommends downloading PollEx Design. However, you can set this option to download the original design data.
- Download schematic data while PCB check out: Specify whether to download schematic design data stored in the server when PCB check-in.
- Creating the Gerber PDF file from PCB: Set whether to create gerber PDF files.
- Creating the step file from PCB: Use it when you want to print Step Data during PCB check-in.
- Creating the PollEx cross Probe report: Outputs two versions of the Part Change Report when you have a design revision.
- Part list generation file type: Specify the generated part list file type. MS excel or SQLite database is available.