Summary Measures Window
Use this window to view or edit summary measure fields. You may also specify any desired exception highlighting using the tabs in this window.
Notes:
-
If you want to add or remove keys, use the Add/Remove Fields window.
-
If you want to edit all summary fields, use the Summary All Fields window.
Displaying the Measures window
-
Go to Summary Design.
-
Select a Summary from the Summaries selector. The summary's properties are displayed on the Summary Window.
-
Select Measures on the Summary Design ribbon.
-
Select a Measure field on the Measures field selector. The field's tabs and properties are displayed.
Measure Field Options
General
|
Field |
Description |
|
Title |
Accepts a string representing the column title. Column titles must adhere to the naming conventions used for summaries and other objects. Column titles are initially assigned by Monarch Classic based upon the name of the field used to create the summary column. Note: To change the column title, you must first clear the "Use Default Title" check box, then enter a new column title in the Title box. |
|
Width |
Accepts a value representing the width of the column on screen. If the width of a numeric summary column is set to less than the width of the values in the column, the column displays pound signs (####). For character columns and date columns, the values are truncated on screen. |
|
Display: Hidden |
When this is checked, the corresponding summary column is hidden. A hidden measure may still be used for sorting purposes. Even though a measure column is hidden, the presence of the measure itself will generally still have some effect; for instance, blank lines and/or subtotal lines specified for a hidden measure will still produce rows in the summary. Note: Hidden columns do not get exported. |
|
Use Default Title |
When selected, the default title (based upon the name of the field used to generate the summary column) is used. Clear this option if you want to enter a new title for the column |
|
Display Settings |
Allows to define custom display settings for the measure. You can set the number of decimals places, the format (e.g., currency), and alignment (left, center, or right). |
Formula
The Formula tab offers a number of calculations that you can choose from when creating a measure:
|
Field |
Description |
|
Fields |
Displays a list of all the fields available for use in the measure expression. Note: When you select a field and hold down the mouse button, its field type displays in the bottom box of the dialog. |
|
Operators |
Displays a list of available operators. The operators list also includes parentheses, braces (to enclose date values), quotes (to enclose character strings) and special comments brackets. Note: When you select an operator and hold down the mouse button, a brief description of the operator is displayed in the bottom box of the dialog. |
|
Functions |
Displays a list of the available functions. When an aggregation is selected, its syntax and a brief description of the function is displayed in the bottom box of the dialog. For more information see Using aggregations. |
|
Expression |
Accepts a valid calculated field expression. Calculated field expressions may be up to 32768 characters in length and may include field names, operators, functions, and constants. |
|
Insert |
Inserts the currently highlighted field, operator or aggregation at the cursor position in the Expression box. Double-clicking a field, operator or aggregation has the same effect. |
Coloring and Limits
|
Field |
Description |
|
Default coloring defined for the Summary |
Select this option to use the defaults that have been defined. Default preferences may be set using the Design Preferences Wizard . |
|
Override for entire column |
Select this option to override the defaults and define colors for the currently selected key column. If you click on this option, a color sample initially displays. Click Edit beside the preview box to display the Color Properties Dialog then use the dialog to set the text color, fill color, pattern style and pattern color.
|
|
Override for selected groups |
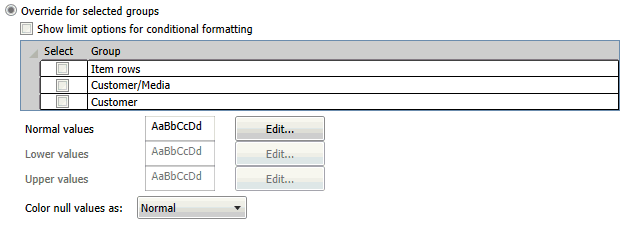
Select this option to override the defaults and define colors for specific groups. If you click on this option a list of groups displays:
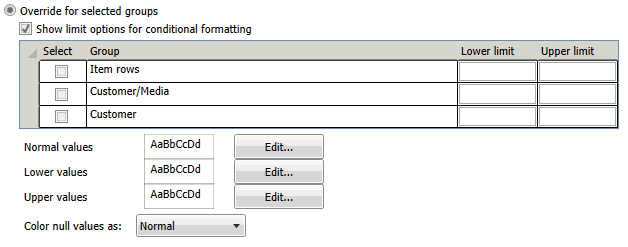
Select the groups you wish to color and then click Edit beside Normal values preview box to display the Color Properties Dialog. Use the dialog that displays to set the text color, fill color, pattern style and pattern color. Also select values for Color null values as to set the color for null value fields. Defining Colors for Conditional FormattingIf you wish to define colors for conditional formatting, click Show limit options for conditional formatting. The screen will provide text boxes for entering the Lower and Upper limits for each group:
Select the groups you wish to color and then enter the lower limit and upper limit values. Click the right arrow beside Normal values, Lower values, and Upper values preview boxes to display the Color Properties Dialog. Use the dialog that displays to set the text color, fill color, pattern style and pattern color. Also select values for Color null values as to set the color for null value fields. |
© 2025 Altair Engineering Inc. All Rights Reserved.


