Connector Dialog for Google BigQuery
NOTE: This connector requires a Java Virtual Machine (JVM) to function properly.
The Google BigQuery connector dialog includes the following fields and settings:
|
Field |
Description |
|
Connection |
|
|
Project |
Enter the name of the project that you want the driver to connect to. The projects in Google BigQuery are equivalent to catalogs in ODBC. |
|
Dataset |
Enter the name of the dataset that you want the driver to connect to. The datasets in Google BigQuery are equivalent to schemas in ODBC. |
|
Authentication Method |
Determines the authentication method to be used during the course of the session. Select the method from the drop-down list. |
|
Client ID |
Enter the client ID key for your application when authenticating to REST endpoints with OAuth 2.0 enabled |
|
Client Secret |
Enter the client secret for your application when authenticating to REST endpoints with OAuth 2.0 enabled. Important: The client secret is a confidential value used to authenticate the application to the service. To prevent unauthorized access, this value must be securely maintained. |
|
Access Token |
Enter the access token used to authenticate to REST endpoints with OAuth 2.0 enabled. Typically, this option is configured by the application; however, in some scenarios, you may need to secure a token using external processes. In those instances, you can also use this option to set the access token manually. Note: You can use the Copy/Paste icon |
|
Refresh Token |
Enter the refresh token used to either request a new access token or renew an expired access token for OAuth 2.0 implementations. Note: You can use the Copy/Paste icon Important: The refresh token is a confidential value used to authenticate to the service. To prevent unauthorized access, this value must be securely maintained. |
|
Authorization URI |
Enter the endpoint for obtaining an authorization code from a third-party authorization service for OAuth 2.0 implementations. |
|
Token URI |
Enter the endpoint for retrieving access tokens when OAuth 2.0 authentication is enabled. |
|
Redirect URI |
Enter the data range that will be used to filter the Google Analytics rows. |
|
Scope |
Enter a space-separated list of OAuth scopes that limit the permissions granted by an access token. |
|
Reset Connection |
Check this box to reset the OAuath connection and fetch new access tokens. |
|
TEST CONNECTION |
Click to initiate a connection and test the values you have entered. If there are errors, messages will be displayed beside this button. Note: You can right-click on an error message to display a Copy button. Select the button to copy the error message. |
|
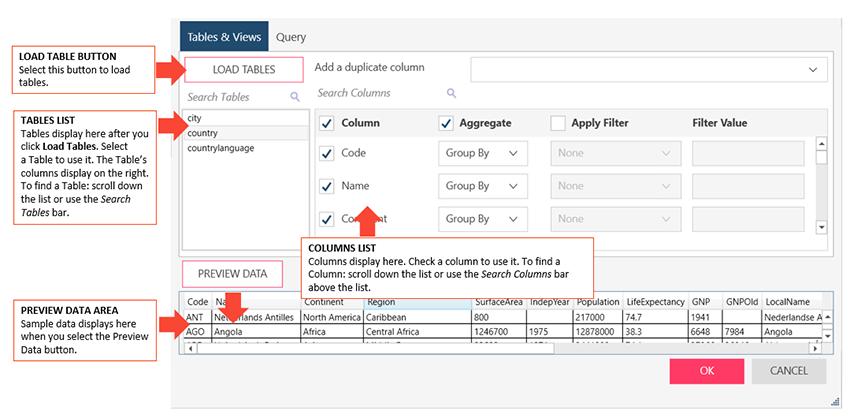
Tables & Views |
|
|
Tables & Views |
Allows you to load, and then select, the tables from your database by manually selecting from a list.
To load tables and views via search and select:
Note: If you wish to add a duplicate column, select this column from the Add a duplicate column drop-down list provided.
To select a column: Check the boxes beside the columns you want to use. If you want to use all columns, check the Column box on the header.
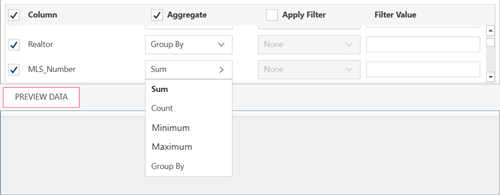
To aggregate columns: If the data returned are to be aggregated, check the Aggregate box on the header, then select the aggregation method you want to use for each column.
The following aggregation methods are possible for each data type:
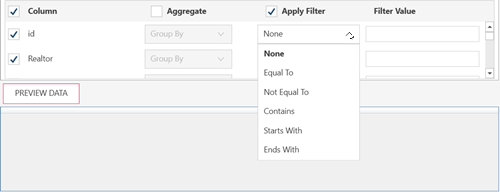
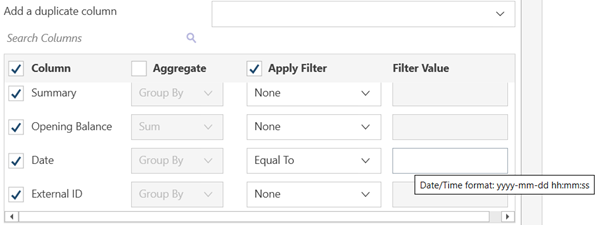
To filter columns: If the data returned are to be filtered, check the Apply Filter on the header. Then, for each column, select a filter method from the filter drop down and then enter the filter value in the Filter Value box.
Notes:
|
|
Preview Data |
Click to fetch data using the credentials and criteria you have specified. This allows you to confirm your connection, ensure you have connected to the correct table, check your query, and verify the information that will be loaded. Notes:
|
|
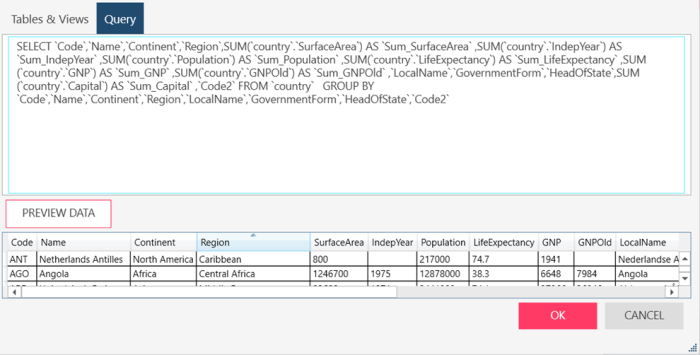
Query |
|
|
Query |
Allows you to load, and then select, the tables from your database by entering a SQL Statement. If you already selected Tables and Views, this box is updated to show the corresponding SELECT * FROM TABLE query.
If you want to define the query, enter the SELECT, EXEC, and/or WITH statements to execute. Notes:
|
|
Preview Data |
Click to fetch data using the credentials and criteria you have specified. This allows you to confirm your connection, ensure you have connected to the correct table, check your query, and verify the information that will be loaded. Notes:
|
|
OK/CANCEL |
Select OK to establish the connection and fetch data or Cancel to close the dialog. The state of the OK and PREVIEW buttons provides a handy status about the state of your connection:
|

Notes:
-
Optional Fields. Other fields are optional but you may need to consult your data source administrator for other field values you need to enter to connect.
-
Connection Strings that Exceed 1020 characters. For Connection Strings that exceed 1020 characters, a File DSN is temporarily created. Refer to this page for details on the implementation.
-
Support for Short Names: Progress short names are supported by this release of Data Prep Studio, specifically in the Other Connection Options field. Refer to this page for details on the implementation.
© 2025 Altair Engineering Inc. All Rights Reserved.