
Create Camera Animations
Animate the camera to view your model and record the animation in any display mode.
-
Do one of the following:
- For models without animated results, in the view controls, click the
Create Camera Animations
 tool.
tool. - For models that already include animated results, the timeline appears automatically, so go to the next step.
The Animation toolbar appears at the bottom of the modeling window. - For models without animated results, in the view controls, click the
Create Camera Animations
-
Click the icon at the far right of the Animation toolbar's timeline. By
default, it's No Animation
 but it could be Turntable
 , Path
 , or Object
 .
The Camera Animation dialog box appears.
.
The Camera Animation dialog box appears.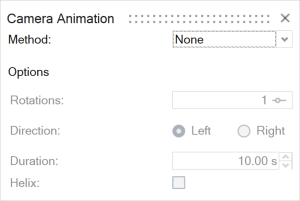
-
Select a method and configure the options:
Method Description None (default) No animation. Turntable - Enter the number of Rotations.
- Set the Direction to Left or Right.
- Enter the Duration. To speed up the animation, decrease the value.
- To add vertical movement, turn on
Helix.
- Enter the Height. For a more dramatic effect, increase the value.
- Set the Direction to Up or Down.
Path Define multiple camera Positions and set the Duration between them. - Orient your model in the desired position.
- In the dialog, click +. Position 0 is added to the table in the dialog box, and a camera is added in the modeling window.
- To add more positions, repeat the previous steps. Enter the Duration between the positions. You can edit a Position's Timestamp by clicking the relevant cell in the table.
To make the camera follow a smooth curve, turn on Smooth path. To make the camera follow linear paths between positions, turn it off.
Object (only available when Motion data is present) Select the part you want the camera to stay aligned to. Remember: Before recording the animation, close the Camera Animation dialog box and place the mouse cursor out of view.