Add your profile using your Altair One Server
URL.
A default auto-profile is generated for a new user. You may modify the default
auto-profile or create a new profile, specify the preferences for accessing your data,
and synchronize your files between Altair
Drive Desktop and Altair
Drive.
Launch the application using the Altair Drive Desktop icon .
Click Profiles on the left pane of the
application.
The Profile tab is displayed. Figure 1. Profile Tab
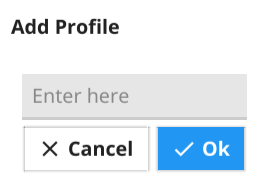
Click to add a new profile.
The Add Profile dialog box is displayed. Figure 2. Add Profile
Enter a name for the profile and click OK.
The profile name is added to the Profile
drop-down list.
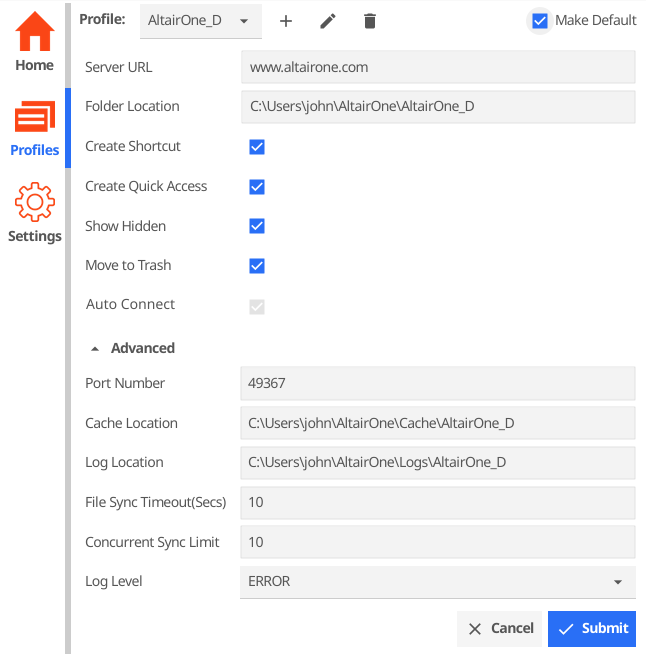
By default, the folder location is derived from the Home
Directory in the Settings tab. You may
choose different file location for mounting your files.
Select Create Shortcut.
A shortcut for the profile is created on your desktop. The profile
shortcut launches the location of your files on your desktop while you are
connected to Altair One.
By default, this
option is selected.
Select Create Quick Access.
Figure 4. Altair One Drive Desktop Profile Quick Access
A quick access menu is created for your profile. You can view this
profile quick access menu and access your files only when you are connected to
Altair One.
Select Show Hidden to view the hidden files in the
connected Altair Drive and in
the mount location.
Tip: To hide a file or a folder from Altair Drive and in the mount
location, and add a period (.) as a prefix to the file name.
Select Move to Trash.
These locally deleted files from Windows Explorer will be moved to
Trash in Altair Drive application. Ensure you are connected to Altair One if you want to track or view these
deleted files in Altair Drive.
By default, this option is selected.
Select Auto Connect.
Your default profile will automatically connect to the Altair Drive if
available.
The advanced profile settings are predefined based on your selections. You may
modify the port number.
The Port Number is used for IPC (Inter Process
Communication) and it is auto-generated for a profile.
Modify the cache location.
By default, the cache location is derived from the Home
Directory in the Settings tab. You may
choose different location for the cache files.
Note: You may choose an existing
or a
non-existing
location on your Desktop.
Modify the log location.
By default, the log location is derived from the Home
Directory in the Settings tab. You may
choose different location for log files.
Note: You may choose an existing or a
non-existing location on your Desktop.
Modify the File Sync Timeout in seconds.
It is the earliest time interval for synchronization of file content changes
and addition or deletion of files from Desktop to the connected Altair Drive Web Server. By default,
it is set to 10 seconds.
Modify the Concurrent Sync Limit.
Specifies the concurrent file upload limit. By default, the value is set to
10 specifying that a maximum of 10 files will get
uploaded concurrently. You can increase or decrease the concurrent sync limit
value based on your bandwidth. Decrease the value to conserve your bandwidth and
increase the value if you have better bandwidth.
Choose the Log Level from the drop-down list:
DEBUG: Select to view data errors and system
processing errors.
INFO: Select to view the events that occur in the
operating system when the application runs.
WARN: Select to view any potential errors that
cause the application operations.
ERROR: Select to view common and critical errors
encountered by the application.
If you select the Debug log, then you categorizing the log entries in your
log file to include all log levels. Therefore, it comprises everything including
debugging messages and up to error messages.
Similarly, you select the Info log, then you categorizing the log entries in
your log file to include log levels of Info, Warn and Error. Hence, is the
pattern for capturing the log details.
Tip: The selected Log Levels is displayed when you click the
Open Log button on the
Home tab.
Note: By default, the Error log type is selected for
a profile. It captures only the errors that the user encounters while
accessing the application.
Optional: Select the Make Default check box at the top-right
corner to set this profile as a default profile.
The default profile is launched automatically when you launch the application.
Click Submit.
The following message is displayed: Profile saved
successfully!
 .
.
 to add a new profile.
The Add Profile dialog box is displayed.
to add a new profile.
The Add Profile dialog box is displayed.