Tutorial: Camera and Display Modes
Learn about viewports, layouts, the View Cube, cameras, the Home view, and display modes.
In this lesson you will learn about:
- Viewports and layouts
- View Cube
- Cameras
- Home view
- Display modes
Expanding and Collapsing Viewports, Changing Layouts
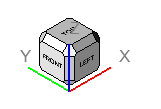
Changing the View Using the View Cube
-
Click the face of the View Cube to change the view.
Changing the View Using the Camera Tool
- Click the camera tool to bring up a thumbnail of all cameras currently available.
- Change the view by selecting a camera preview.
Adding, Deleting, and Renaming a Camera
-
Ctrl + left-click
 or Ctrl + right-click
at the bottom left of the modeling window to set
the home view for this new camera.
or Ctrl + right-click
at the bottom left of the modeling window to set
the home view for this new camera.
-
To rename a camera, click the name of the camera at the bottom left of the
thumbnail.
Note: To set a new home view:
- Move the camera to a desired location.
- Ctrl + left-click
or Ctrl +
right-click
at the bottom left of
the modeling window.
Modify the Camera Properties
Change the Display Mode
-
Inspire Render has two sets of options that change the way objects are displayed. This
mostly applies to surfaces and for the entire scene.
Display Mode Description Wireframe 
The wireframe mode offers the fastest display. Objects are displayed as curve meshes. Press 1. Shaded 
The shaded mode is useful for seeing the shape of objects and how lights illuminate the scene. Press 2. MatCap 
The MatCap mode allows you to apply a "material capture" to an object. The MatCap is a complete material that includes lighting and reflection, to quickly sculpt or render the object. Press 3. Zebra Stripes 
The zebra stripes mode is useful for spotting discontinuities between adjacent surfaces. Press 4. Real-time 
The Real-time mode gives you a quick, real-time view of existing textures and materials in an imported scene. Press 5. -
In modes 2, 3, and 4, you can control the display of isoparms and edges:
Display Mode Description No Edges or Isoparms 
View your model with no edges or isoparm lines. Press R. Edges 
View your model with edges only. Press T. Edges and Isoparms 
View your model with edges and isoparm lines. Press Y. Note: MatCap cannot be rendered. An alternate is to use the Snapshot tool.