Previewing Data
Previewing your data is an important aspect of data preparation as it allows you to first review the information and check the quality of the data before loading these into the Data Prep Studio workspace.
For instance, by previewing your data, you can quickly determine if:
-
your table has enough rows for you to work with
-
the column values are meaningful
-
there are nulls or blanks
Changes made to tables in Preview mode (e.g., when columns are deleted or filtered) display as a group of changes in Change History.
NOTE: Tables that are require an upgrade or have been deprecated (e.g., those from connectors that are no longer supported in Monarch) will not display in the list of tables for preview.
-
After selecting a table to add to your Data Prep Studio session, go to the Preview window. A list of all tables added to your workspace, their data source type, source name, and path displays.
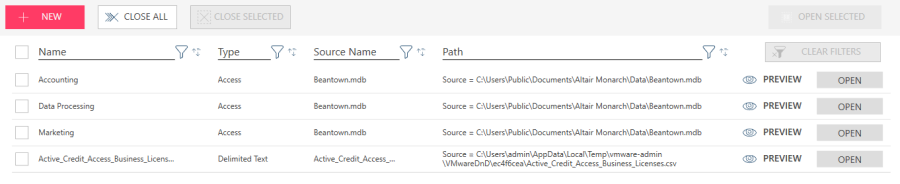
In this panel, you can sort the rows in any of the columns that display by clicking the Sort ![]() icon.
icon.
You can also filter for specific items by clicking the Filter ![]() icon and then entering a suitable keyword in the filter field that displays.
icon and then entering a suitable keyword in the filter field that displays.
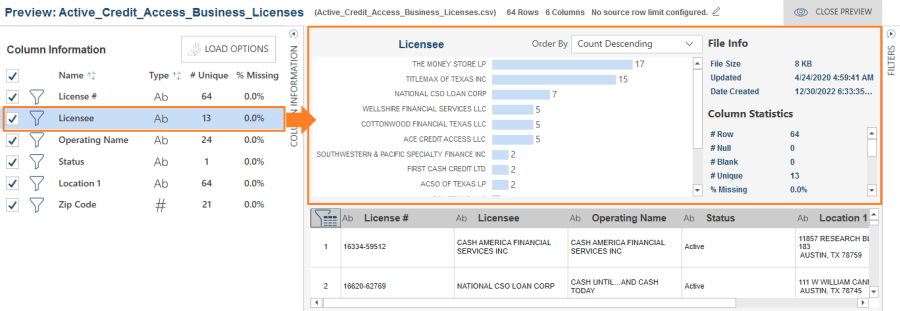
- Select a table from the Table List and then click Preview. A set of panels showing information about the columns of the table, including a preview of the rows in the table, display.
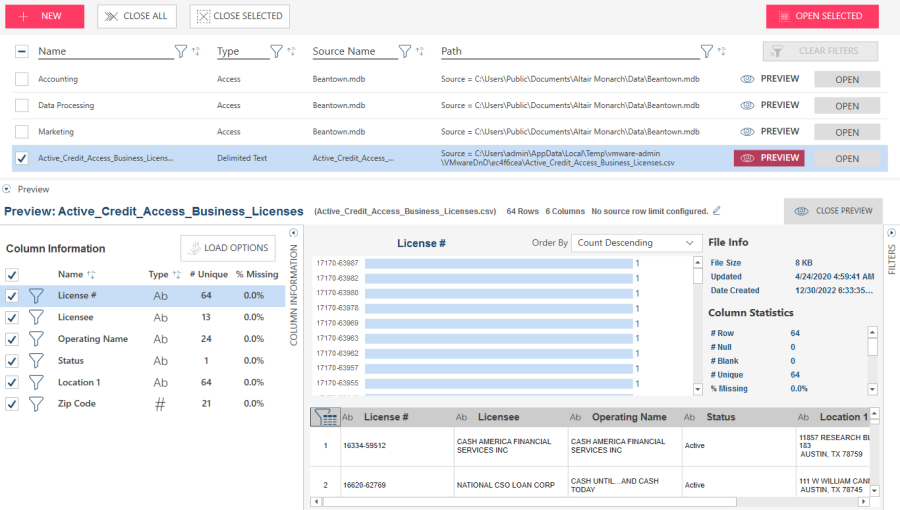
Each of the panels shown above is described here.
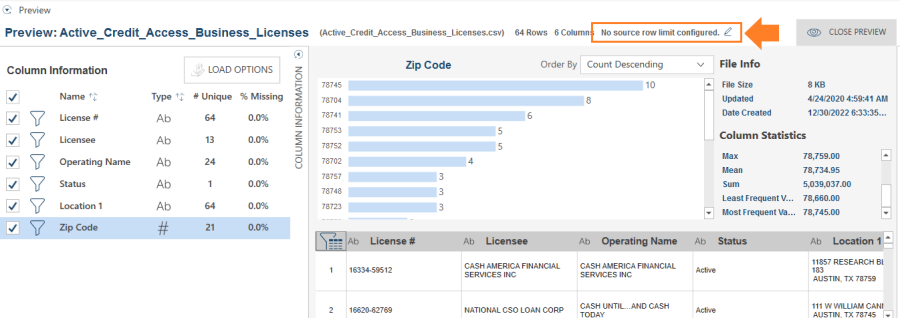
Setting row limits
You can limit the number of rows to work with by selecting the Edit icon beside No Source Limit Configured (applicable if no row limit has been set) or Row Limit (applicable if a row limit has been previously set).
to display the Edit source row limit dialog.
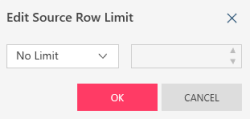
Click on the Limit drop-down list, select Limit, enter the row limit you wish to apply, and then click OK.
Viewing column information and statistics
The columns comprising a table being previewed display in the Column Information subpanel. By default, all columns are selected and opened in the Prepare window. If you wish to remove a column from a table before opening it, clear the checkbox located to the left of this column.
Clicking on the name of a specific column:
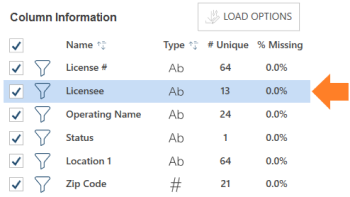
displays various column statistics in the Column Statistics subpanel.
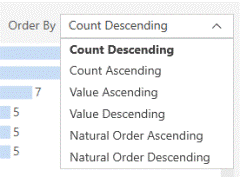
You can control how values are displayed for a selected column by selecting an order by option from the Order by list on the Column Statistics subpanel.
The statistics displayed for a column depend on its data type.
|
Statistics
|
Text |
Numeric |
Date/Time |
|
# Rows # Null # Blank # Unique % Missing Min Length Max Length Avg Length Min Word Count Max Word Count Avg Word Count Least Frequent Value Most Frequent Value |
# Rows # Null # Unique % Missing Min Max Mean Sum Least Frequent Value Most Frequent Value |
# Rows # Null # Unique % Missing Min Date Max Date Least Frequent Value Most Frequent Value |
Filtering columns
Data Prep Studio allows you filter the data in a table under preview. Use this functionality to quickly locate records that meet a specific criteria.
Filtering text columns
-
Select the filter icon beside a text column to display the Filter subpanel to the right of the Column Statistics subpanel.
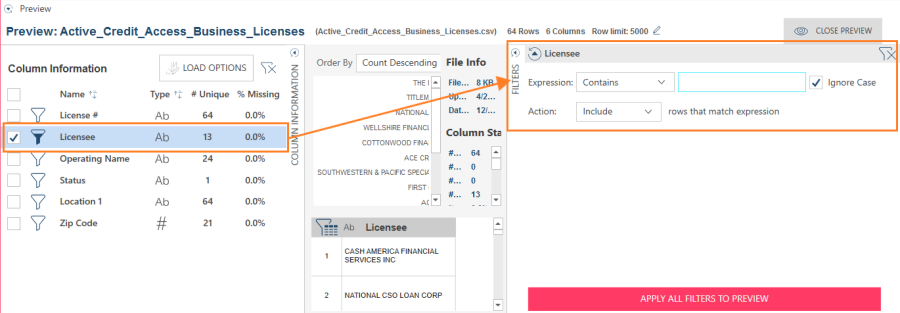
-
Select a filter operator using the drop-down provided to the right of the Expression field. You can choose among the following operators:
-
Contains - This filter operator allows you to filter records with field values that contain a specific set of characters.
-
Multiple Selection - This filter operator allows you to filter records of one or more unique string.
-
Equals - This filter operator returns records containing a specific string.
-
Does Not Equal - This filter operator returns all records except those containing the specified string.
-
Starts With - This filter operator allows you to select records with column values that start with a specific set of characters.
-
Ends With - This filter operator allows you to select records with column values that end with a specific set of characters.
-
Is Null - This filter operator returns all records with nulls in the selected field.
-
Is Not Null - This filter operator returns all records without nulls in the selected field.
-
-
In the field provided to the right of the Expression field, enter your filter criteria.
NOTE: When Multiple Selection is selected in Step 2, the Filter sub-panel displays a list of all possible values that can be selected for your filter criteria.
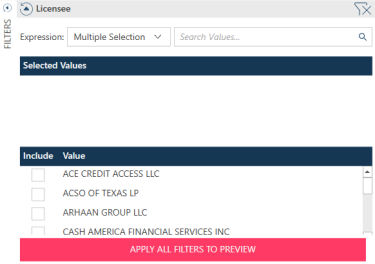
Values selected from the lower pane display in the upper pane.
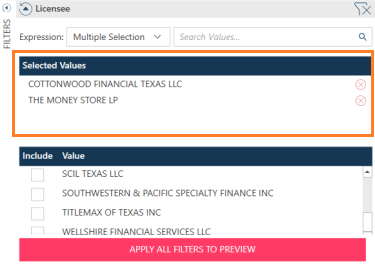
If the list of values is long, you can use the field labeled Search Values to search for and select the desired value to include in your filter. Clicking on the Delete  icon beside a selected value removes this value from the filter criteria and returns it to the list of possible values.
-
Tick the box for Ignore Case to instruct Data Prep Studio to ignore case when searching for possible records to return. This setting is applicable only to the filter operations Contains, Equals, Does Not Equal, Starts with, and Ends with.
-
Use the drop-down provided to the right of the Action field to either include or exclude the filter criteria you specified in Step 3 in the resulting table. This setting is applicable only to the filter operations Contains, Starts with, and Ends with.
-
You can create several filters to further refine your table. Repeat Steps 1-5 to create other text-based filters.
-
Click Apply All Filters to Preview to implement the filter(s).
The example below shows changes to the previewed column when the indicated filter is applied to it.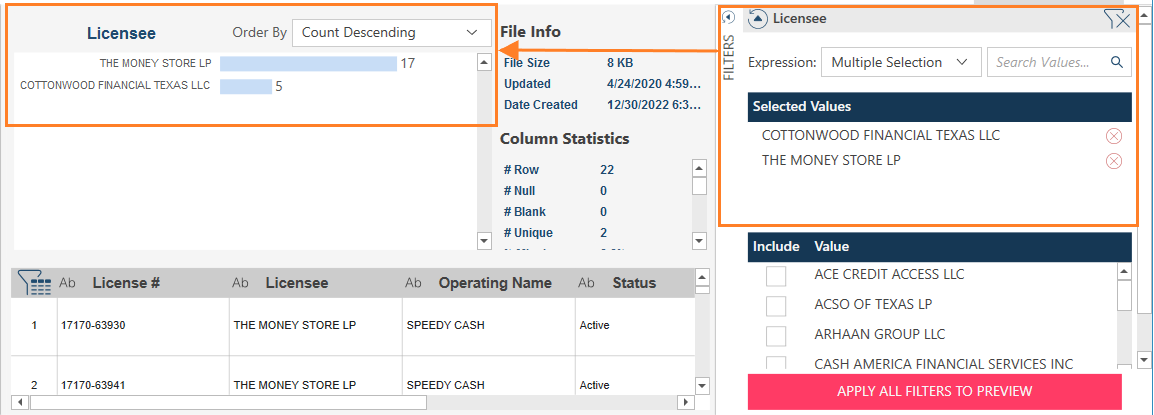
Filtering numeric columns
Filters for numeric fields in the Preview window are created in the same way as filters for text fields.
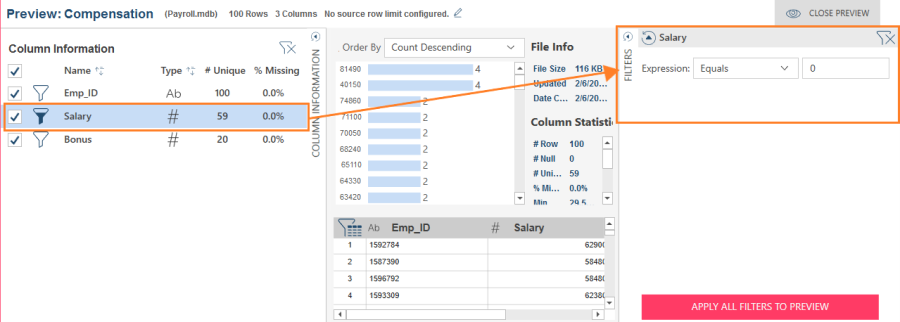
The following operators may be applied when creating numeric filters:
-
Equals - This filter operator returns records containing a specific field value.
-
Does Not Equal - This filter operator returns all records except those containing the specified field value.
-
Multiple Selection - This filter operator allows you to filter records of one or more unique field values.
-
Less than - This filter operator allows you to filter for records less than a specified value.
-
Greater than - This filter operator allows your to filter for records greater than a specified value.
-
Less than or Equal to - This filter operator allows you to filter for records less than or equal to a specified value.
-
Greater than or Equal to - This filter operator allows you to filter for records greater than or equal to a specified value.
-
Between - This filter operator allows you to define numeric ranges; when this operator is selected, you must also select one from each of two sets of operators (i.e., greater than/greater than or equal to and less than/less than or equal to) to identify the range to filter for.
-
Is Null - This filter operator returns all records with nulls in the selected field.
-
Is Not Null - This filter operator returns all records without nulls in the selected field.
Filtering date/time columns
You can filter date/time values and opt to review only records with column values that fall within a range or are before or after a specific date:
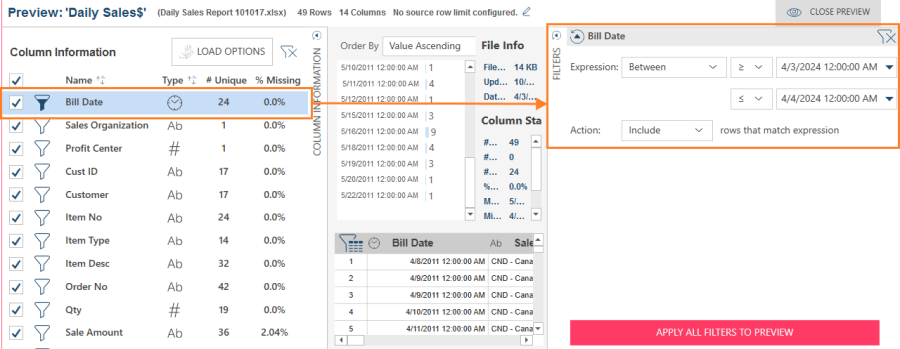
The following operators may be applied when creating date/time filters:
-
Equals - This filter operator returns records containing a specific date/time.
-
Does Not Equal - This filter operator returns all records except those containing the specified date/time.
-
Multiple Selection - This filter operator allows you to filter records of one or more unique dates/times.
-
Less than - This filter operator allows you to filter for records earlier than a specified date/time.
-
Greater than - This filter operator allows your to filter for records later than a specified date/time.
-
Less than or Equal to - This filter operator allows you to filter for records less earlier than or equal to a specified date/time.
-
Greater than or Equal to - This filter operator allows you to filter for records later than or equal to a specified date/time.
-
Between - This filter operator allows you to define date/time ranges; when this operator is selected, you must also select one from each of two sets of operators (i.e., greater than/greater than or equal to and less than/less than or equal to) to identify the range to filter for.
-
Is Null - This filter operator returns all records with nulls in the selected field.
-
Is Not Null - This filter operator returns all records without nulls in the selected field.
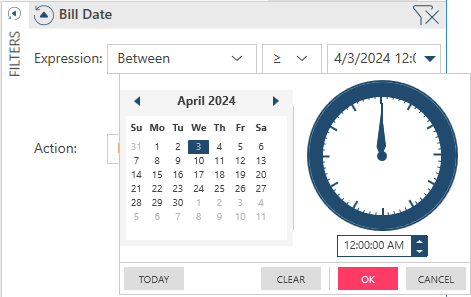
You can specify calendar and/or clock values when creating date/time filters. To do so, click on the drop-down buttons provided beside the date/time fields in the (Date/Time) Filter subpanel. Calendar and Clock controls display to help you select the required date and time, respectively.
Discarding filters in the Preview window
When a filter has been defined for a column, the filter icon in the Column Information subpanel changes from empty (![]() ) to partly filled (
) to partly filled (![]() ) .
) .
DISCARDING INDIVIDUAL FILTERS
Hover over the filter icon next to a column for which a filter has been defined. Click this icon when its color changes.
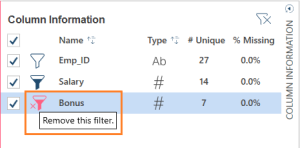
Alternatively, in the Filters subpanel, select the filter you wish to discard and then click Remove this filter ![]() .
.
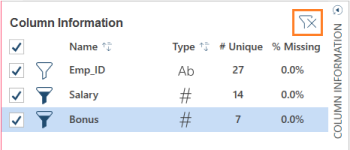
DISCARDING ALL FILTERS
If you wish to discard all defined filters for a table in Preview mode, click the Clear Filters icon found to the right of the Column Information panel.
Loading previewed tables into your workspace
Load tables into your workspace by selecting these tables from the Preview window and then clicking Open Selected or Open.
Related Links
© 2025 Altair Engineering Inc. All Rights Reserved.