The PDF Table Extractor Interface
The PDF Table Extractor Interface has panels, windows, and icons that allow you to:
-
navigate open documents
-
define tables, and
-
refine the tables that have been defined.
The Interface with several PDF documents is shown below:
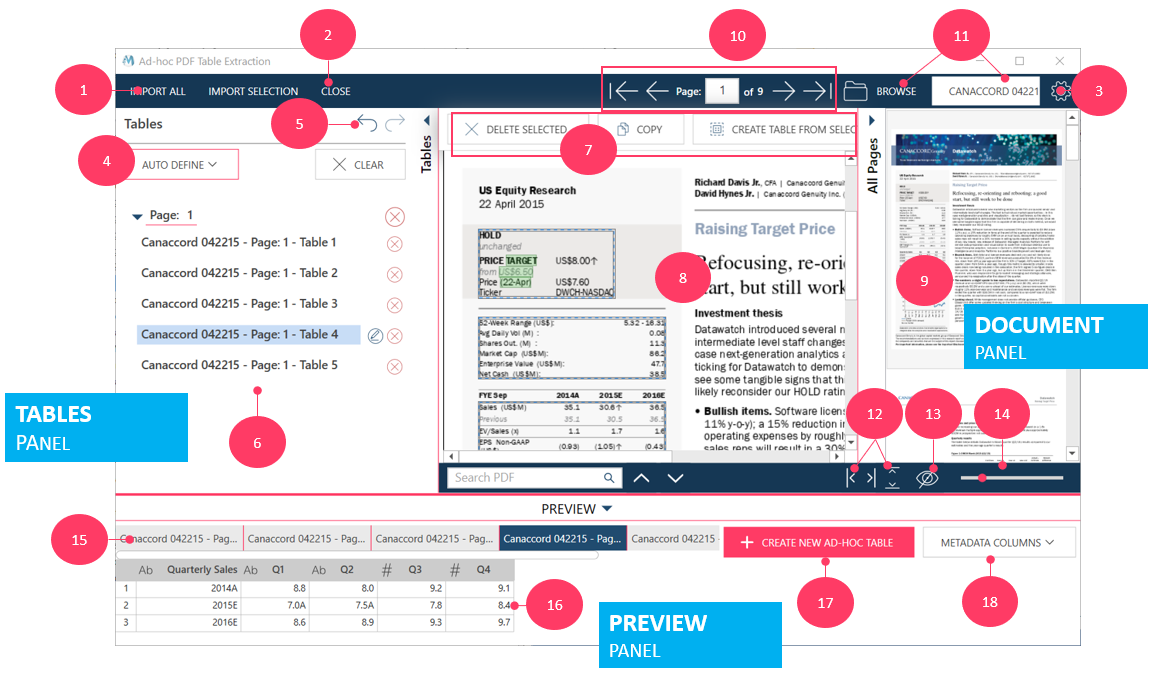
Interface elements
|
Element/Panels |
Description |
|
APPLICATION MENU |
|
|
1 |
Import Options Import brings your data into a table in Data Prep Studio. Select one of the following:
Refer to Importing Tables for details. |
|
2 |
Close Close the PDF Table Extractor. |
|
3 |
Application Menu Click to display a dialog box that will allow you to:
Refer to The Application Settings for details. |
|
TABLE PANEL |
|
|
4 |
Auto-Define Actions Select an option from the drop-down:
Refer to Defining Tables for details. |
|
5 |
Undo/Redo Select to undo a previous action, or re-do an action you have just undone. |
|
6 |
Page and Table List Displays a list of all pages for which tables have been defined. Each page in turn displays a list of tables in the page. Use the arrows to hide or display the list. Refer to Selecting and Viewing Defined Tables for details. |
|
DOCUMENT PANEL |
|
|
7 |
Table Actions Displays actions you can carry out to define tables. Actions that display depend on the table, or table element, you have selected. You can, for example:
Refer to Defining Tables and Exporting Tables for details. |
|
8 |
Document Page Preview Displays the current page of a document. Use this window to view a page and it's tables. Go to a different page by using the the page thumbnails (see element #9) and page navigators (see element #10) Refer to Opening and Working with Your Document for details. |
|
9 |
Page Thumbnails Displays thumbnails (i.e., small versions of the document pages) that you can use to easily look for a specific page. Use the scroll bar at the right of the thumbnail panel to scroll through the pages. Hover the mouse over a thumbnail to display that thumbnail's page number. Use the arrow at the top left of the thumbnail panel to show or hide the panel. Refer to Opening and Working with Your Document for details. |
|
10 |
Page Navigators Use the arrow keys to go to the first, last, previous, or next page of a document. To go to a specific page, enter a page number and hit Enter. See Opening and Working with Your Document for details. |
|
11 |
Document Browse and Selector Allows you to load and select a document. To load a document, click on Browse (or folder icon) to bring up the File Open dialog. To select a currently-loaded document, click on the drop-down list. Refer to Opening and Working with Your Document for details. |
|
12 |
Fit Page Width or Height Click Fit Page Width to make the page width fit across the page preview area. Click Fit Page Height to make the page height fit vertically across the preview area. Refer to Opening and Working with Your Document for details. |
|
13 |
Hide Graphics Check this box to hide all graphic elements in the document. This feature can help you in two ways:
Refer to Opening and Working with Your Document for details. |
|
14 |
Page Zoom Control Use this control to zoom in or out of a specific area of the page:
Refer to Opening and Working with Your Document for details. |
|
PREVIEW PANEL |
|
|
15 |
Table Tabs Displays a tab for each table defined so far. Select a tab to display a table. The panel only displays tables from one page at a time. Refer to Defining Tables for details. |
|
16 |
Table with Values Displays a table. The table may contain:
Refer to Defining Tables for details. |
|
17 |
Create New Ad-Hoc Table Click to add an Ad-Hoc table: a table whose properties and values you define on the fly. Refer to Creating an Ad-Hoc Table for details. |
|
18 |
Meta Data Columns Click on this button to select one or more of the following metadata columns:
These columns identify where values on the table are located, or where data came from. These can help you audit information that are on the table, |
© 2025 Altair Engineering Inc. All Rights Reserved.