Exporting Summaries in Data Prep Studio

You can export a summary to various file formats in Monarch Data Prep Studio. The steps in setting up a summary export are detailed below.

Setting up a summary export

  1. Click the Export tab to display the Export window.

  2. Click on the Add Export button located to the right of the table from which you created a summary, and from the options that display, select an export format.
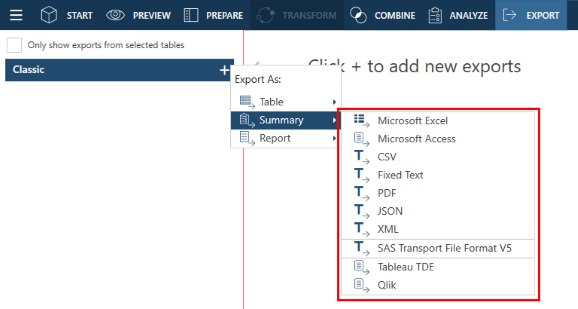
     

You can export summary tables to the following formats:

  • Microsoft Excel

  • Microsoft Access

  • CSV

  • Fixed Text

  • PDF

  • JSON

  • XML

  • SAS Transport File Format V5

  • Tableau TDE

  • Qlik

NOTE:

  • Note that data exported in Data Prep Studio to Excel files are exported as named ranges. Thus, when the table is opened, the worksheet name displayed corresponds to that of the named range.

  1. The table you selected displays in the Export Management panel and its properties display in the Export Properties panel.
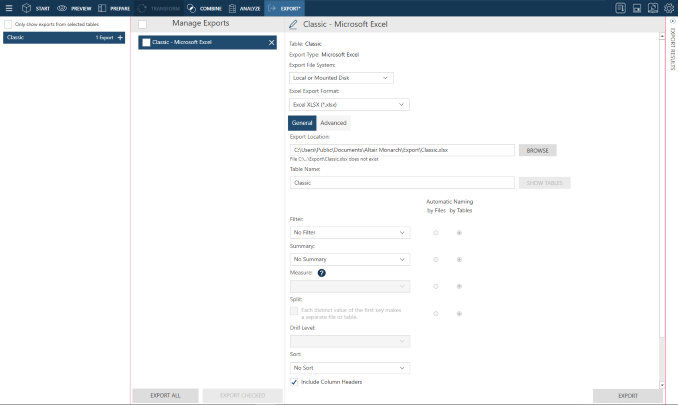
  1. Rename the export if you wish by clicking on the Edit button located to the left of the Export name and then entering a new name into the field.

  2. Specify general export settings as necessary. Your export options will vary depending on the export type. The table below describes these settings.

Field

For Export Type

Description

Export Name

All

Each export is assigned a name using the convention <Table Name> - <Export Format>. Click on the edit button of this field to change the name of your export if you wish.

Export Type

All

This field is prepopulated with the value you selected from the Export type drop-down.

Export File System

All

This field describes the file system to which your summary will be exported.

  • Local or mounted disk

  • Amazon S3

  • Azure Data Lake Storage Gen2

  • Azure Blob Storage

  • Oracle Cloud Infrastructure

  • Google Cloud Storage

Note: Credentials for cloud-based storage systems can be specified in the Server section of The Application Default Settings.

Excel Export Format

Microsoft Excel

This setting specifies the Microsoft Excel file format to apply to the export:

  • Excel XLSX

  • Excel XLS

  • Excel XLSM

General/Advanced Tab

  • Microsoft Excel

The General tab allows you to modify general export settings (e.g., Export Location, Table Name).

The Advanced tab allows you to modify the following settings:

  • Digital Signature: Allows you to embed the currently selected digital signature to the exported Excel file (XLSX/XLSM). By adding a digital signature, you establish the authenticity, integrity, and non repudiation of the export output.

  • Certificate: Select this button to digitally sign with a valid X.509 Certificate (an existing Certificate selected from the Current User's Certificate Store or from a Certificate file). 

  • Embed the page setup header in the worksheet title: This option is available for summaries with a defined page setup header. The page setup settings can be modified by editing the summary in the Analyze tab.

    Select this option to embed the page header set in the page setup settings into the title of the worksheet being exported.

  • Include outline to enable Drill Up/Down in Excel: Select this option to enable drilling up and down in the Excel worksheet.
  • Include Formulas to facilitate editing in Excel: Select this option to include the formula expressions for the subtotal and grand total fields in Excel.
  • Use conditional formatting if required conditions are fewer than...: Select this option to set the upper limit for the conditional format rules.

Export Location

All

This setting describes where the export file will be saved and what its name will be. Enter the path and name of the export file. You can embed macros (of the form &[macro]) in the file name.

Table Name

  • Microsoft Excel

  • Microsoft Access

  • SAS Transport File Format (XPORT) Version 5

This setting specifies the table name data will be exported to. Enter the name of the table to which data will be exported. You can embed macros (of the form &[macro]) in the table name.

Show Tables

  • Microsoft Excel

  • Microsoft Access

When exporting a table to a file that already exists, this setting allows you to see the destination file’s existing tables and columns and select the table to which the data should be appended or overwritten. When a table from the Show Tables dialog is selected and confirmed, the name of the selected table is inserted into the Table Name textbox and the current content of this box is overwritten.

The tables displayed in the Show Tables dialog may be sorted by name by clicking on the sort icon in the header. The tables have an expander button that allows you to view a list of columns belonging to that table.


Filter

All

This setting specifies what filter to apply to the table when it is exported.

When All Filters is selected as a filter option for Excel and Access file types, you will be asked to specify your desired Automatic Naming setting:

  • by Files: produces a file for each filter

  • by Tables: produces a table for each filter


Summary

All

This setting specifies which summary to export. Use the drop-down provided to select a summary.

When All Summaries is selected as a filter option for Excel and Access file types, you will be asked to specify your desired Automatic Naming setting:

  • by Files: produces a file for each summary

  • by Tables: produces a table for each summary


Measure

All

When exporting an across-key summary, this setting specifies which measure to apply to the summary. If your summary is an ordinary one, this setting is inactive.

Split

All

Check Each distinct value of the first key makes a separate file or table to split the summary export according to each value change in the first key (i.e., the leftmost one). If you choose this option, specify the desired Automatic Naming setting:

  • by Files: produces a file for each distinct first key

  • by Tables: produces a table for each distinct first

Drill Level

All

This setting specifies what drill level to apply to the summary about to be exported. A lower drill level means fewer columns in the output table.

Sort

All

This setting specifies what sort to apply to the table when it is exported.

When File Exists

All

This setting specifies what Data Prep Studio should do if a file with the same name exists in the folder you specified in the Export Location field. Select an action if the export file already exists:

  • Overwrite the file

  • Skip the export operation

  • Append records to the existing file

When Table Exists

  • Microsoft Excel

  • Microsoft Access

This setting specifies what Data Prep Studio should do if a table or sheet with the same name you specified exists in the file you indicated in the Export Location field. Select an action if the export table already exists:

  • Overwrite the table.

  • Skip the export operation.

  • Append records to the existing table

Export All / Limited Rows

  • Microsoft Excel

  • Microsoft Access

  • CSV

  • Fixed Text

  • JSON

  • XML

  • Microsoft Power BI

  • IBM Cognos Analytics

  • SAS Transport File Format (XPORT) Version 5

  • Altair Knowledge Studio

  • Tableau TDE

  • Tableau Server

  • Qlik

  • Altair Panopticon

For tables with defined row limits, this setting specifies whether the defined row limits should be respected during export. Select the appropriate checkbox to instruct Data Prep Studio to export all rows or only those rows that fall within the limit you have set.

Include Column Headers

  • Microsoft Excel

  • CSV

  • Fixed Text

Checking this setting instructs Data Prep Studio to include the column header in the export file. This header will become the first line in the summary export file.

Delimiter

  • CSV

This setting specifies data delimiter for CSV files. Select a delimiter from the drop-down. The delimiter will be used to separate column values.

Text Qualifier

  • CSV

This setting specifies a text qualifier for CSV files. Select a text qualifier  from the drop-down. The text qualifier tells you where text values begin and end. This is useful when you have text values that may contain the delimiter character you selected above.

Encoding Type

  • CSV

  • Fixed Text

This setting specifies which encoding type to apply to the export file. At present, the encoding types Code Page, UTF-8, UTF-16LE, and UTF-16BE are accepted.

Code Page

  • CSV

  • Fixed Text

When the encoding type selected is Code Page, this setting specifies which code page to apply to the export file.

Append DOS end-of-file character (x1A)

  • CSV

  • Fixed Text

This setting instructs the application to add a DOS EOF character to the export file.

Pad each field with X extra spaces

  • Fixed Text


Use this setting to separate exported fields with an extra space when exporting to a fixed text file. With this option unselected, field values might "bump up" against each other producing, for example, " 123.45CD " rather than " 123.45 CD ".

Pad numeric fields with zeros, suppress the decimal point, and use trailing negation

  • Fixed Text


Use this setting to export numeric fields using a standardized format that pads each value with leading zeros, removes the decimal point and places the negation sign at the end of the field value. This format represents the number "-123.45" as "00012345-". When selected, this option reformats each numeric field whose type is set to "Numeric" (as opposed to Thousands, Currency, or Percentage), removing the decimal character, and then padding the field with sufficient leading and trailing zeros to match the field’s column format, preserving the rightmost character position for a trailing negation sign.

Insert a page break after X lines

  • Fixed Text


Use this setting to add page breaks to a file at regular intervals by specifying the number of lines you want on each page.

Repeat field names on each page

  • Fixed Text


Exports the Summary window column titles to each page when exporting data to a fixed-width text file with pagination enabled.

Default decimal precision when not supplied by column format

  • Fixed Text


The value selected refers to the number of decimal places of accuracy. It is applied when the format string does not indicate decimal precision.

Legacy compatibility mode - Ignore format customizations during export

  • CSV

  • Fixed Text

  • XML

Enabling this option will cause column format customizations to be ignored during the export of numeric and date columns. Using Monarch Classic formatting, numeric values are exported using the localized decimal separator of the current system. Meanwhile, date values are exported based on the Date Format setting.

Date Format

  • CSV

When legacy compatibility mode is selected, this setting allows you to specify the date format to apply to date fields in the exported file.

Text Encoding

  • PDF

This setting specifies which type of text encoding to apply to the export file. The accepted text encoding types are Western, Japanese, Simplified Chinese, and Traditional Chinese. To use the default setting, choose Use current system locale.

Require a password to open the document

  • PDF

Select this option to set a password for the export file. Click the Open Password button to set the desired password.

Restrict access to document contents

  • PDF

Select this option to manage access to the content of the export file. You can restrict or allow printing, context extraction, editing, and annotation for the export file. To apply any of the restrictions to the export file, you must set a password by clicking the Permissions Password button. 

Encryption Type

  • PDF

This setting specifies which encryption type to apply to the export file. The following options are available:

  • AES (128-bit): Encrypts the export file with the Advanced Encryption Standard. If you choose this encryption method, Adobe Acrobat 7 or higher must be used to open the export file, as earlier versions of Acrobat do not support AES encryption.
  • RC4 (128-bit): Encrypts the export file with RC4 encryption. Note that this option is not recommended for extremely confidential data. Use the AES option instead.

Legacy compatibility mode - For numeric and date columns, override Data Prep Studio conversion locale settings with system defaults

  • PDF

Enabling this option will cause the conversion locale settings of Monarch Data Prep Studio to be ignored during the export of numeric and date columns. 


  1. If exporting to the Microsoft Excel XLS, XLSX, and XLSM formats, specify advanced export settings if necessary.

  2. Click the Export button located at the bottom right of the window to execute the export operation.

    When the export operation is completed, the Export Results panel displays.
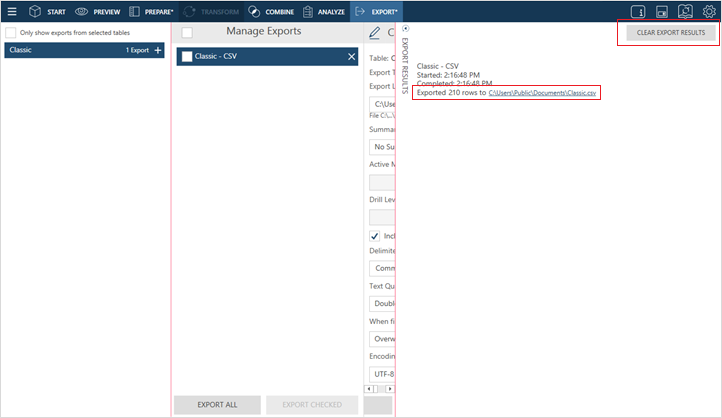
  • If the export was completed successfully, an export link will appear. Clicking on this link launches the folder to which you saved the exported summary. 
  • You can erase all export results from this panel by clicking on the Clear Export Results button located at the top right-hand corner of the panel.


© 2024 Altair Engineering Inc. All Rights Reserved.

Intellectual Property Rights Notice | Technical Support