Exporting Reports in Data Prep Studio

You can export a report to a text file in Monarch Data Prep Studio. The steps in setting up a report export are detailed below.

Setting up a report export

  1. Click the Export tab to display the Export window.

  2. Click the Add Export button located to the right of the table you wish to export as a report, and from the options that display, select an export format.

    You can export tables to the following formats:

    • Text

    • PDF

The table you selected displays in the Manage Exports panel and its properties display in the Export Properties panel.
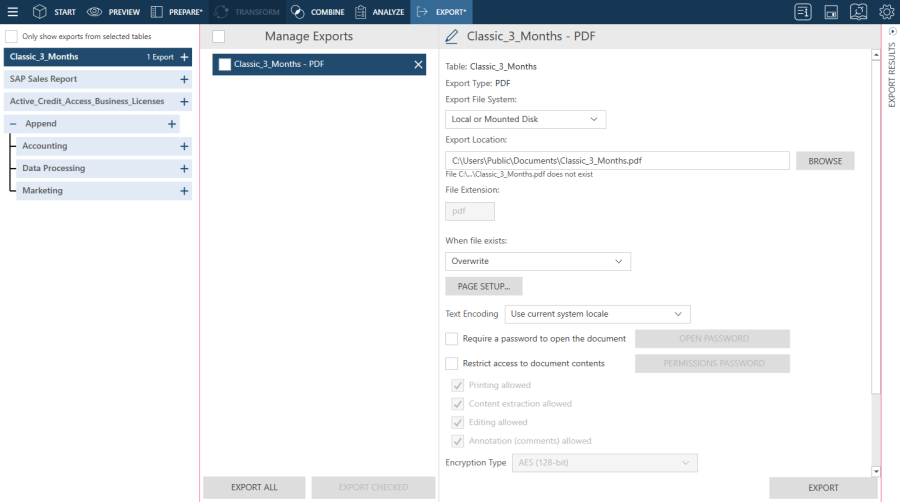
 

  1. Rename the export if you wish by clicking on the Edit button located to the left of the Export name and then entering a new name into the field. Click the Accept  or Cancel  icons to accept or reject your specified changes, respectively.

  2. Specify general export settings as necessary. The table below describes these settings.

Field

For Export Type

Description

Export File System

All

This field describes the file system to which your report will be exported.

  • Local or mounted disk

  • Amazon S3

  • Azure Data Lake Storage Gen2

  • Azure Blob Storage

  • Oracle Cloud Infrastructure

  • Google Cloud Storage

Note: Credentials for cloud-based storage systems can be specified in the Server section of The Application Default Settings.

Export Location

All

This setting describes where the export file will be saved and what its name will be. Enter the path and name of the export file. You can embed macros (of the form &[macro]) in the file name.

When file exists

All

This setting specifies what Data Prep Studio should do if a file with the same name exists in the folder you specified in the Export Location field. Select an action if the export file already exists:

  • Overwrite the file
  • Skip the export operation
  • Append records to the existing file

NOTE: Exports to PDF do not support appends to existing tables.

Encoding Type

Text

This setting specifies which encoding type to apply to the text file. At present, the encoding types Code Page, UTF-8, UTF-16LE, and UTF-16BE are accepted.

Code Page

Text

When the encoding type selected is Code Page, this setting specifies which code page to apply to the CSV file.

Append DOS end-of-file character (x1A)

Text

This setting instructs the application to add a DOS EOF character to the export file.

Insert page breaks

Text

This field describes where page breaks will be added in the export file. It also has the option to not add page breaks at all. The following options are available:

  • Between first page and between pages
  • Never
  • Between pages only

Automatically Select All Reports

All

This setting instructs the application to automatically include all reports associated with the table in the export file. 

Select report(s)

All

This setting shows all reports contained in the table being exported. Select the checkboxes of the reports you want to add to the export file.

Page Setup

PDF

You can modify the margins, page size, and paper orientation of report exports by clicking the Page Setup button. The default values of these settings are indicated in the Default Table Page Setup tab of the Current Workspace Settings dialog.

Text Encoding

PDF

This setting specifies which type of text encoding to apply to the export file. The accepted text encoding types are Western, Japanese, Simplified Chinese, and Traditional Chinese. To use the default setting, choose Use current system locale.

Require a password to open the document

PDF

Select this option to set a password for the export file. Click the Open Password button to set the desired password.

Restrict access to document contents

PDF

Select this option to manage access to the content of the export file. You can restrict or allow printing, context extraction, editing, and annotation for the export file. To apply any of the restrictions to the export file, you must set a password by clicking the Permissions Password button. 

Encryption Type

PDF

This setting specifies which encryption type to apply to the export file. The following options are available:

  • AES (128-bit): Encrypts the export file with the Advanced Encryption Standard. If you choose this encryption method, Adobe Acrobat 7 or higher must be used to open the export file, as earlier versions of Acrobat do not support AES encryption.
  • RC4 (128-bit): Encrypts the export file with RC4 encryption. Note that this option is not recommended for extremely confidential data. Use the AES option instead.

Automatically Select All Reports

All

This setting instructs the application to include all reports associated with the table in the export file. It is applicable only to report exports.

Select Reports

All

When Automatically Select All Reports is deselected, this setting specifies which of the reports that make up the table should be included in the export file. It is applicable only to report exports.


  1. Click the Export button located at the bottom right of the window to execute the export operation.

  2. When the export operation is completed, the Export Results panel displays.
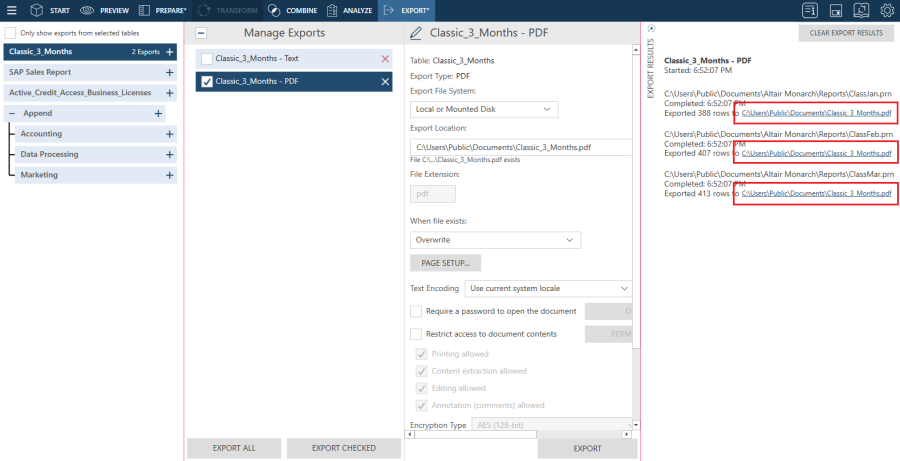
 

  • If the export was completed successfully, an export link will appear. Clicking on this link launches the folder to which you saved the exported summary.

  • You can erase all export results from this panel by clicking on the Clear Export Results button located at the top right-hand corner of the panel.

  • If you have several exports configured and an export validation occurs, for example, the file extension for a specific export does not match the allowed extensions for a certain export type or the file name is too long, the Export All button is disabled and the problematic export is identified by a red border in the Manage Exports panel. The issues related to this export must be resolved before all exports can be executed.

Setting up quick report exports

  1. In the Prepare window, click on the dropdown arrow located to the right of a table you wish to export to display its context menu and then select Quick Report Export from the options that display.

    Alternatively, you can select this table in the Export window, right-click on your mouse and then select Quick Report Export.
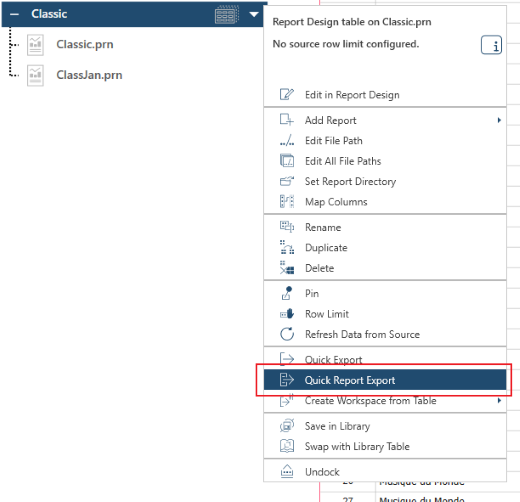
    The Select an Export Type dialog displays.

  2. Choose a file type to which your report should be exported.

    Doing so displays an Export Properties dialog.
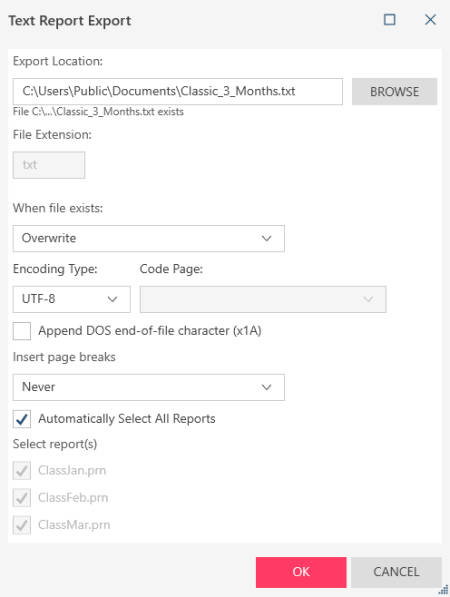
  3. Modify the properties of your export using the table provided above as a guide and then click OK when you are finished.


© 2024 Altair Engineering Inc. All Rights Reserved.

Intellectual Property Rights Notice | Technical Support