The Current Workspace Settings
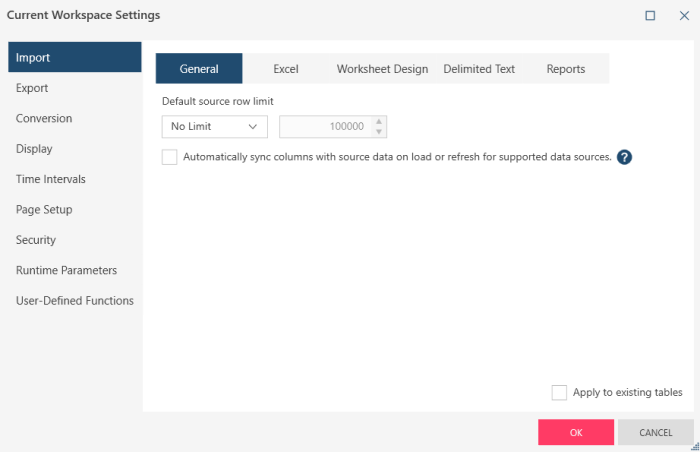
Current Workspace settings allow you to define current workspace-level settings for Data Prep Studio.
Import
GENERAL
GENERAL
|
Setting |
Description |
|
Default source row limit |
Specifies a row limit to enable the partial data loading of excessively large files and improve the application's performance. To do so, use the dropdown provided and select Limit: from the options that display. In the field that appears to the right of this selection, specify a row limit to apply when opening tables. Notes:
|
|
Automatically sync columns with source data on load or refresh data for supported data sources |
Instructs Data Prep Studio to sync columns with the data source when opening a workspace or refresh data for supported data sources (delimited text, Excel). While in this mode, your Change History items may reflect errors if the column they were applied to is renamed or deleted from the source file. The supported data types for this mode are delimited text and Excel. |
|
Apply to existing tables |
Applies the specified settings to all tables in the current workspace. |
EXCEL
|
Setting |
Description |
|
Default sample size when detecting Excel column types |
Specifies how Data Prep Studio should determine the data type of a column in an Excel data source. Take the following example: Column A Row 1 1234 Row 2 4569 Row 3 4568 Row 4 4562 Row 5 4562A If the default sample size is set to 4, Data Prep Studio will scan up to Row 4 and the column datatype will be Numeric. When the table is displayed, Row 5 will be NULL. If the default sample size is set to 5, Data Prep Studio will scan up to Row 5 and the column datatype will be Text. All values from Rows 1-5 are displayed. Select a sample size that ensures Data Prep Studio can make a correct assessment of the data type. At the same time, be mindful that if you select a very large sample size, you sacrifice speed in loading data. |
|
Import all columns as text to avoid potential loss of data during type conversion |
Converts all columns imported from the data source as text regardless of their original type. Note: This option is only available via the Monarch Excel Table import connector. |
|
Apply to existing tables |
Applies the specified settings to all tables in the current workspace. |
WORKSHEET DESIGN
|
Setting |
Description |
|
Utilize unformatted values from Excel for numeric and date columns |
Instructs the application to use unformatted values from Excel cells for various operations, including cell/column type detection, "Is Number" and "Is Date" value rule behaviors, and the output table values for numeric and date columns, when opening a data source in Excel Worksheet Design. |
|
Recursively evaluate formulas |
Instructs the application to calculate dependent cells in a worksheet if this worksheet's cells depend on the cells of other worksheets. Note: This setting may have an important impact on the application's performance, particularly if numerous cells must be calculated. |
|
Apply to existing tables |
Applies the specified settings to all tables in the current workspace. |
DELIMITED TEXT
|
Setting |
Description |
|
Rows to scan for columns |
Specifies a number of rows that must be scanned by Data Prep Studio to determine what data type to assign to a certain column. Note: Setting this number to a very high value may negatively impact the application's load performance depending on the number of rows and columns in your input source. |
|
Formatting |
Specifies the encoding type to apply when loading the table into your workspace. The encoding types enabled for delimited-text files include:
When Code Page is selected as the encoding type, the Code Page dropdown is activated, and you can select the code page to apply to your delimited text file. |
|
Apply to existing tables |
Applies the specified settings to all tables in the current workspace. |
REPORTS
|
Setting |
Description |
|
FORMATTING |
|
|
Encoding |
Specifies the default report file format. The following encoding types are supported by Data Prep Studio:
These options may also be accessed in open files by right-clicking on the report in Report view. |
|
Code page |
Selects the appropriate code page to use with the chosen input file encoding format. This option is only applicable to the ASCII (14 code pages available), ANSI (10 code pages available), and EBCDIC (16 code pages available) encoding systems. These options may also be accessed in open files by right-clicking on the report in Report view. |
|
File Type |
Specifies the file type to use with the EBCDIC encoding option. This option is enabled only when EBCDIC is selected as the encoding type. The available options are:
|
|
Ignore print control characters |
Instructs Data Prep Studio to ignore all print control characters below ASCII 32 except for:
|
|
Ignore additional non-printing and control characters |
Instructs the application to ignore Unicode characters in the report. A number of Unicode characters are known to cause misalignment issues with Report Design's character position-based data capture. These characters include U+008D (reverse line feed), U0080 (padding character), U+200B (zero-width space), and U+FEFF (zero-width no-break space), for example. |
|
Hide n leading characters on each line |
Specifies the number of leading characters to strip from each line of a report. Typical values are 0, 1, and 2. The value can be in the range 0-99. When you download print files from a network, a mini-computer, or a mainframe, one or more extra characters may appear at the beginning of each line. The exact number and type of characters depends on the operating system. These introductory characters are typically used for form feed, carriage return, or line feed printer commands. They are usually not needed in a PC file and may affect the way the file is displayed by Data Prep Studio. A few communications programs are smart enough to either discard unnecessary characters or translate useful characters into the corresponding PC character codes. However, a form feed command is typically the only useful character you may get, and most communications programs are unable to translate it. For example, if you download from an IBM 3090 mainframe computer using an IRMA communications card, each line in the report will be preceded by two non-productive characters. Using this setting, you can strip those characters from the data by entering 2 in the Hide n leading characters box. |
|
PAGE BREAK |
|
|
Ignore the form feed character |
Instructs Data Prep Studio to ignore all form feed (page break) characters in a report. Use this setting to turn off the hard-coded page breaks in a report file and replace them with page breaks based upon a Page Header trap or based upon the Force Page Break After n Lines setting (see below). |
|
Page break on hidden leading text: n |
Instructs the application to hide control characters and force a page break when a specified character is encountered. For some mainframe and mid-range system generated reports, especially from AS/400 systems, a page break could be indicated by a leading control character in the report file. This setting will allows you to hide this character and force a page break instead. Note: This option is not accessible unless you specify a Hide n Leading Characters on Each Line setting. |
|
Force page break after n lines |
Adds a page break to a file at regular intervals. When a value for this setting is specified, Data Prep Studio scans the report for existing page breaks and inserts a virtual page break whenever a real page break has not been encountered before the number of lines specified. |
|
FIELDS |
|
|
Trim leading and trailing spaces from Character and Memo fields |
Instructs the application to remove all leading and trailing spaces from character and memo fields. |
|
TRAP CHARACTERS |
|
|
Trap characters |
Specifies whether to use Monarch Complete's standard trap characters or alternate ones. The Alternate trap characters have been chosen to be compatible with different languages, so that characters that are commonly used in a language are not chosen as wildcard trap characters. For example, in the standard trap character set, the Alpha Trap uses a character which is common in Portuguese, the Numeric Trap uses a character which is common in Spanish, the Blank trap uses a character which is common in German, and the non-blank trap uses a character that is common in Scandinavian languages.
Note: The characters used in the Alternate trap set are all low ANSI, i.e., lower than character code 128, so they will be consistent across all code pages. |
| Non Regex traps are case-sensitive | When enabled, automatically sets all non-regex traps to be case-sensitive. |
|
Apply to existing tables |
Applies the specified settings to all tables in the current workspace. |
XML
|
Setting |
Description |
|
Encoding |
Specifies the encoding type to apply when loading the table into your workspace. The encoding types enabled for delimited-text files include:
When Code Page is selected as the encoding type, the Code Page dropdown is activated, and you can select the code page to apply to your delimited text file. |
| Use simplified column names | When selected, instructs the application to open the XML table using simplified column names as column headers. |
| Allow empty tags as columns |
When selected, this setting instructs the application to allow the import of XML elements with no values as columns. This setting applies for both self-closing (e.g., <Name/>) and conventionally tagged (e.g., <Name></Name>) elements. |
|
Apply to current Workspace |
Applies the specified settings to the relevant tables in the current workspace. Note, however, that visiting Edit Table Info for each related table is necessary to reestablish the schema and see some changes (i.e., use simplified column names, allow empty tags as columns) take effect. |
JSON
|
Setting |
Description |
|
Formatting |
Specifies the encoding type to apply when loading the table into your workspace. The encoding types enabled for delimited-text files include:
When Code Page is selected as the encoding type, the Code Page dropdown is activated, and you can select the code page to apply to your delimited text file. |
| Use simplified column names | When selected, instructs the application to open the JSON table using simplified column names as column headers. |
|
Apply to current Workspace |
Applies the specified settings to the relevant tables in the current workspace. Note, however, that visiting Edit Table Info for each related table is necessary to reestablish the schema and see some changes (i.e., use simplified column names) take effect. |
Export
|
Setting |
Description |
|
EXCEL |
|
|
Apply formatting to XLS and XLSX files (Y/N) |
Directs Data Prep Studio to apply table formatting when exporting to XLS and XLSX files.
|
|
Enable advanced Excel features (Y/N) |
Instructs the application to enable advanced Excel features during export. |
|
DELIMITED TEXT |
|
|
Delimiter |
Specifies the character to use for separating field values when exporting to a delimited text file (comma, tab, semicolon, space, pipe). |
|
Text Qualifier |
Specifies a text qualifier (i.e., where text values begin and end) for CSV files. Select the desired text qualifier from the drop-down (double quote, single quote, none). |
|
Quote column names (Y/N) |
Instructs the application to enclose column names with quotes. |
|
DELIMITED TEXT/XML |
|
|
Legacy compatibility mode - Ignore format customizations during export (Y/N) |
Instructs the application to ignore column format customizations when exporting numeric and date columns in favor of Monarch Classic-style formatting. When using Monarch Classic formatting, numeric values are exported using the current system's localized decimal separator, and date values are exported according to the Date Format setting. |
|
Legacy Compatibility Settings: Date Format |
Specifies the date format when exporting data to a delimited text file. This setting can be configured only when the Delimited Text/XML > Legacy compatibility mode - Ignore format customizations during export setting is enabled. The valid date format options are:
|
|
DELIMITED TEXT/FIXED TEXT/TEXT REPORTS |
|
|
Append DOS end-of-file character (x1A) (Y/N) |
Specifies whether to append a DOS end-of-file character (x1A) to the end of the file. This option is provided to enable compatibility with systems that expect the data in this format. This end-of-file character is often known as Control-z. |
|
Encoding |
Specifies the encoding type to apply when exporting data to a delimited text file. The possible encoding types are:
When Code Page is selected as the encoding type, the Code Page dropdown is activated, and you can select the code page to apply to your delimited text file. |
|
DELIMITED TEXT/FIXED TEXT |
|
|
Include Column Headers (Y/N) |
Instructs the application to include column headers when exporting to the delimited text/fixed text format. |
|
FIXED TEXT |
|
|
Insert a page break after n lines (Y/N) |
Instructs the application to inserts a page break after n lines, which can be specified using the selector provided. |
|
Repeat field names on each page |
Instructs the application to add field names at the beginning of each new page. This setting is enabled only when the Include Column Headers option is selected. |
|
Pad each field with n extra space |
Instructs the application to separate exported fields with n extra spaces when exporting to a fixed text file. With this option cleared, field values might "bump up" against each other producing, for example, "123.45CD" rather than "123.45 CD". |
|
Pad generically formatted numeric fields with zeros, suppress the decimal point, and use trailing negation |
Instructs the application to export generically formatted numeric fields using a standardized format that pads each value with leading zeros, removes the decimal point and places the negation sign at the end of the field value. This format represents the number "-123.45" as "00012345-". Note that padding is applied only to numeric columns with the formats F, F<n>, G, or G<n>. |
|
Default decimal precision when not supplied by column format |
Specifies a fallback value to use when a decimal precision cannot be determined from the format string. Note: The "n" in the format G<n> denotes significant digits, NOT decimal precision. Thus, any G format will use this fallback value. |
|
TEXT REPORTS |
|
|
Insert page breaks in reports |
Instructs the application to insert page breaks at predefined points in multi-page reports.
|
|
|
|
|
Text Encoding |
Specifies the text encoding type for PDF exports. The possible values are:
|
|
MISCELLANEOUS |
|
|
Use summary measure labels as column names during database exports (Y/N) |
Instructs Data Prep Studio to use summary measure labels as column names. When cleared, the underlying field name, instead of the label, is used to name measure columns. |
|
Include field names as the first row when using Ctrl+C to copy the clipboard |
Instructs the application to use column headers as the first row of any table created using the CTRL + C command. |
|
Apply to existing exports |
Applies the specified settings to all exports defined in the current workspace. |
Conversion
|
Setting |
Description |
|
From text to numeric |
Decimal Separator - Specifies the character to use as a decimal separator when converting text into a numeric value. You can select:
|
|
From text to date |
Date Format - Specifies the format of dates used when converting text into a date value. You can select:
First Year of Century - Specifies the first year of the century (100-year range) to use when converting two-digit years into four-digit years. The default value is 50 (i.e., 1950-2049). Extraction Pattern - Specifies the pattern applied to a text string when converted into a date/time value. You can select:
|
|
Apply to existing tables |
Applies the specified settings to all tables in the current workspace. |
Display
|
Setting |
Description |
|
Default Locale |
Sets the global language to be used by the application. When specified, this locale is used to display table cell values on screen. It can also be used to match join keys of differing types. |
| Default Numeric Format |
Specifies the default format to apply to numeric columns until fomatting changes are applied. Clicking the Edit |
|
Default Date Format |
Specifies the default format of date/time columns. When specified, Data Prep Studio applies this format until other formatting changes are applied |
|
Default Fonts |
Specifies the default font and font size to use in tables, reports, and summaries. Dropdowns to select a default font and font size are provided.
|
|
DATA VALUES |
|
|
Suppress zero values |
Suppresses zero values when viewing data. Suppressed zeros are not printed, but are exported as zero values when the Table or Summary data are exported or copied to any format except text. For text export and copy operations, the suppressed zeros are exported as space characters to retain column integrity. Note that Data Prep Studio implements zero suppression based upon the value that is returned to each cell after any rounding has been done on the value. For example, if you set the precision of a cell containing the value 0.004 to two decimal places, the application will round the value to 0.00. Since this value equates to zero, it will be suppressed if zero suppression is turned on. This is not the case in other applications, such as MS-Excel, where the underlying value 0.004 is retained and evaluated against zero. In Excel, the cell would be displayed as 0.00 and would not be suppressed, since its underlying value (0.004) is not equal to zero. |
|
Display nulls as text |
Applies the column type Text to all columns with null values. |
|
Display null values as |
Determines how null values should appear on screen in the Prepare window. You may enter a text string to use when representing null values. In Data Prep Studio, as in most other database applications, a null value represents an unknown value or a value that cannot be calculated. Data Prep Studio returns null values under a variety of situations:
The application exhibits the following behavior when evaluating expressions and calculations that reference one or more null values: Evaluation When a null is used in an evaluation, the expression always evaluates to False. This is the case even when a null is evaluated against another null. The reason is that null is treated as an unknown value (when two unknown values are evaluated against each other, it cannot be said that they are equal). Data Prep Studio's expression engine also does not support the constant NULL, so evaluations like the following one cannot be made: If(Amount=NULL, true result, false result) However, an indirect method of evaluation against null will work in Data Prep Studio. For example, let's say that you want to create a filter in the Table window that removes all records where the Amount field value is null. Let's say that you also know that the Amount field values are never likely to be larger than 1,000,000.00 (one million) or smaller than –1,000,000.00 (negative one million). You could use either of the following filter expressions to remove records whose values are null: Amount>-1000000 Either expression will evaluate to True for all records that contain a valid value in the Amount field, and will evaluate to False for all records that contain a null in the Amount field (since an evaluation against null returns False). Calculation When a null is referenced in a calculated field expression, the result of the expression is null. For example, the expression Amount*0.2 returns the Amount field value divided by 5 for all records where Amount contains a number. For records where Amount contains null, the expression returns null. When one or more null values are included in a measure aggregation, the null values are ignored. This can produce the desired result or an unexpected result, depending upon your point of view. For example, the Average(Amount) calculation returns the average Amount by dividing the sum of the Amount values by the Count (the number of records from which the function drew Amount values). Records for which the Amount value is null are not included in the calculation. A different result is returned by the Ratio(Amount:Count) calculation, as this calculation tallies the Amount values and the Count values in two steps. First, the sum of the Amount values is calculated, then, in isolation, the Count for all records matching the same key field values is determined. Thus, in a Ratio calculation, the Count represents all of the records, including those whose Amount field contains null. |
|
Highlight null cells |
Instructs the application to highlight null (as opposed to, for example, blank) cells in the table/summary |
|
Show whitespace characters |
Instructs the application to show whitespace characters in the table/summary. |
|
DEFAULT ROW HEIGHT |
|
|
Lines in column title row |
Specifies the default height for column titles in the Table and Summary windows. You may set the height from 1-12 lines. Column titles that are too long to fit on a single line will wrap to fit. |
|
Lines in data rows |
Specifies the default height for data rows in the Table and Summary windows. You may set the height from 1-12 lines. Data values that are too long to fit on a single line will wrap to fit. This setting is ignored if Automatically increase row heights to fit multi-line data is enabled. |
|
AUTOMATIC ROW SIZING |
|
|
Automatically increase row heights to fit multi-line data (Y/N) |
Instructs the application to increase row heights automatically to accommodate multi-line data. |
|
DEFAULT COLUMN DISPLAY WIDTH AND ALIGNMENT |
|
|
Display Width |
Specifies the default display width (measured in number of characters) for rows |
|
Text Alignment |
Specifies the default alignment for text, numeric, and date/time fields.
|
|
Numeric Alignment |
|
|
Time Alignment |
|
|
Apply to existing tables, reports, and summaries |
Applies the specified settings to all tables, reports, and summaries in the current workspace. Note: Date columns from report sources will not reflect changes to the Default Date format. To change the format these columns, you must create a format change or modify the field in Report Design. |
 icon displays the Default Numeric Format dialog, from which the default numeric format can be selected.
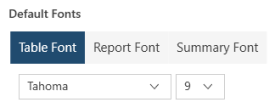
Time Intervals
FISCAL YEAR
|
Setting |
Description |
|
Month-based (12 calendar months starting on a designated month) |
Specifies that the fiscal year consists of 12 calendar months. |
|
First month of the fiscal year |
Selects the month of which the first day begins the new fiscal year. |
|
Week 1 starts on January 1 |
Specifies that the first week of the fiscal year begins on January 1. |
|
Each week starts on a specified weekday |
Defines the start of a fiscal week and the week number of a partial week, if any, at the start of the year. |
|
Week-based (52 or 53 whole weeks) |
Specifies that the fiscal year consists of 52 or 53 whole weeks. You can specify the first day of each fiscal week, a reference month and day, and a rule for year start or end. Select to divide the year into four 13-week quarters, then pick one of the following:
|
|
The year is divided into four 13-week quarters |
Divides the year into four 13-week quarters and allows you to choose a week distribution pattern and quarter and period in which to place the 53rd week if necessary. |
|
The year is divided into thirteen 4-week periods. |
Divides the year into thirteen 4-week periods and allows you to choose a period in which to place the 53rd week if necessary. |
|
Apply to existing tables |
Applies the specified settings to all tables in the current workspace. |
CALENDAR WEEK
|
Setting |
Description |
|
Week 1 starts on January 1. |
Specifies that the first full week of the year starts on the first day of the week on or after January 1.
|
|
Each week starts on a specified weekday |
Specifies that the week begins on a specific weekday and allows you to set a week number for a partial week. |
|
Apply to existing tables |
Applies the specified settings to all tables in the current workspace. |
FORMATTING
|
Setting |
Description |
|
Interval |
Lists the names of the time intervals available.
|
|
Formatting Mask
|
Displays the formatting mask applied to the adjacent interval. To edit the formatting mask, double-click on the desired time interval, or select an interval and press the Edit Formatting Mask button |
|
Sample Value
|
Shows the effect of the formatting masks on today’s date. To change the date that the sample value is based on, adjust the sample date calendar control accordingly. This control is located on the right-hand side of the dialog immediately below the table containing the time intervals. |
|
Description |
Displays a description of each time interval.
|
|
Apply to existing tables |
Applies the specified settings to all tables in the current workspace. |
Page Setup
The following default page setup settings apply to tables, summaries, and reports unless otherwise indicated.
PREFERENCES
|
Setting |
Description |
|
MARGINS |
|
|
Top |
Specifies a value representing the top margin. The default value is .5" or 1 cm, depending on the Windows Control Panel Measurement setting. |
|
Bottom |
Specifies a value representing the bottom margin. The default value is .5" or 1 cm, depending on the Windows Control Panel Measurement setting. |
|
Left |
Specifies a value representing the left margin. The default value is .5" or 1 cm, depending upon the Windows Control Panel Measurement setting. |
|
Right |
Specifies a value representing the right margin. The default value is .5" or 1 cm, depending upon the Windows Control Panel Measurement setting. |
|
OPTIONS |
|
|
Show Grid lines |
Instructs the application to print the grid lines between rows and columns, as displayed on screen. These settings are applicable only to tables and summaries. |
|
Show Column Titles |
Instructs the application to print column titles at the top of each page. These settings are applicable only to tables and summaries. Note that when applied to Excel exports, the export will also contain row numbers. PDF exports will require the additional "Show Row Numbers" to replicate this behavior. |
|
Show Row Numbers |
Instructs the application to print row numbers as displayed on screen. These settings are applicable only to tables and summaries for PDF exports. |
|
Repeat Suppressed Values on New Page |
Instructs the application to ignore the Suppress Duplicate Values setting for all key fields when printing the first line of each page of a summary. This setting is only applicable to summaries for PDF exports. When selected, all key values for the first line on a page are printed, even if they are suppressed in the summary display. |
|
EXPORT PAGINATION |
|
|
Paper Size |
Specifies the desired paper size. |
|
Orientation |
Specifies the desired paper orientation.
|
|
Apply to existing exports/summaries |
Applies the specified settings to all exports/summaries in the current workspace. |
HEADER/FOOTER LAYOUT
Settings for header and footer layouts are only applicable to tables and summaries.
|
Setting |
Description |
|
Page Header display box |
Specifies text to print in headers. A page header may include up to 3 lines, each with text left-aligned, centered, or right-aligned text. Enter text into the boxes provided. You can insert special characters and/or variables by clicking on the left arrow button
|
|
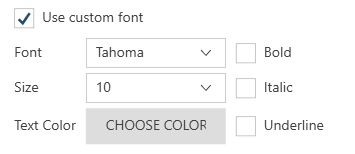
Use custom font |
Specifies font options.
|
|
Apply to existing exports/summaries |
Applies the specified settings to all exports/summaries in the current workspace. |
Security
|
Setting |
Description |
|
Select credentials that should be cleared from saved items |
Specifies what types of credentials should be cleared from saved items, such as workspaces:
|
|
Define connection string parameters that should be cleared from saved items |
Identifies strings that should be considered a sensitive connection parameter when saving details for OLE DB data sources and connectors for which the field Other Connection Options is provided in the connector dialog. When Data Prep Studio saves a connection detail and encounters the specified sensitive connection parameter (e.g., "password"), it "scrubs" (i.e., deletes) the selected string according to the save behavior defined above. Note: Microsoft Jet/ACE drivers use a specific password parameter for connection strings that must be added to the default clearing settings to maintain parity with password clearing in other sources. This parameter is: "Jet OLEDB:Database Password" This parameter will be added to the default parameters in its normalized, lower case form and will appear as: "jet oledb:database password." |
Runtime Parameters
Allows you to define and set values for runtime parameters that can be used by all tables in the current workspace.
Refer to Working with Runtime Parameters for details on defining and using runtime parameters.
Metadata Columns
You can specify the types of metadata to import into your workspace when you open data sources based on delimited text, Microsoft Excel, HTML, JSON, PDF/text report, and XML files.
|
File Type |
Metadata Columns |
| Delimited text |
File created File last modified Source filename |
| Excel |
File created File last modified Source filename Sheet number Sheet name |
| HTML |
File created File last modified Source filename |
| JSON |
File created File last modified Source filename |
| PDF/Text report |
Report column Report file created Report file last modified Report filename Report file number Report line Report page count Report page PDF Producer |
| XML |
File created File last modified Source filename |
When the Apply to <File Type> tables in current Workspace box is enabled, all metadata columns selected for the specified <file type> tables will be imported into the current workspace.
User-Defined Functions
Allows you to add user-defined functions, import them from existing models or workspaces, and manage (i.e., edit, copy, and delete) user-defined functions.
© 2025 Altair Engineering Inc. All Rights Reserved.