Ribbons
The ribbon allows you to quickly access tools and standard functions, and is located along the top of the user interface. Click on an icon to open the related tool. Hovering over a group of icons may reveal additional tools.
- Ribbon Hints
- Ribbon hints are small indicators that appear in the ribbon between a tool’s icon and label. They help identify tools that have multiple pick targets or open a secondary ribbon.
-
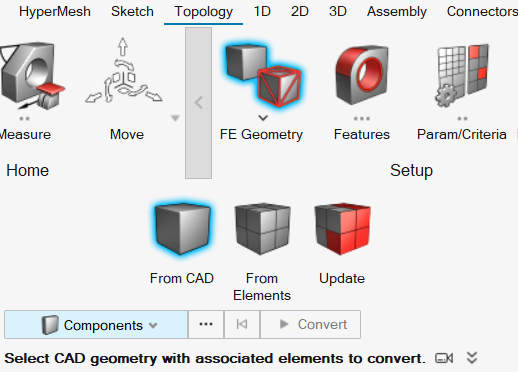
Figure 1. 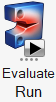
Layout of a Tool Icon
Tool icons can have different states when you hover your mouse over them, allowing you to perform multiple tasks from a single tool icon. The blue highlighted areas are called pick targets. Satellite icons only appear on mouse-over and generally provide access to functions of lesser importance.
Multi-State Tool Icons
- The first image (far left) shows the tool icon in its unselected state
- The second image highlights the piece of paper pick target, which allows you to create a new model
- The third image highlights the folder pick target, which allows you to open an existing model
- The last image (far right) highlights the disk pick target, which allows you to save your work
These tool icons, which allow you to perform multiple tasks, help to streamline the application's interface and provide for a more efficient work flow.
Satellite Tool Icons
In the images above, the Evaluate tool on the left is not moused over. The image on the right shows the mouse-over state and displays a satellite icon. Satellite icons differ from multi-state icons in that the additional tools are not readily visible on a satellite icon. Also, the additional functionality they provide is generally with lesser used tasks.
Hover your mouse cursor over different parts of the tools you use most to discover additional functionality.
Collapse or Expand the Ribbon
Switch between having the ribbon collapsed or expanded.
-
To control this option, do one of the following:
- Go to .
- Double-click a ribbon tab to collapse or expand the ribbon.
The selected mode persists across sessions. For example, if the application is closed while the ribbon is collapsed, it remains collapsed when you relaunch the application.The ribbon is displayed above graphics and browsers and will not cause them to resize.
- To dismiss the ribbon tab's tools/options while in collapse mode, click anywhere in the application.
-
Activating a tool or context while in collapse mode displays the guide bar, secondary toolbar, and workflow help on the left
side of the modeling window, instead of under the active
tool/context.
Figure 5. 
-
If you dismiss the ribbon while the tool/context is still active, the guide bar and workflow help shift up and the secondary toolbar
remains hidden.
Figure 6. 
-
To display the secondary toolbar again, click the ribbon tab.
The guide bar and workflow help shift below the ribbon and the secondary toolbar is displayed.
-
After deactivating collapsed mode and returning to expanded mode, the guide bar, secondary toolbar, and workflow help display below
their respective tool when selected.
Figure 7.