Word Reports#
Some examples require external input files. Before you start, please follow the link in the Example Scripts section to download the zip file with model and result files.
Example 01 - Creating a DOCX with formatted text#
In this example, first the HyperMesh session, the report session, and the document are initilized. Then two texts are added to the document.
The first text is initialized using a Text object and uses a bold and italics font with size 15.
The second text is initilized using a string and afterwards other text and images are added.
In the end, the document is exported and opened.
 1import os
 2import hm
 3import hw
 4
 5import report.hwxdocxtypes as reporting
 6
 7# Initializing session and setting the data directory
 8session=hw.Session()
 9datadir = rf"{hm.altair_home}\demos\report\data"
10
11# Initializing report session
12rep_ses = reporting.ReportSession()
13
14# Create a Document instance
15doc1 = reporting.Document()
16
17# Create a Text instance
18sample1_text = reporting.Text()
19sample1_text.text = (
20    "The following report is about the structural analysis of this part.\n"
21)
22
23# Create a DocText instance containing the content of Text above
24doctext1 = reporting.DocText(text=sample1_text, parent=doc1, name="DocText1_name")
25# Change the fontsize and setting the italics and bold letters
26doctext1.boldFont = True  # Bold
27doctext1.italicFont = True  # Italics
28doctext1.lineBreak = True  # Adding a linebreak after end
29doctext1.fontSize = 15  # Change font size
30
31# Create a DocText instance containing a new string
32doctext2 = reporting.DocText(
33    text="The isoview of the part is:\n", parent=doc1, name="DocText2_name"
34)
35# Addformated text, images, and changing the alingment
36doctext2.addImage(
37    image=os.path.join(datadir, "isoview.png"),
38    lineBreak=True,
39)
40doctext2.addFormatedText(
41    text="The element coordinate system is:",
42    font_color=[255, 0, 0],
43    underline=True,
44    line_break=True,
45)
46doctext2.addImage(
47    image=os.path.join(datadir, "element_coordinate_system.png"),
48    lineBreak=True,
49)
50# Align text in 'center' of document
51doctext2.alignment = "center"
52
53# Export Document to default directory
54errObj, filepath = doc1.saveDocx(
55    name=f"{doc1.name}.docx",
56    open=True,
57)
58
59# If status=0 then document successfully published
60if errObj.status == 0:
61    print("Document is published at", filepath)
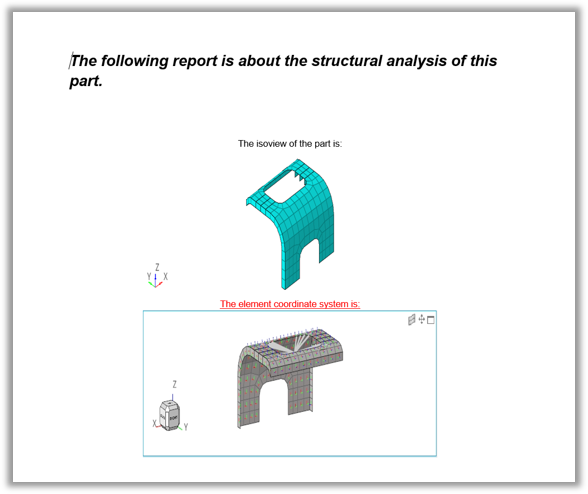
Figure 1. Text inside the document
Example 02 - Creating a DOCX with Images#
In this example, first the HyperMesh session, the report session, and the document are initilized. Then two images are added to the document.
The first image with a caption is initialized using an Image object.
The second image with a caption is initialized using an image path.
In the end, the document is exported and opened.
 1import os
 2import hm
 3import hw
 4
 5import report.hwxdocxtypes as reporting
 6
 7# Initialize session and setting the data directory
 8session=hw.Session()
 9datadir = rf"{hm.altair_home}\demos\report\data"
10
11# Initializing report session
12rep_ses = reporting.ReportSession()
13
14# Create a Document instance
15doc2 = reporting.Document()
16# Create an Image instance
17sample1_image = reporting.Image()
18sample1_image.path = os.path.join(datadir, "frontview.png")
19sample1_image.caption = "Front view of the part."
20
21# Create a DocImage instance containing the content of Image above
22docimage1 = reporting.DocImage(image=sample1_image, parent=doc2, name="DocImage1_name")
23
24# Creating a DocImage instance containing a new image
25docimage2 = reporting.DocImage(
26    image=os.path.join(datadir, "leftsideview.png"), parent=doc2, name="DocImage2_name"
27)
28# Add caption
29docimage2.caption = "Left side view of the part."
30
31# Export Document to default directory
32errObj, filepath = doc2.saveDocx(
33    name=f"{doc2.name}.docx",
34    open=True,
35)
36
37# If status=0 then document successfully published
38if errObj.status == 0:
39    print("Document is published at", filepath)
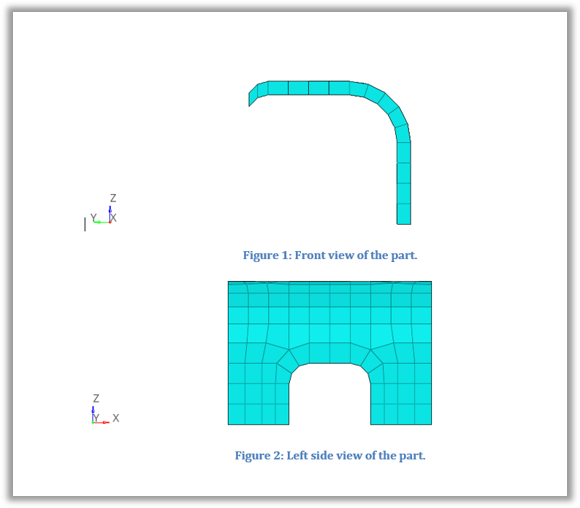
Figure 2. Images inside the document
Example 03 - Creating a DOCX with Tables#
In this example, first the HyperMesh session, the report session, and the document are initilized. Then two tables are added to the document.
The first table with a caption is initialized using a Table object.
The second table with a caption is initialized using a csv path.
In the end, the template is set and the document is exported and opened.
 1import os
 2import hm
 3import hw
 4
 5import report.hwxdocxtypes as reporting
 6
 7# Initialize session and setting the data directory
 8session = hw.Session()
 9datadir = rf"{hm.altair_home}\demos\report\data"
10
11# Initializing report session
12rep_ses = reporting.ReportSession()
13
14# Create a Document instance
15doc3 = reporting.Document()
16
17# Create a Table
18tab1 = reporting.Table("Table1")
19tab1.csvFile = os.path.join(datadir, "model_statistics.csv")
20tab1.caption = "Entire Model Statistics Summary."
21
22# Create a DocTable instance containing the content of Table above
23doctable1 = reporting.DocTable(table=tab1, parent=doc3, name="DocTable1_name")
24
25# Create a DocTable instance containing a new table
26doctable2 = reporting.DocTable(
27    table=os.path.join(datadir, "model_mass.csv"), parent=doc3, name="DocTable2_name"
28)
29doctable2.caption = "Model Mass Statistics Summary."
30
31# Export Document to default directory and set template
32doc3.template = f"{hm.altair_home}/hwx/scripts/python/report/io/document/templates/wordTemplate.docx"
33errObj, filepath = doc3.saveDocx(
34    name=f"{doc3.name}.docx",
35    open=True,
36)
37
38# If status=0 then document successfully published
39if errObj.status == 0:
40    print("Document is published at", filepath)
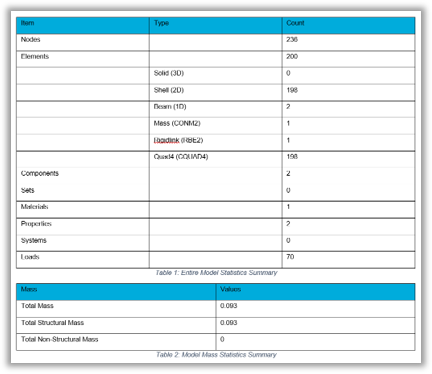
Figure 3. Tables inside the document
Example 04 - Create a DOCX with multiple chapters#
To run this example the Example 01, Example 02, Example 03 need to be run first, after removing the rep_ses = reporting.ReportSession() line from Example 02, Example 03.
First, the document is initilized. Then three chapters and two subchapters are added to the document.
The assingment of chapters to Document or other Chapter objects is done using the parent attribute.
In the end, the template is set and the document is exported and opened.
 1"""
 2By using the instances from the 3 previous examples in serial execution from 1 to 3.
 3
 4Please do not forget to remove the line "rep_ses = reporting.ReportSession()" from **Example 02, Example 03**.
 5"""
 6
 7doc4 = reporting.Document()
 8
 9# Create Chapters
10chap1 = reporting.Chapter(name="Introduction", parent=doc4)
11
12chap2 = reporting.Chapter(name="FrontView", parent=doc4)
13
14chap3 = reporting.Chapter(name="Model Summary", parent=doc4)
15
16chap31 = reporting.Chapter(name="Model Summary Table", parent=chap3)
17
18chap32 = reporting.Chapter(name="Model Mass Table", parent=chap3)
19
20# Moving content to chapters using parent attribute
21print(doctext1.parent)  # Current parent of DocText 1
22doctext1.parent = chap1
23docimage1.parent = chap2
24doctable1.parent = chap31
25doctable2.parent = chap32
26
27# Export Document to default directory and set template
28doc4.template = f"{hm.altair_home}/hwx/scripts/python/report/io/document/templates/wordTemplate.docx"
29errObj, filepath = doc4.saveDocx(
30    name=f"{doc4.name}.docx",
31    open=True,
32)
33
34# If status=0 then document successfully published
35if errObj.status == 0:
36    print("Document is published at", filepath)
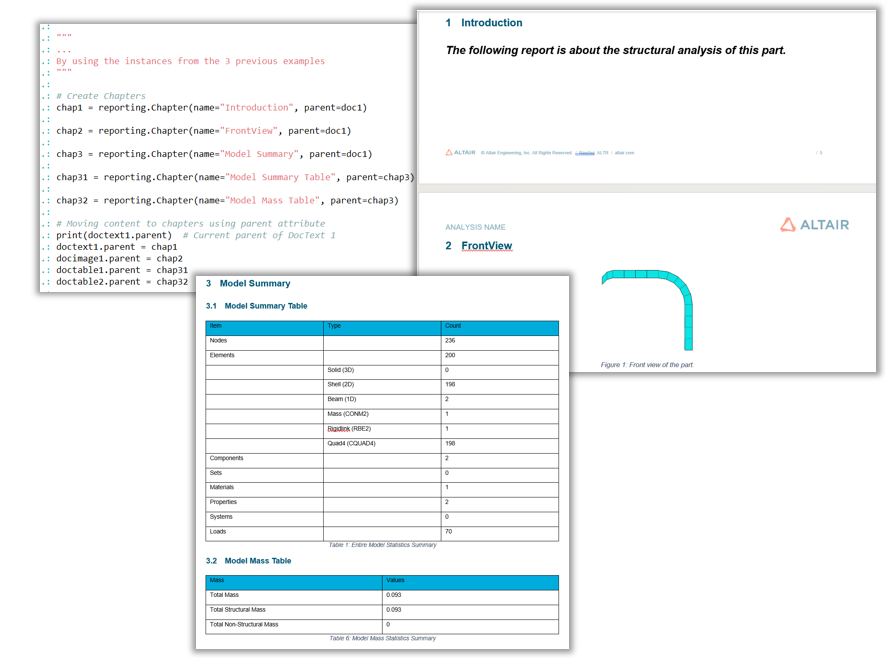
Figure 4. Multiple chapters inside the document
Example 05 - Copying & Pasting from one place in the document to another#
To run this example the Example 01, Example 02, Example 03, Example 04 need to be run first, after removing the rep_ses = reporting.ReportSession() line from Example 02, Example 03.
First, the document is initilized. Then a list is obtained containing the tables (DocTable objects) inside the document in all levels (from all chapters, subchapters). Tese tables are pasted to chapter 1 which was defined in Example 04.
In the end, the template is set and the document is exported and opened.
 1"""
 2By using the instances from the 4 previous examples in serial execution from 1 to 4.
 3
 4Please do not forget to remove the line "rep_ses = reporting.ReportSession()" from **Example 02, Example 03**.
 5"""
 6
 7# List of all DocText objects from Chapter "Model Summary"
 8chapt3List=chap3.getChildren(type=[reporting.DocTable], childrenLevel="all")
 9
10# Copy & Paste from Chapter "Model Summary" to Chapter "Introduction"
11rep_ses.paste(chapt3List,chap1)
12
13# Export Document to default directory and set template
14doc4.template = f"{hm.altair_home}/hwx/scripts/python/report/io/document/templates/wordTemplate.docx"
15errObj, filepath = doc4.saveDocx(
16    name=f"{doc4.name}.docx",
17    open=True,
18    newname=True,
19)
20
21# If status=0 then document successfully published
22if errObj.status == 0:
23    print("Document is published at", filepath)
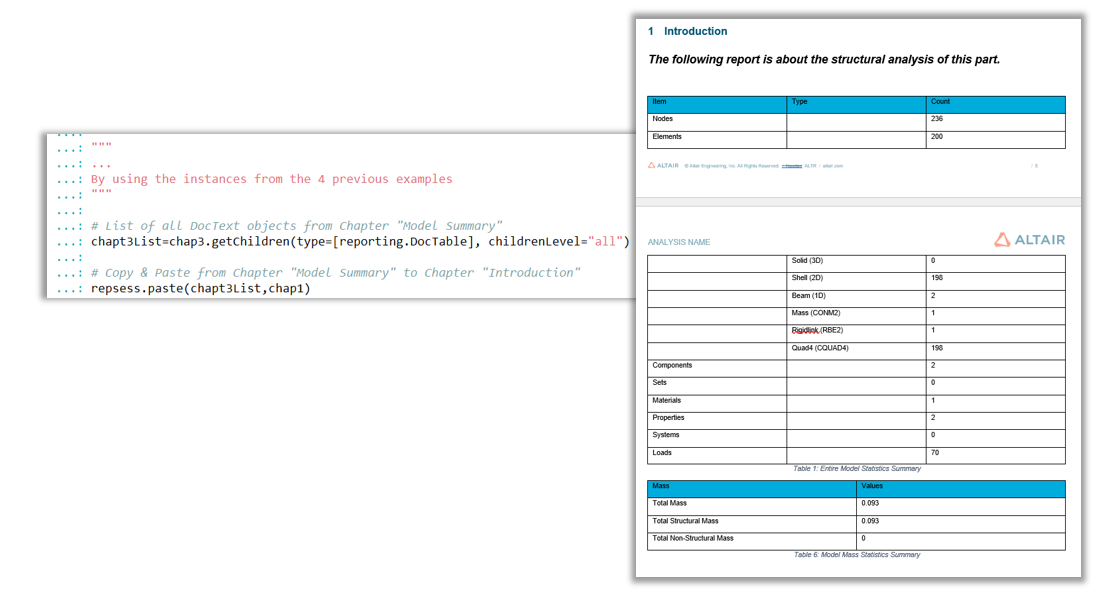
Figure 5. Listing Document classes and copying & pasting content inside the document
Example 06 - Creating a complete report in a DOCX#
First, preliminary steps are performed to collect the data for the report. In HyperMesh client a model and results are loaded and entities of HyperMesh post classes such as PlotcontrolContour and PlotcontrolTensor are created to capture the plots of interest with CaptureImageTool.
Then the report session and the document are initilized. Finally, chapters, text, tables and images are added based on collected data from the model.
In the end, the template is set and the document is exported to the ../Export directory and opened.
  1import hw
  2import os
  3import report.hwxdocxtypes as reporting
  4
  5
  6# Preleminaries for the demo (loading a file, results, creating some contours and tensor plot and capture them)
  7scriptdir = os.path.dirname(os.path.abspath(__file__))
  8hmFile = os.path.join(scriptdir, "aerobox", "aerobox.fem")
  9resFile = os.path.join(scriptdir, "aerobox", "aerobox-LC1-2.op2")
 10
 11import hm
 12import hm.entities as ent
 13
 14sess = hw.Session()
 15win1 = sess.get(tag=hw.Window, id=1, page=1)
 16win1.type='fepre'
 17
 18model = hm.Model()
 19if not win1.isEmpty():
 20    model.hm_answernext("yes")
 21    model.deletemodel()
 22
 23model.start_batch_import(mode=2)
 24model.feinputwithdata2(
 25    import_reader="#optistruct/optistruct",
 26    filename=hmFile,
 27    overwrite_flag=0,
 28    reserved1=0,
 29    cleanup_tolerance=0,
 30    blanked_component=0,
 31    offset_flag=0,
 32    string_array=[
 33        "OptiStruct ",
 34        " ",
 35        "CREATE_ONE_COMP_ACROSS_INCLUDES ",
 36        "ASSIGNPROP_BYHMCOMMENTS ",
 37        "CREATE_PART_HIERARCHY",
 38        "IMPORT_MATERIAL_METADATA",
 39        "ENGINEERINGENTITIES ",
 40        "ANSA ",
 41        "PATRAN ",
 42        "EXPAND_IDS_FOR_FORMULA_SETS ",
 43        "CONTACTSURF_DISPLAY_SKIP ",
 44        "LOADCOLS_DISPLAY_SKIP ",
 45        "SYSTCOLS_DISPLAY_SKIP ",
 46        "VECTORCOLS_DISPLAY_SKIP ",
 47    ],
 48    scale_factor=1.0,
 49    name_comps_by_layer=0,
 50)
 51model.end_batch_import()
 52loadcolSet = hm.CollectionSet(model)
 53loadcolSet.set(hm.Collection(model, ent.Loadcol))
 54model.hideentitybymark(collection_set=loadcolSet)
 55
 56res = ent.Result(model)
 57res.resultfiles = [f"{resFile}"]
 58res.init = 1
 59
 60model.rotateabout(overridedefault=1, x=756.703568, y=2926.22443, z=1708.34003)
 61model.viewset(
 62    0.992622267,
 63    0.0320712525,
 64    0.116929341,
 65    0,
 66    -0.0183647278,
 67    0.993024857,
 68    -0.116466176,
 69    0,
 70    -0.119848958,
 71    0.113459544,
 72    0.986287564,
 73    0,
 74    74.2850936,
 75    -2768.32299,
 76    1974.16452,
 77    1,
 78    -481.944534,
 79    -1388.37276,
 80    1615.79217,
 81    2099.54578,
 82)
 83model.window(0, 0, 0, 0, 0)
 84
 85plotc1 = ent.PlotcontrolContour(model, name="contour1", datatype="Stress", layer="Z1")
 86plotc1.plot = True
 87capture = hw.CaptureImageTool()
 88capture.type = "png"
 89capture.width = 1200
 90capture.height = 800
 91capture.file = os.path.join(scriptdir, "aerobox", "loadcase_1.png")
 92capture.capture()
 93
 94model.window(function=2, xmin=10, ymin=2, xmax=10, ymax=2)
 95plotten1 = ent.PlotcontrolTensor(model, name="tensor1", datatype="Stress", layer="Z1")
 96plotten1.plot = True
 97plotten1.txx = True
 98plotten1.tyy = True
 99plotten1.tzz = True
100plotten1.txy = True
101plotten1.tyz = True
102plotten1.tzx = True
103
104
105capture = hw.CaptureImageTool()
106capture.type = "png"
107capture.width = 1200
108capture.height = 800
109capture.file = os.path.join(scriptdir, "aerobox", "loadcase_1_tensor.png")
110capture.capture()
111
112
113model.window(0, 0, 0, 0, 0)
114plotten1.plot = False
115model.setsimulationstep(subcase_id=2, simulation_id=2)
116capture = hw.CaptureImageTool()
117capture.type = "png"
118capture.width = 1200
119capture.height = 800
120capture.file = os.path.join(scriptdir, "aerobox", "loadcase_2.png")
121capture.capture()
122
123
124# Creating a report session object if needed
125rep_ses = reporting.ReportSession()
126
127# Creating Documents in the current session
128doc1 = reporting.Document()
129
130# Creating 'Loadcase1' at 'Aerobox' chapter
131chap1 = reporting.Chapter(name="Aerobox", parent=doc1)
132chap11 = reporting.Chapter(name="Loadcase1", parent=chap1)
133
134
135loadc1_text = reporting.Text()
136loadc1_text.text = "This is the Von Mises Stresses for the 1st loadcase\n"
137
138# Create DocText and DocImage for chapter "Loadcase1"
139doctext1 = reporting.DocText(text=loadc1_text, parent=chap11, name="DocText11_name")
140docimage1 = reporting.DocImage(
141    image=os.path.join(scriptdir, "aerobox", "loadcase_1.png"),
142    parent=chap11,
143    name="DocImage_11_Name",
144)
145docimage1.caption = "Results_1"  # DocImage caption
146doctext1.underline = True  # Underline
147doctext1.boldFont = True  # Bold
148doctext1.italicFont = True  # Italics
149doctext1.lineBreak = True  # Break after line
150doctext1.fontColor = [255, 0, 0]  # red color in text
151doctext1.fontSize = 15  # Change font size
152doctext1.fontName = "Calibri"  # Change font
153
154
155# Create DocText for "Loadcase1" and add nested text and image
156doctext2 = reporting.DocText(
157    text="The Von Mises stresses as tensor\n",
158    parent=chap11,
159    name="DocText11_extra_name",
160)
161doctext2.addFormatedText(text="Look at the figure below:", line_break=True)
162doctext2.addImage(
163    image=os.path.join(scriptdir, "aerobox", "loadcase_1_tensor.png"),
164    lineBreak=True,
165)
166doctext2.alignment = "center"  # Align text
167
168
169# Creating 'Loadcase2' at 'Aerobox' chapter
170chap12 = reporting.Chapter(name="Loadcase2", parent=chap1)
171loadc2_text = reporting.Text()
172loadc2_text.text = "This is the Von Mises Stresses for the 2nd loadcase\n"
173doctext3 = reporting.DocText(text=loadc2_text.text, parent=chap12, name="DocText12_name")
174docimage3 = reporting.DocImage(
175    image=os.path.join(scriptdir, "aerobox", "loadcase_2.png"),
176    parent=chap12,
177    name="DocImage_12_Name",
178)
179docimage3.caption = "Results_2"
180
181# Creating 'Table_chapter' chapter and insert a DocTable
182chap2 = reporting.Chapter(name="Table_chapter", parent=doc1)
183doctable = reporting.DocTable(
184    table=os.path.join(
185        rf"{hm.altair_home}\demos\report\data", "model_statistics.csv"
186    ),
187    parent=chap2,
188    name="DocTable_name",
189)
190doctable.caption = "Table with Data"
191
192# Paste all DocImages of 'Aerobox' to 'Table_chapter'
193rep_ses.paste(chap1.getChildren(type=[reporting.DocImage], childrenLevel="all"), chap2)
194
195# Set a template and export
196doc1.template = f"{hm.altair_home}/hwx/scripts/python/report/io/document/templates/wordTemplate.docx"
197errObj, filepath = doc1.saveDocx(
198    os.path.join(scriptdir, "..", "Export", f"{doc1.name}.docx"),
199    open=True,
200    indexpages=True,
201)
202
203# If status=0 then document successfully published
204if errObj.status == 0:
205    print("Document is published at", filepath)
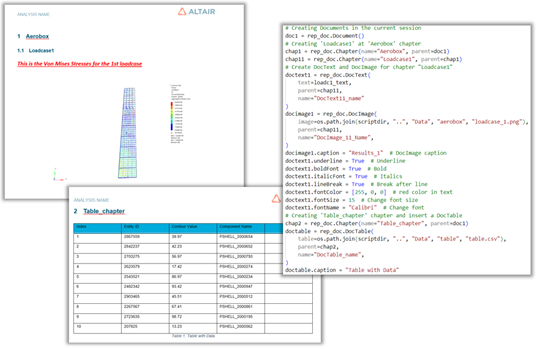
Figure 6. Output of a complete example with Report APIs
Example 07 - Accessing and modifying a table cell#
After initializing the report session and the document, tables are assigned to the document. A cell object is obtained from each table using the cell method. For each cell, some properties and values are modified.
In the end, the document is exported and opened.
 1import hm
 2import os
 3import report.hwxdocxtypes as reporting
 4
 5scriptdir = os.path.dirname(os.path.abspath(__file__))
 6datadir = rf"{hm.altair_home}\demos\report\data"
 7
 8# Initializing session and setting the data directory
 9rep_ses = reporting.ReportSession()
10
11# Creating Documents in the current session
12doc1 = reporting.Document()
13
14# Creating Chapters in the current session and DocTables
15chap1 = reporting.Chapter(name="Chap1", parent=doc1)
16
17t1 = reporting.Table()
18t1.csvFile = os.path.join(datadir, "component_mass.csv")
19doctable_00 = reporting.DocTable(name="DocTable_00", parent=chap1, table=t1)
20doctable_01 = reporting.DocTable(
21    name="DocTable_01", parent=chap1, table=os.path.join(datadir, "model_mass.csv")
22)
23t1.caption = "Table_1"
24doctable_01.caption = "Table_2"
25t1cell = t1.cell(1, 1)  # Accessing the cell, from Table object
26doctableCell = doctable_01.cell(1, 1)  # Accessing the cell, from DocTable object
27doctableCell2 = doctable_01.cell(1, 1)  # Accessing the cell, from DocTable object
28t1cell.backgroundColor = [255, 255, 0]  # Background color
29t1cell.horizontalAlignment = "center"  # Horizontal Alignment
30t1cell.verticalAlignment = "center"  # Vertical Alignment
31t1cell.fontName = "Times New Roman"  # Font type
32t1cell.fontSize = 14  # Font Size
33t1cell.boldFont = True  # Bold
34t1cell.italicFont = True  # Italics
35t1cell.underline = True  # UnderLine
36t1cell.textColor = [255, 0, 0]  # Text color
37print(f"Cell row: {t1cell.getRowIndex()}")  # Getting the row index of the cell
38print(f"Cell column: {t1cell.getColumnIndex()}")  # Getting the column index of the cell
39print(f"Doc Table cell value: {doctableCell.getValue()}")
40
41# Setting text value in the cell and attributes
42doctableCell.setValue(text="random_text")  # Set Value text in the cell
43doctableCell.setAttributes(textColor=[255, 55, 0], backgroundColor=[255, 255, 0])
44
45# Setting image value in the cell and attributes
46doctableCell2.setValue(
47    imagepath=os.path.join(datadir, "2d_mesh.png"),
48    hyperlink="https://altair.com/hypermesh/",
49)
50
51# Export
52errObj, filepath = doc1.saveDocx(
53    os.path.join(scriptdir, f"{doc1.name}.docx"),
54    open=True,
55)
56
57# If status=0 then document successfully published
58if errObj.status == 0:
59    print("Document is published at", filepath)
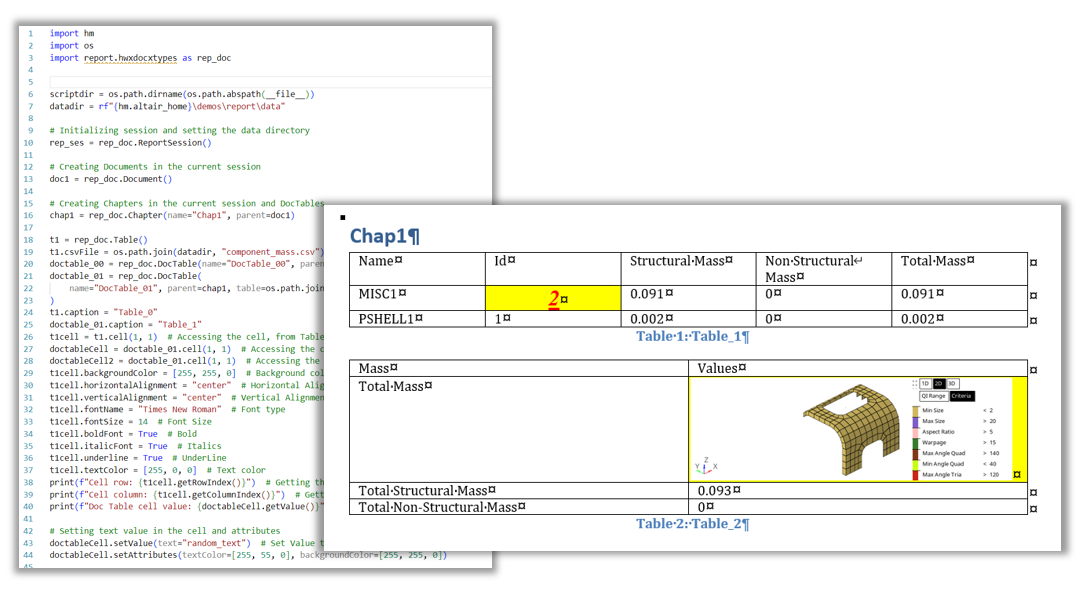
Figure 7. Output of cell manipulation inside a report