
VOV Security Infrastructure
VOV Security Keys
The VOV system supports a public/secret key pair-based security and authentication mechanism called VOV Security Keys. VOV security key authentication is the preferred authentication mechanism for REST and is also the basis for highly secure connections between Accelerator and the Event port on Monitor when RDS resource management is activated.
- You create a public/private key pair.
- You use some other authentication means to connect to the server, and tell the server to trust your public key and associate it with your identity.
- You use your private key as part of an authentication "handshake" with the server, and it verifies your identity using your matching public key.
It’s important to remember that you do not need a new public/private key pair for each queue where you intend to use key based authentication. You can create one key pair and set up the public half of your key on all the vovservers you wish to authenticate against.
VOV security keys in no way replace the security rules and policies enforced by security.tcl or Access Control Lists. The keys are only a means to authenticate the user, after which Security Levels and Access Control Lists still come into play.
Create a Public/Private Key Pair
- Method 1 - Using the VOV CLI
- If the host where the REST client will execute has access to the VOV
software installation, you can use these VOV CLI commands:
% vovproject enable PROJECT % vovsecurity keygen - Method 2 - Using the Browser
- If the client host does not have access to the VOV command line interface on the same local network where the vovserver is running, then this method will work.
- Method 3 - Using Curl
- This is equivalent to the prior method, but using the Linux curl command to
access the target
URL:
% curl -k -X GET <VOV_URL>/api/v3/apikeys/newkey | jq '.rows[0]'
Register Your Public Key on a vovserver Instance
- Method 1 - Using the VOV CLI
- If you have access to a host on the LAN where the vovserver is running and
the VOV CLI commands, the CLI key registration method is convenient.
Normally the public VOV security key is stored in
$HOME/.vov/userkey, and the vovsecurity
getkey command simply reads the public key. The
vovsecurity addkey command will prompt for this
user’s password to authenticate the registration request, which is
implemented behind the scenes as an authenticated REST
request.
% vovproject enable PROJECT % pubkey=$(vovsecurity getkey) % vovsecurity addkey -kv $pubkey -kd "My Cool Key" Enter your password for connecting to PROJECT on HOST: ************* - Method 2 - Using the VOV REST API Interactive Web UI Page
- The VOV project’s web UI provides a means to register a user’s public key at
vovserver. To register a public key, follow this procedure:
- Browse to the VOV REST API Interactive Web UI Page at <VOV_URL>/ html/vovrest.html
- Login with the user name that corresponds to the public key being registered.
- Scroll down to the apikeys topic and click on the POST button beside the /apikeys Add Key line.
- Click Try it Out on the right side of the page.
- Edit the Request Body JSON to add your public key for the “value” keyword, and to add a description string for the “description” keyword.
- Click Execute.
-
Figure 1. 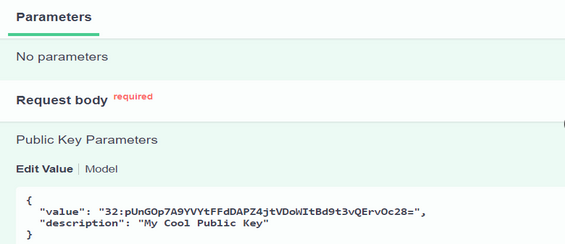
Listing Your Public Keys on a vovserver Instance
- Method 1 - Using the VOV CLI
- You can list the public keys that have already been registered on a
vovserver instance, using the following command in an enabled
shell:
% vovsecurity listkeys user1 32:Ihq6djlx5L9XQzRWRWy0Z2hl5fD64JhJoqa7FpDmiyg= Backup key user1 32:+fmR1SmWValRspQjcLQ7OGX266MZj/m90B5fii3FMTY= 2nd key user1 32:wlefJq4QjTm2QgtWTUtD7kG11nCyUtrKfobW/HPfoD0= 3rd Key - Method 2 - Using the VOV REST API Interactive Web UI Page
- The VOV project’s web UI provides a means to list a user's registered public
keys Follow these steps:
- Browse to the VOV REST API Interactive Web UI Page at <VOV_URL>/ html/vovrest.html
- Login with the user name that corresponds to the public key being registered.
- Scroll down to the apikeys topic and click on the GET button beside the /apikeys List Key line.
- Click Try it Out on the right side of the page.
- Click Execute.
- Scroll down to the Response Body sub-window and view the JSON description of the list of registered public keys.
Using Key Based Authentication from a Python-Based REST Client
REST client authentication is typically done through VOV security keys that are generated and properly registered with a vovserver instance and stored in a local file on the client. The key based authentication is handled automatically inside the submitRequest() Python REST member function described below.
- The vovserver webport must be non-zero (this is true by default).
- The vovserver webprovider must be set to “internal” (this is the default value).
- The ssl.enable configuration parameter should be set to 1 (this is the default value)
- A VOV security key pair should be generated and stored on the client host in
a file (normally ~/.vov/userkey), in the following
format. This can be done using the vovsecurity keygen
command or the REST program shown in Create a Public/Private Key Pair above.
% cat ~/.vov/userkey secret-key = 32:WUhyiwOUBYqonfVR66fNVnHd6sfK9QbK257A8jheYfc= public-key = 32:NIqRzIOhv0r7GZFTPkL0nQLZX6U6UTihleHhFwlVqnQ= - Key pairs must be registered with a vovserver via the vovsecurity
addkey command or the REST program shown in Register Your Public Key on a vovserver Instance
above.The simplest way to program a REST request using key-based authentication is to pass the two required arguments to the submitRequest() method function for the VOVRestV3 class in the vov_rest_v3.py module that is included in $VOVDIR. Before running this Python program, perform the following setup from an enabled shell:
% export VOV_URL=$(vovbrowser)
% cp $VOVDIR/scripts/python/vov_rest_v3.py .
This Python program can be run with Python version 3 or higher. The submitRequest() function will automatically take care of these prerequisite actions before issuing a REST request:- Retrieve the server public key
- If the first REST call, or if the underlying REST access token is expired, then the user will be authenticated using the secret VOV key from ~/.vov/userkey. If the secret VOV key is stored in a different file, then add the keyword parameter authKeyFile=filename to the argument list in the submitRequest() function call.
#
# easy_REST_key_101.py
#
import os, sys, vov_rest_v3
url = os.environ['VOV_URL']
vrest = vov_rest_v3.VOVRestV3()
r = vrest.submitRequest("GET", url + "/api/v3/project/1/project")
print (r)
The following example shows an alternative to the above. It explicitly authenticates using the authorizeWithKey() method function prior to calling submitRequest(). This allows one user impersonate another user whose secret key is known. It also allows explicit passing of the secret key as an argument instead of passing the name of a local file containing the key.
- Set VOV_URL and copy vov_rest_v3.py
locally:
% export VOV_URL=$(vovbrowser) % cp $VOVDIR/scripts/python/vov_rest_v3.py . - Set the MY_SECRET_KEY environment variable to the user secret VOV security key (normally viewed in ~/.vov/userkey)
- Set the VOV_SERVER_PUBLIC_KEY environment variable to the value of the
server public key that is assigned to a VOV project at creation time. There
are three ways to do
this:
# Method 1
Browse to URL   <VOV_URL>/api/v3/apikeys/serverkey

# Method 2
% curl -k -X GET   <VOV_URL>/api/v3/apikeys/serverkey | jq '.rows[0][0]'

# Method 3
% vovproject enable PROJECT
% vovsecurity getserverkey
authorizeWithKey()method function
to authenticate, followed by the submitRequest() function to issue
the REST request. This might be convenient if multiple key pairs are registered with
the vovserver for this user, and the desired key pair is not currently present in
~/.vov/userkey.#
# explicit_REST_key_101.py
#
import os, sys
import vov_rest_v3
url = os.environ['VOV_URL']
secret_key = os.environ['MY_SECRET_KEY']
sp_key = os.environ['VOV_SERVER_PUBLIC_KEY']
user = os.environ['USER']
vrest = vov_rest_v3.VOVRestV3()
vrest.authorizeWithKey(url, secret_key, sp_key, username=user)
r = vrest.submitRequest("GET", url + "/api/v3/project/1/project")
print (r)Advanced Key Handling
The REST client will use the libsodium library to construct an encryption message
which is a combination of the user’s private key and vovserver’s public key, which
will be sent to REST at the endpoint /api/v3/token with
grant_type set to apikey and
apikey set to the contents of the encrypted message.
If you wish to handle REST sessions yourself, look inside
vov_rest_v3.py at the
_getEncryptedMessage() procedure to see how the authentication
handshake message is composed using the user’s private key and the vovserver’s
public key. In _getEncryptedMessage(), you can see how it decodes
the two key strings into raw bytes, creates an PyNaCl Box object using the two keys,
and then encrypts the message by calling Box.encrypt(). The
encrypted message is then base-64 encoded and returned as a string that the
vovserver REST API can understand.
def _getEncryptedMessage(self, userseckey, serverpubkey, message=None):
    """Generated an encrypted message block using the caller's secret key and the server's public key.

    :type userseckey string
    :param userseckey User's secret key.  It should be in base64 format with the binary length prepended,
                      and a colon separating the length and the base64 string.

    :type serverpubkey string
    :param serverpubkey vovserver's public key.  It should be in base64 format with the binary length prepended,
                      and a colon separating the length and the base64 string.
                      This can be retrieved from $VOVDIR/local/registry/ as the 'CLIENT_PUBKEY' entry.

    :type message string
    :param message The message to encode.  Optional. If None, a generic default message is used. It doesn't
                   effect the key authentication process in any way.

    :rtype: string
    :return: A string containing a base64 encoded, then url-encoded buffer.
    """
    idx = userseckey.find(':')
    if idx == -1:
        return ""
    buflen = int(userseckey[:idx])
    userseckey = userseckey[idx + 1:]
    seckeybuf = base64.b64decode(userseckey)
    seckeybuf = seckeybuf[:buflen]

    idx = serverpubkey.find(':')
    if idx == -1:
        return ""
    buflen = int(serverpubkey[:idx])
    serverpubkey = serverpubkey[idx + 1:]
    pubkeybuf = base64.b64decode(serverpubkey)
    pubkeybuf = pubkeybuf[:buflen]

    if message is None:
        message = 'VOV API Key Client Auth ' + str(time.time())
    messageBuf = message.encode("utf-8")
    secretKey = PrivateKey(seckeybuf)
    publicKey = PublicKey(pubkeybuf)

    box = Box(secretKey, publicKey)
    cipher = box.encrypt(plaintext=messageBuf)
    cipherLen = len(cipher)
    encodedCipher = base64.b64encode(cipher)
    cipherStr = str(cipherLen) + ':' + encodedCipher.decode("utf-8")
    return cipherStr
_getEncryptedMessage() procedure
above:url = 'https://hostname:9100/api/v3/token'
clientSecret = ''
postData = {}
postData["grant_type"] = "apikey"
postData["client_id"] = "Python client"
postData["client_secret"] = clientSecret
postData["username"] = “myusername”
postData["apikey"] = self._getEncryptedMessage(userseckey, serverpubkey)
session = requests.Session()
response_obj = session.post(url, timeout=self.connectionTimeout, verify=False,
data=postData)
respContent = response_obj.text
respStatus = response_obj.status_code
if (respStatus == 200):
contentJSON = json.loads(respContent)
if ("access_token" in contentJSON):
sToken = contentJSON['access_token']
Once you have the session token, you can use it for subsequent REST API requests, similar to previous REST examples which used username/password authentication to get the session token.
Deleting A Key from vovserver
vovsecurity delkey -kv 32:jA0iq1mLbdSuuDKjlPeEoHJX+fYqR/0HxpI5nhgThE8=> vovsecurity listkeys -a
user1 32:jA0iq1mLbdSuuDKjlPeEoHJX+fYqR/0HxpI5nhgThE8= Primary Key
user2 32:Ihq6djlx5L9XQzRWRWy0Z2hl5fD64JhJoqa7FpDmiyg= Primary Key
user2 32:+fmR1SmWValRspQjcLQ7OGX266MZj/m90B5fii3FMTY= 2nd key
user2 32:wlefJq4QjTm2QgtWTUtD7kG11nCyUtrKfobW/HPfoD0= 3rd Key
> vovsecurity delkey -kv 32:jA0iq1mLbdSuuDKjlPeEoHJX+fYqR/0HxpI5nhgThE8= -u user1
vovsecurity
This program provides security key pair management functions for VOV.
  vovsecurity : Usage Message

    vovsecurity ACTION {OPTIONS}

vovsecurity - security and key related management commands:
    This program provides security key management functions for VOV.

    ACTIONS:
      keygen       Generate a new VOV security key pair and store them in
                   ~/.vov/userkey
      getkey       Read your VOV public key from ~/.vov/userkey and print to
                   stdout
      getserverkey Show the VOV server public key
      addkey       Add a user's public key to vovserver
      delkey       Delete user key from vovserver
      listkeys     List user's public keys currently registered on vovserver
      gettoken     Get a token for a given security level and duration
    OPTIONS:
      -f <filename>
                   Filename to read or write for API keys.
                   The default is ~/.vov/userkey
      -kv <keyval> Value of public key to add or delete
      -kd <keydes> Human readable description of key being added
      -sl <securitylevel>
                   Security level for token
      -du <duration>
                   Duration for token
      -y           Don't prompt when overwriting existing file
      -v           Enable verbosity
      -a           List public keys for all users. Only valid for admins
      -stdout      Print key to stdout
      -u <username>
                   Specify user whose key you wish to delete. Only valid for
                   admins
      -h           Show brief usage

EXAMPLES:
    % vovsecurity keygen
    % vovsecurity keygen -f keyfile.txt -y
    % vovsecurity getkey
    % vovsecurity getserverkey
    % vovsecurity addkey
    % vovsecurity addkey -kv KEYVAL -kd 'My New Key'
    % vovsecurity delkey -kv KEYVAL
    % vovsecurity delkey -kv KEYVAL -u USERID
    % vovsecurity listkeys
    % vovsecurity listkeys -a
    % vovsecurity listkeys -u USERID
    % vovsecurity gettoken -sl SECURITYLEVEL -du DURATION
Examples
| Action | Command |
|---|---|
| Generates a public/private key pair and tries to write to $HOME/.vov/userkey. If the file already exists, you will be asked whether to overwrite the existing file. Overwriting your key file means that the previous keypair stored there will no longer be usable, and thus rendering storage of that public key on any vovserver instances as useless. |
|
| Generates a public/private keypair and writes it into a separate key file named keyfile.txt. |
|
| Reads $HOME/.vov/userkey and echos the public key back to the console. |
|
| Retrieves the public key for the current project. The vovserver’s public key is written in $VOVDIR/local/registry/[system-nc | system-wx | system-lm] folders respectively. Currently, FlowTracer and Allocator projects do not support the system registry. |
|
| Adds a new public key to vovserver, associated with the current user. Interactively prompts for the key value and the key description on the terminal, in addition to the user’s password in order to perform password based authentication. |
|
| Adds a new public key to vovserver associated with the current user. Interactively prompts for the user’s password in order to perform username/password authentication with vovserver. If VOV_PASSWORD is set, the value of this environment variable will be used, and no prompts will be made. |
|
| Deletes a key belonging to the current user. Interactively prompts for the user’s password in order to perform username/password authentication with vovserver. If VOV_PASSWORD is set, the value of this environment variable will be used, and no prompts will be made. |
|
| For users with ADMIN security access on the project, keys belonging to other users can be deleted using this variation. |
|
| Lists all the current user’s public keys which vovserver has stored. Interactively prompts for the user’s password in order to perform username/password authentication with vovserver. If VOV_PASSWORD is set, the value of this environment variable will be used, and no prompts will be made. |
|
| For users with ADMIN access to the project, list all public keys stored in vovserver for the project. Interactively prompts for the user’s password in order to perform username/password authentication with vovserver. If VOV_PASSWORD is set, the value of this environment variable will be used, and no prompts will be made. |
|
Client User Authentication
Client user authentication for clients connecting to the VOV port on vovserver is
implemented "opt-in" in this release. To enable this authentication, set the
comm.requireClientAuth server configuration parameter to 1.
Without a valid key registered in the server, you will have a limited set of
commands you can perform against the queue without error. These include
vovproject enable, vovbrowser,
vovsecurity, and nc cmd vovsecurity.
When client user authentication is enabled, VOV client and server will authenticate the user using the VOV security key pair stored in ~/.vov/userkey if present (%USERPROFILE%\.vov\userkey for Windows clients). These are the same security keys used to authenticate REST clients, and are managed via the vovsecurity command. This affects system clients like taskers and VOV daemons as well as end user clients like job submit and job status check commands.
- The project owner must have created a key pair using vovsecurity keygen that is stored at $HOME/.vov/userkey
- If the VOV project is newly created, it will automatically have the owning user's public key added because project creation reads the key from $HOME/.vov/userkey. But if the VOV project is pre-existing, the owning user needs to add the public key to vovserver using the vovsecurity addkey command.
- For Accelerator/Accelerator Plus/FlowTracer/Hero products, all users who will run jobs and query job status must create a key pair using vovsecurity keygen and add the public key to vovserver using the vovsecurity addkey command.
- Root user does not authenticate. vovtaskerroot taskers will "su" to the project-owning user's UID and similarly authenticate with the project owner's key.
- Running taskers or other commands in an environment without access to a key pair in $HOME/.vov/userkey is not supported.
- The command vovproject enable [PROJECTNAME] will set an additional new environment variable called VOV_SERVER_PUBKEY to the value of the server instance's public key. This is needed internally by clients as part of the key-based authentication process.