Creating Webhooks
This section discusses the instructions and guidelines to create webhooks.
Steps:
1. On the Webhooks tab, click on
a folder then  .
.
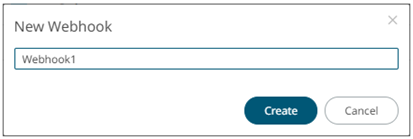
The New Webhook dialog displays.

2. Enter the name of the webhook then click
![]() .
.
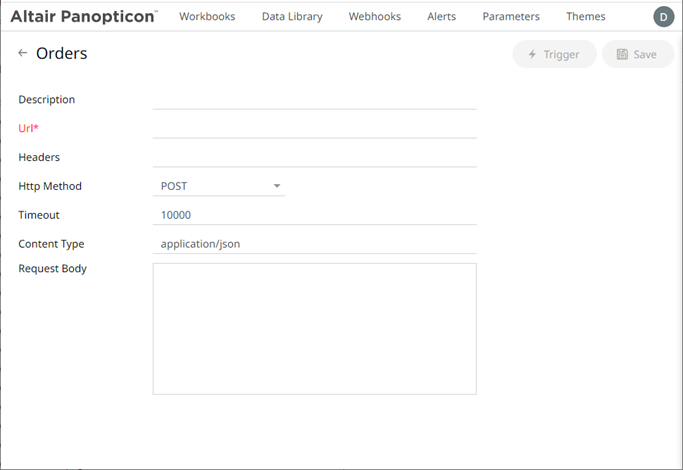
The new webhook is displayed on the Webhook page.

3. Enter or select the following webhook properties:
|
Property |
Description |
|
Description |
Description of the webhook. |
|
URL |
URL of the webhook. This property is required. |
|
Headers |
A comma separated list of name=value pairs representing HTTP headers. |
|
HTTP Method |
Select the appropriate HTTP method for the request from the following options:
· GET – retrieve data · POST – add new data · PUT – replace existing data · DELETE – remove existing data |
|
Timeout |
Timeout (in ms) for reading a response from the URL. |
|
Content Type |
The content type of the request body. Default is application/json. |
|
Request Body |
The request body to be supplied to the HTTP call. For example: { 'Alert title': '{_alert_title}', 'Alert dashboard URL': '{_alert_dashboard_url}', 'Alert description': '{_alert_description}', 'Alert reason': '{_alert_reason}', 'Triggering items': '{_alert_triggering_items}', 'Timestamp': '{_current_time}', 'Folder': '{_workbook_folder}', 'Workbook': '{_workbook_name}', 'Dashboard': '{_dashboard_name}' } |
|
NOTE |
URL, Headers, and Request Body fields can be parameterized (i.e., special server parameters, alert parameters, and global parameters). |
4. Click ![]() to save the new webhook.
to save the new webhook.
5. You may opt to click ![]() to trigger the webhook. Any parameter
in the request body will be replaced by its value when triggering
the webhook request.
to trigger the webhook. Any parameter
in the request body will be replaced by its value when triggering
the webhook request.
For example:
{_current_time} - 2021-07-01T12:34:56Z
6. Click  to go back to the Folders and
Webhooks list. The new webhook is added on the list.


