


|
Global Settings
To customize global settings, select the Configurator tab, and click the Global Settings tab.
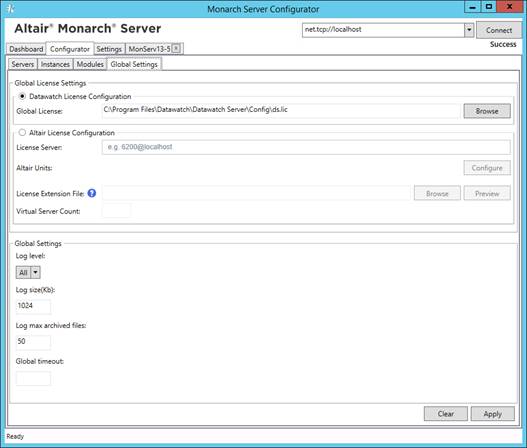
The following settings are available on the Global Settings page:
q Global License Settings: Modify the global license source to be used. The specific steps are detailed here.
q Global Settings:
· Log level: Select the log level from the drop-down list (the default value is All).
· Log size (kb): Enter the log size (the default value is 1024).
· Log max archived files: Enter the max number of archived files (the default value is 50).
· Global timeout: Enter to set receiveTimeout for all URI schemes. The receiveTimeout setting can be configured manually for each particular scheme via config.xml.
Path to this file: C:\Program Files\Datawatch\Datawatch Server\Config\config.xml
This parameter is located in the <binding> of the <basicHttpBinding>, <wsHttpBinding>, <netTcpBinding>, <netNamedPipeBinding>:
<bindings>
<basicHttpBinding>
<binding name="basicHttpBinding"
openTimeout ="00:10:00"
sendTimeout ="00:10:00"
closeTimeout="00:10:00"
receiveTimeout ="01:00:00"
maxReceivedMessageSize="2147483647"
transferMode="Streamed">
<readerQuotas
maxStringContentLength="2147483647"
maxArrayLength="2147483647" />
</binding>
</basicHttpBinding>
...
</bindings>
To save changes, click Apply.
|
NOTE |
User session ID may be logged by modifying the config file as follows: a. Open the config.xml file and locate the logging template field. b. Modify this field by adding {keyvalue(sessionId)}. q The field should appear as: q template="[{timestamp(local:G)} {severity} {keyvalue(sessionId)}] {message}" [For local:G, additional information is available here.] For a new installation of Monarch Server The config.xml file may be modified as follows: <formatters> <add type="Microsoft.Practices.EnterpriseLibrary.Logging.Formatters.TextFormatter, Microsoft.Practices.EnterpriseLibrary.Logging, Culture=neutral" template="[{timestamp(local:M/d/yyyy h:mm:ss.ffff tt)} {severity} {keyvalue(sessionId)}] {message}" name="Text Formatter" /> </formatters>
For an upgrade to the latest version of Monarch Server a. Perform the upgrade as usual (refer to the Monarch Server Installation Guide or the Monarch Server Single Server Installation Guide). b. Open the config.xml file and locate the old template field: <formatters> <add type="Microsoft.Practices.EnterpriseLibrary.Logging.Formatters.TextFormatter, Microsoft.Practices.EnterpriseLibrary.Logging, Culture=neutral" template="[{timestamp(local:G)} {severity}] {message}" name="Text Formatter" /> </formatters> c. Replace this field with following: <formatters> <add type="Microsoft.Practices.EnterpriseLibrary.Logging.Formatters.TextFormatter, Microsoft.Practices.EnterpriseLibrary.Logging, Culture=neutral" template="[{timestamp(local:M/d/yyyy h:mm:ss.ffff tt)} {severity} {keyvalue(sessionId)}] {message}" name="Text Formatter" /> </formatters> d. Save the changes. e. Restart Services to apply the changes made. |
Configuring Global License Settings
Monarch Server supports two global license sources: Datawatch license and Altair license. This section details these two sources.
Datawatch license configuration
Use this configuration if you have a license file located in a local folder or network.
|
NOTE |
Global license is used for all instances. To set a separate license for a particular instance, see Configuring Instances, point 6. |
Steps:
1. Launch Monarch Server Configurator from the Start menu.
2. In the Configurator window, click the Configurator tab.
3. From the available tabs, select Global Settings.
4. Under Global License Settings, select Datawatch License Configuration.
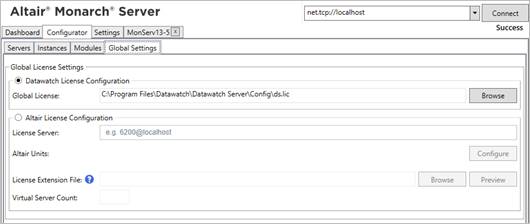
5. Specify the full path (e.g., “C:\License\ms.lic”) or relative path (e.g., “ms.lic,” with the base directory being the “[InstallDir]\Config” folder) of the license file or click Browse to manually search for it.
6. To save your settings, click Apply.
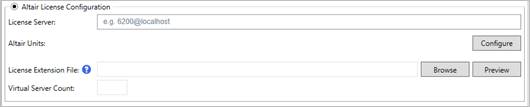
Altair License Configuration
Use this configuration if you have access to Altair’s License server or Altair Units. Altair Units is a cloud-based licensing system that provides seamless access to Altair licenses through an internet connection.
|
NOTE |
Altair Units requires valid Altair Connect credentials. Check with your administrator for access. |
Steps:
1. Launch Monarch Server Configurator from the Start menu.
2. In the Configurator window, click the Configurator tab.
3. From the available tabs, select Global Settings.
4. Under Global License Settings, select Altair License Configuration.
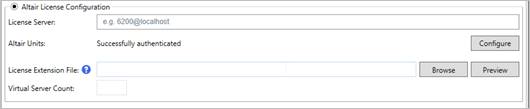
5. If your license source is Altair’s License Server, perform the following steps:
a. Specify the location of the Altair License Server in the License Server field with the following format: port@hostname (e.g., 6200@localhost).
|
NOTE |
Multiple license servers can be specified. Use the semicolon to separate the license servers (e.g., 6200@localhost;6200@externalALS). |
b. Save your settings by clicking Apply.
If your license source is Altair Units, perform the following steps:
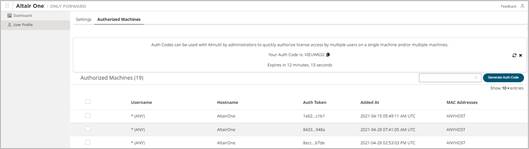
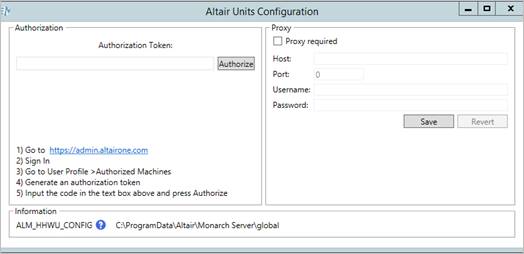
c. Generate the Auth Code first:
i. Launch Google Chrome and navigate to the Altair One Admin portal at https://admin.altairone.com/login. Use your credentials to log in.
ii. In the portal, click User Profile and then click the Authorized Machines tab in the main display.


iii. Click Generate Auth Code.

The page displays the auth code and a timer indicating the code’s expiration.

d. Return to the Configurator and launch the Altair Units Configuration dialog by clicking Configure.

e. In the Altair Units Configuration dialog, enter the Auth Code you generated in Step iii and then click Authorize.

If the auth code is successfully authorized, the following prompt displays:
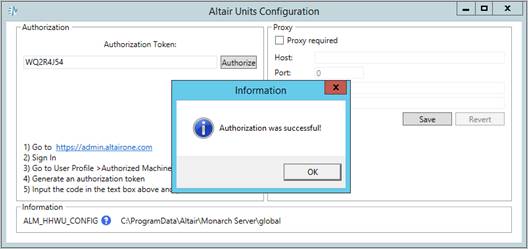
f. Click OK and then close the Altair Units Configuration dialog.
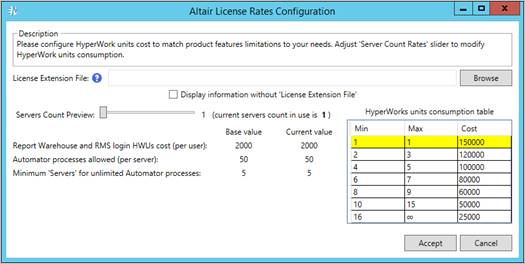
g. You can then modify the number of Altair Units that will be consumed to meet your specific requirements. For this purpose, click the Preview button in the Global Settings tab of the Configurator to launch the Altair License Rates Configuration window.

h. In the Altair License Rates Configuration window, you can adjust the Server Count Rates slider to modify the unit consumption.
|
NOTE |
The default unit consumption is as follows: 2,000 units per user when logged in to MSClient and RMSClient, 50 Automator processes per server, and a minimum number of 5 servers for an unlimited number of processes. The default costs may be changed when using a license extension file. |
i. Save your settings by clicking Apply.