Navigating Tables
Tables open in the Prepare window may be easily navigated in a number of ways.
Navigation controls
The following controls have been enabled in Data Prep Studio to allow quick movement through a table.
-
Ctrl + Home – Go to first cell of the first row of the table
-
Ctrl + End – Go to the last cell of the last row of the table
-
Ctrl + Right arrow – Go to right-most cell in the current row
-
Ctrl + Left arrow – Go to the left-most cell in the current row
Searching for data
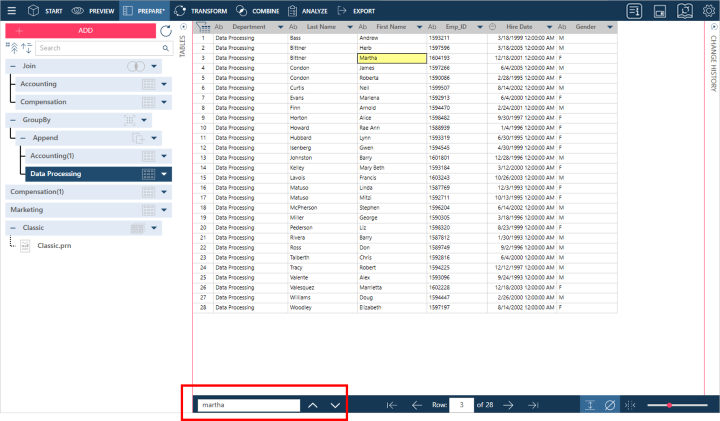
You can search for specific data in tables by using the Search field located at the bottom of your workspace. Enter the string you would like to search for and then either press Enter on your keyboard or click the Search for Next  button located to the right of this field. The first cell including the string you are searching for is highlighted. Keep pressing Enter or clicking the Search for Next button to locate all instances of this string. To reverse the search direction, click on the Search for Previous
  button.
When performing searches in tables, the following options are available:
- Wrap
 - The search is performed as a loop (i.e., the search restarts at the beginning of the summary) when the last instance of the search string is reached.
 - Match case
 - The search is performed by using the string you provided exactly as typed.
 - Expression search
 - The search is performed using an expression string (e.g., Amount>=100)
Working with rows
The row number of a selected cell, along with the total number of rows in the table, is provided at the bottom of your workspace.

To go to a specific row in your table, simply enter the row number you wish in the row field provided. To go to the first and last rows of the table, click on the First Row  and Last Row
  buttons, respectively. Similarly, the Previous Page
  and Next Page
  buttons take you to views of previous and next pages of data, respectively.
Clicking any of these buttons or entering a row number highlights a corresponding row in your table. Right-clicking on this highlighted row displays a context menu:
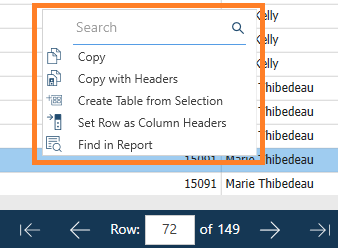
The following operations are available:
|
Operation |
Description |
|
Copies row values only or row values with column headers to the clipboard. |
|
|
Creates a new table based on the highlighted rows and the corresponding columns in an existing table. |
|
|
Replaces the current column headers with values from the selected row. |
|
|
Find in Report |
Allows you to jump to the report line that matches the content of the selected row. Selecting this operation brings you to the Report View, where the content of the selected row from the table is highlighted in the report shown. Note: This operation is only available for tables whose sources are PDF and report documents. |
You can increase row heights by selecting the Adjust Row Height  button to fit multi-line data into your rows.
Finding Number of Columns
Tables open in the Prepare window may be composed of numerous columns, including hidden ones. You can easily find the column count information in the Prepare window by navigating toward the lower right-hand corner of the workspace.

If this detail is truncated, hover over the Column label to find the total number of visible and hidden columns.

Showing nulls and whitespace characters
Two buttons, which appear at the lower right-hand corner of the Prepare window, are available to help you visualize your data better.
- The Show Nulls
 button helps you see null values (i.e., empty fields).
 - The Show Whitespace Characters
 button displays spaces, tab indents, and line breaks between text characters; these indicators are displayed as
  , →, and
  , respectively.
Increasing/Decreasing the size of Table Text
You can increase of decrease the size of the table text by using the slider found at the lower-right of the Prepare window.
![]()
Slide this slider to the left or to the right to decrease or increase the font size of the column values.
© 2025 Altair Engineering Inc. All Rights Reserved.