Capturing a Multiple Line Field
Some reports contain description fields that wrap onto multiple lines. Some multiple line fields always occupy a fixed number of lines, but others occupy a variable number of lines. An example of each appears in the illustrations below.
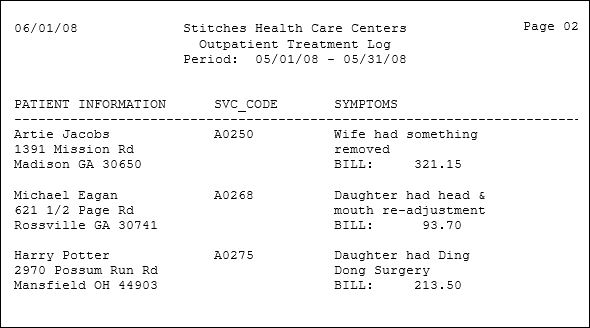
In the image below, the SYMPTOMS field always contains a fixed number of lines.
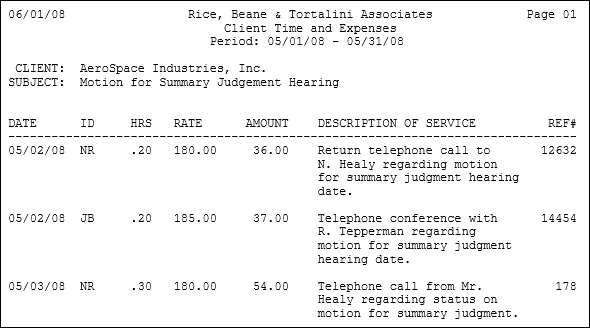
In the image below, the DESCRIPTION OF SERVICE field contains a varying number of lines.
You can use Data Prep Studio to extract these fields by indicating the field's starting and ending locations.
Note: This procedure assumes that you are familiar with the template creation process. To learn more about this process, see the detailed instructions in Creating a template.
-
Open a report containing data you want to capture spanning multiple lines and then go to Report Design.
-
Select a line or group of lines that contain a single instance of the multiple line field. Extend the selection only as far as required to highlight the first line of the multiple line field. You do not need to highlight all of the lines occupied by the field, only its first line. Later, you'll learn how to extend the field definition to include the remaining lines occupied by the field.
-
Click Add New Template
 from the Template and Field Properties panel and then select a template role (typically Detail or Append).
 -
Create a trap to capture all instances of the template.
-
Scroll through the report to satisfy yourself that the trap captured all instances of the selected level. At this point, the trap needs to capture only the first line of the multiple line field. Later, you'll learn how to capture the remaining lines occupied by the multiple line field.
If the trap missed any instances of the selected level, inspect those lines to determine what modifications you need to make to the trap in order to capture them. After making the modifications repeat Steps 4 and 5.
After you are satisfied that the trap is working to capture all of the lines occupied by the selected level, but not lines from other levels, you are ready to highlight the multiple line field, along with any single lines fields that you also want to capture.
-
Highlight the first line of the multiple line field. You may also highlight any single-line fields that you might want to extract using this template.

-
Click on the first line of the multiple-line field so that its properties display in the Edit Field Properties portion of the Template and Field Properties panel.
-
In the General tab, type a name for the field in the Name box and then specify settings for each of the available options. For a detailed explanation of these options, see Input Field Properties.
-
Select the Advanced tab. The Advanced tab includes options for defining a multiple-line field.
-
Select one of the following Start Field On options to indicate where the multiple line field begins relative to the top of the template sample:
-
Line Number: Select to indicate that the first line of the field begins at an absolute offset from the top of the template. The line number represented by this setting is determined by the position of the field highlight in the template. For example, if you highlighted the field on the second line of the template, this option would be represented as Line Number 2.
-
String: n Anywhere In Previous Line: Select to indicate that the defined field will exist only if the specified string is found anywhere on the previous line. This option is typically used to assist in the trapping of HTML data.
-
Preceding String: in current line: Select to indicate that the first line of the field begins immediately to the right of a string, such as a label. Enter the string in the adjacent box. The maximum length of the string is n-1 where n is the column starting position of the field. For example, if the field starts in column 15 you may enter a string of up to 14 characters (i.e., the entire search string must fit to the left of the field). This option is typically used to locate the beginning of a field based upon the presence of a label to its left.
-
After Last Defined Field in Template: Select to indicate that the first line of the field begins two lines below the last line of a multiple line field which is also extracted by the template. This option can be used to capture a field that falls immediately after another multiple line field, in which case the starting position of the second field may vary relative to the top of the template but falls at an absolute offset relative to the end of first field. This option can be used to capture a multiple line field or a normal [single line] field. To capture a normal field, select the "Line Count: 1" End Field On option.
-
-
Select one of the following End Field On options to indicate where the multiple line field ends:
-
Line Count: Select to terminate the field after a fixed number of lines. This option should be used whenever all instances of the field have the same number of lines. Enter the height of the field in the adjacent box.
-
Nonblank Preceding String of Characters: Select to terminate the field when a line is encountered that contains a non-blank string to the left of the field. The maximum length of the string is n-1 where n is the column starting position of the field. For example, if the field starts in column 15 you may specify up to 14 as the length of the non-blank string (i.e., the entire string must fit to the left of the field). This option is typically used to terminate a field based upon the presence of a subsequent field or field label that appears below and to its left. Use this option only if the number of lines in each instance of the field varies. If the field always contains the same number of lines, use the Line Count option, described above.
-
Blank Field Values: Select to terminate the field when a blank line or series of blank lines is encountered. It is important to note that Data Prep Studio does not require the entire line to be blank, only the column positions occupied by the field. Enter the number of blank field values required to terminate the field. Use this option only if the number of lines in each instance of the field varies. If the field always contains the same number of lines, use the Line Count option, described above.
-
End of Left Justification: Select to terminate the field when Data Prep Studio encounters a line with a blank in the first column position of the field or any nonblank character in the column immediately preceding the field. Either of these conditions indicate that left justification within the field has ended. This option is useful for capturing left aligned text blocks. However, if the text block contains a blank line, such as that found between paragraphs, Data Prep Studio will consider the blank line an end to left justification and will therefore terminate the field. For multiple paragraph blocks, use either the Nonblank Preceding String option, the Blank Fields option or the Minimum Action Only option. Use this option only if the number of lines in each instance of the field varies. If the field always contains the same number of lines, use the Line Count option, described above.
-
Any Template Hit: Select to terminate the field when Data Prep Studio encounters another template, including another instance of this template. The field will also be terminated if a HTML markup line is encountered.
Data Prep Studio will also terminate a multiple line field after it extends two pages. The field will be terminated on the second page where the page break character (character code 12) is encountered. This prevents a field from continuing without end if the selected End Field On action is not appropriate to end the field.
The Any Template Hit behavior is always enforced by Data Prep Studio, even when the Any Template Hit option is not selected. Select this option only when none of the other options would apply.
Note: Using a "dummy" template to terminate a multiple line field.
If none of the other End Field On options can be used to terminate a multiple line field and you don't have an appropriate template already defined that can be used to terminate the field, consider creating a dummy template (i.e., a blank one) specifically for this purpose. By creating a template, you have available to you all of Data Prep Studio's sophisticated trapping techniques.
-
-
Use the vertical scroll bar to scroll through the report. View enough of the report to satisfy yourself that the field definition capture properly captured each instance of the multiple line field.
If the definition is inappropriate for any instance of the field, inspect that field value to determine what modifications you need to make to the field definition (e.g., you may need to select a different End Field On option). After making your modifications, repeat this step.
-
Choose Accept to accept the template and field definitions.
The extracted data display in a table in the Prepare window.
Note: If you want to break the multiple line text block into separate lines after extracting it, see the Textline function for more information.
© 2025 Altair Engineering Inc. All Rights Reserved.