Adding an Icon Legend
Icon Legends display configured icons and their associated labels.
Steps:
1. After double-clicking or drawing a rectangle
on the dashboard canvas, click  on
the Select Part pane then click the Icon Legend
![]() icon.
icon.
The Icon Legend Settings pane is displayed, and the Icon Legend part is added on the dashboard canvas.
![]()
2. Select any of the available parent visualizations with icon variables from the Linked Part drop-down list.
The icon legend is connected to its parent visualization and the link between them is displayed. The icon variables are retrieved from this visualization and displayed in the legend.
![]()
3. To set the style of the Icon Legend,
click Style  .
.
The page updates to display the Style pane.
![]()
4. Set the Font type, size, style (Bold and/or Italic).
5. Click Update Style  and
select any of the following options:
· Set current as default – Save the changes and set it as the default.
· Create custom style – Save the changes and set it as a custom style.
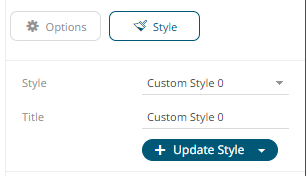
The Style pane updates to display the Title control.

¨ Enter the custom style Title.
¨ If there are additional changes made, click Update Current Style in the Update Style drop-down.
The new custom style is added in the Workbook > Theme > Custom Styles list.
![]()
If published, the custom style configuration of the Icon Legend will be added to the Global custom styles list and can be applied to other parts.
· Reset to default – Revert to the original default settings.
6. Click the Save  icon on the toolbar to save the
changes.
When
saved, the  notification
is displayed.


