Rigid Groups
Use the Rigid Groups tool to group bodies into a rigid group.
- From the Geometry ribbon, click the Rigid icon.
- Use the Bodies collector on the guide bar that appears to select the bodies to be grouped.
- Use the Ctrl key to add more bodies to the group.
- Use the Shift key to remove bodies from the group.
- Click the
 button in the modeling window to create the
group.
button in the modeling window to create the
group. - Use the entity selector on the left of the guide bar to
select an existing group to edit.
- Use the Ctrl key to add more bodies to the group.
- Use Shift key to remove bodies from the group.
- Click Ungroup to delete the rigid group.
Note:
- A body cannot belong to more than one group.
- Deleting a rigid group does not delete the bodies that were part of the rigid group.
- Any connections between the bodies within a rigid group will not be realized to the solver.
- A property editor provides information about the aggregated mass, inertia
and CG of the rigid group.
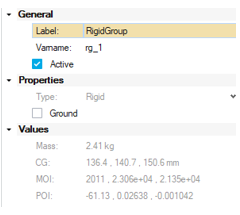
Figure 1. - A rigid group can be grounded using the Ground check box in the property editor.