


|
Exporting Data in Data Prep Studio
You can export individual or multiple tables after combining and transforming these.
Tables may be exported in Data Prep Studio via two ways:
-
Named Exports - These exports are set up using the Export window and saved with the workspace.
-
Quick Exports - These exports are set up from the Prepare window via the table list context menu or by right-clicking on a table in the Export window. Quick exports are not saved with the workspace.
Setting up named exports
Steps:
-
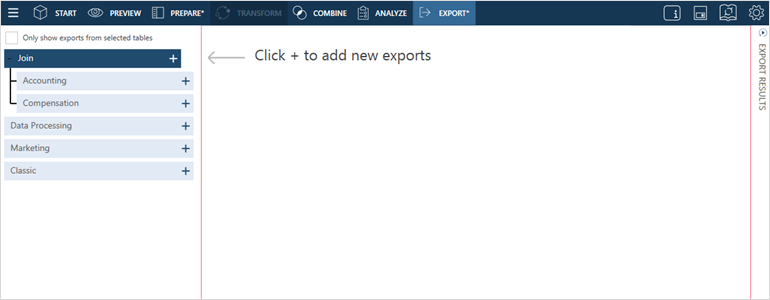
Select Export from the Data Prep Studio toolbar.
The Export Window displays:
-
Click the Add Export
 button
located to the right of the table you wish to export and, from the
options that display, select an export format.
button
located to the right of the table you wish to export and, from the
options that display, select an export format.You can export tables to the following formats:
-
Microsoft Excel (.xls, .xlsx, .xlsm)
-
Microsoft Access (.mdb, .accdb)
-
CSV
-
JSON
-
XML
-
Microsoft Power BI
-
IBM Cognos Analytics
-
SAS Transport File Format (XPORT) Version 5
-
Altair Knowledge Studio (.kdd)
-
Tableau TDE (.tde)
-
Tableau Server (.tde, .hyper)
-
Qlik (.qvx)
-
Altair Panopticon (.xls, .xlsx, .xlsm)
NOTES:
-
The current version of Monarch Data Prep Studio no longer supports integration with Altair Knowledge Hub. Thus, when an export to Knowledge Hub is run from a workspace created in previous versions of DPS, the error message "Monarch Data Prep Studio no longer supports integration with Altair Knowledge Hub" displays.
-
Data exported in Data Prep Studio to Excel files are exported as named ranges. Thus, when the table is opened, the worksheet name displayed corresponds to that of the named range.
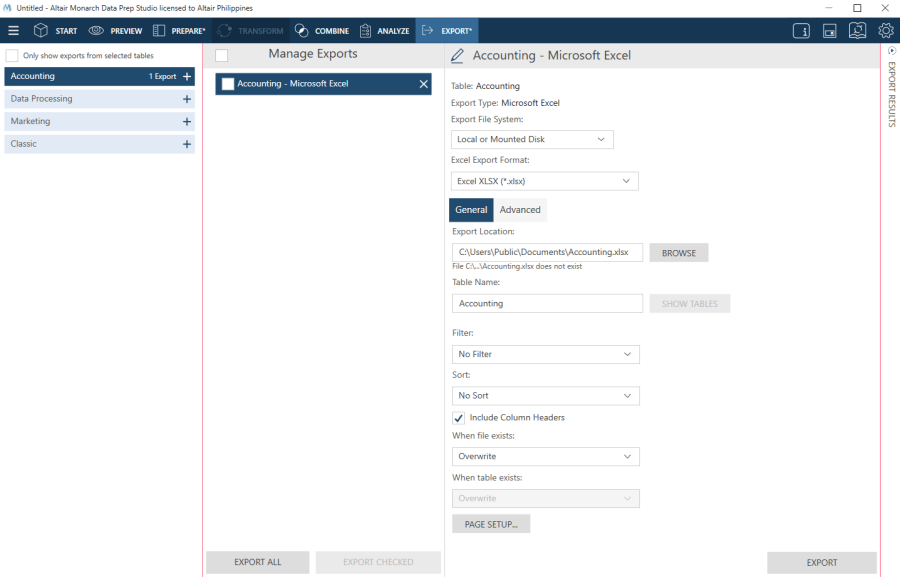
The table you selected displays in the Export Management panel and its properties display in the Export Properties panel.
-
-
Rename the export if you wish by clicking on the Edit
 button located to the left of the Export name (in the figure above,
"Accounting - Microsoft Excel") and then entering a new
name into the field.
button located to the left of the Export name (in the figure above,
"Accounting - Microsoft Excel") and then entering a new
name into the field. -
Specify general export options as necessary. Your export options will vary depending on the export type. The table below describes these settings.
Field
For Export Type
Description
Export Name
All
Each export is assigned a name using the convention <Table Name> - <Export Format>. Click on the edit button of this field to change the name of your export if you wish.
Export Type
All
This field is prepopulated with the value you selected from the Export type drop-down.
Export File System
-
Microsoft Excel
-
Microsoft Access
-
CSV
-
JSON
-
XML
-
SAS Transport File Format V5
-
Tableau TDE
-
Qlik
This field describes the file system to which your table will be exported.
-
Local or mounted disk
-
Amazon S3
-
Azure Data Lake Storage Gen2
Excel Export Format
-
Microsoft Excel
This setting specifies what file format to apply when exporting to Microsoft Excel files. The advanced properties you can set will depend on which format you select.
-
.XLS
-
.XLSX
-
.XLSM
General/Advanced Tab
-
Microsoft Excel
-
Altair Panopticon
The General tab allows you to modify general export settings (e.g., Export Location, Table Name).
The Advanced tab allows you to modify the following settings:
-
Digital Signature: Allows you to embed the currently selected digital signature to the exported Excel file (XLSX/XLSM). By adding a digital signature, you establish the authenticity, integrity, and non repudiation of the export output.
-
Certificate: Select this button to digitally sign with a valid X.509 Certificate (an existing Certificate selected from the Current User's Certificate Store or from a Certificate file). This option is available for XLSX/XLSM export files only.
-
Add AutoFilter drop down lists to column labels in the Table: This option enables the Excel AutoFilter feature, ready and active when you open the exported Excel file.
-
Include Pivot Table sheet: This option is available for Table exports to Excel 2007 (XLSX/XLSM) files.
-
Fields tab: Use this tab to select the desired pivot field(s). This option is available for XLSX/XLSM export files only.
-
Options: Use this tab to select the following pivot options (this option is available for XLSX/XLSM export files only):
-
Pivot Table Name: Assign a name to your pivot table here.
-
Weight: This refers to the style weight applied to the pivot table when rendered in Excel. The weight is used in conjunction with the style index.
-
Index: This is the number of the table format style that will be applied when the pivot table is rendered in Excel. Excel has 28 styles available in 3 weights. This style can be viewed in Excel by selecting the “Format as Table” menu item when viewing a pivot table.
-
Apply to row headers: Applies the style settings to the row headers of the pivot table.
-
Apply to column headers: Applies the style settings to the column headers of the pivot table.
-
Banded rows: Applies alternate color shading to the rows in the pivot table.
-
Banded columns: Applies alternate color shading to the columns in the pivot table.
-
Show grand total for rows: Displays grand totals for each row of the pivot table.
-
Show grand total for columns: Displays grand totals for each column of the pivot table.
Export As/Export Location
-
Microsoft Excel
-
Microsoft Access
-
CSV
-
JSON
-
XML
-
SAS Transport File Format (XPORT) Version 5
-
Altair Knowledge Studio
-
Tableau TDE
-
Qlik
-
Altair Panopticon
This setting describes where the export file will be saved and what its name will be. Enter the path and name of the export file. You can embed macros (of the form &[macro]) in the file name.
Table Name
-
Microsoft Excel
-
Microsoft Access
-
Microsoft Power BI
-
IBM Cognos Analytics
-
SAS Transport File Format (XPORT) Version 5
-
Altair Panopticon
This setting specifies the table name data will be exported to. Enter the name of the table to which data will be exported. You can embed macros (of the form &[macro]) in the table name.
Show Tables
-
Microsoft Excel
-
Microsoft Access
-
Panopticon
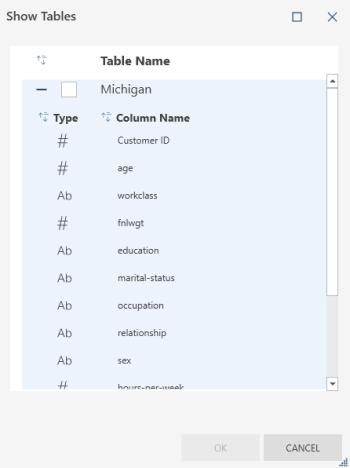
When exporting a table to a file that already exists, this setting allows you to see the destination file’s existing tables and columns and select the table to which the data should be appended or overwritten. When a table from the Show Tables dialog is selected and confirmed, the name of the selected table is inserted into the Table Name textbox and the current content of this box is overwritten.
The tables displayed in the Show Tables dialog may be sorted by name by clicking on the sort icon in the header. The tables have an expander button that allows you to view a list of columns belonging to that table.
Filter
All
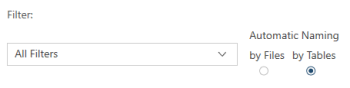
This setting specifies what filter to apply to the table when it is exported.
When All Filters is selected as a filter option, you will be asked to specify your desired Automatic Naming setting:
-
by Files: produces a file for each filter
-
by Tables: produces a table for each filter
Sort
All
This setting specifies what sort to apply to the table when it is exported.
When File Exists
-
Microsoft Excel
-
Microsoft Access
-
CSV
-
JSON
-
XML
-
SAS Transport File Format (XPORT) Version 5
-
Altair Knowledge Studio
-
Tableau TDE
-
Tableau Server
-
Qlik
-
Altair Panopticon
This setting specifies what Data Prep Studio should do if a file with the same name exists in the folder you specified in the Export As field. Select an action if the export file already exists:
-
Overwrite the file
-
Append records to the existing file
-
Skip the export operation
NOTE: Exports to Microsoft Power BI and IBM Cognos Analytics do not support appends to existing tables.
When Table Exists
-
Microsoft Excel
-
Microsoft Access
-
Microsoft Power BI
-
IBM Cognos Analytics
-
Altair Panopticon
This setting specifies what Data Prep Studio should do if a table or sheet with the same name you specified exists in the file you indicated in the Export As field. Select an action if the export table already exists:
-
Overwrite the table.
-
Append records to the existing table
-
Skip the export operation.
Include Column Headers
-
Microsoft Excel
-
CSV
-
Altair Panopticon
Checking this setting instructs Data Prep Studio to include the column header in the export file. This header will become the first line in the export file.
Delimiter
-
CSV
This setting specifies data delimiter for CSV files. Select a delimiter from the drop-down. The delimiter will be used to separate column values.
Text Qualifier
-
CSV
This setting specifies a text qualifier for CSV files. Select a text qualifier from the drop-down. The text qualifier tells you where text values begin and end. This is useful when you have text values that may contain the delimiter character you selected above.
Encoding Type
-
CSV
This setting specifies which encoding type to apply to the CSV file. At present, the encoding types Code Page, UTF-8, UTF-16LE, and UTF-16BE are accepted.
Code Page
-
CSV
When the encoding type selected is Code Page, this setting specifies which code page to apply to the CSV file.
Export All / Limited Rows
All
This setting specifies whether your defined row limit should be respected when exporting tables. Tick the appropriate checkbox to instruct Data Prep Studio to export all rows or only those rows that fall within the limit you have set.
Append DOS end-of-life character (x1A)
-
CSV
This option determines whether or not a DOS end-of-file character (x1A) is appended to the end of the file. This option is provided to enable compatibility with systems that expect the data in this format. This end-of-file character is often known as Control-z.
Legacy compatibility mode - Ignore format customizations during export
-
XML
-
CSV
Enabling this option will cause column format customizations to be ignored during the export of numeric and date columns. Using Monarch Classic formatting, numeric values are exported using the localized decimal separator of the current system. Meanwhile, date values are exported based on the Date Format setting.
Date Format
-
CSV
When legacy compatibility mode is selected, this setting allows you to specify the date format to apply to date fields in the exported file.
Page Setup
-
Microsoft Excel
-
Altair Panopticon
When exporting Excel tables, you can modify the margins, header layout, and footer layout of the pages by clicking the Page Setup button. The default settings are those indicated in the Default Table Page Setup tab in the Current Workspace Settings dialog.
-
-
If exporting to the Microsoft Excel file format, specify advanced export settings if necessary
-
If you wish to export other tables, set them up by repeating Steps 2 to 4.
-
If you wish to limit the exports displayed in the Export Management panel to only those created from specific selected tables, tick the Only show exports from selected tables box located at the top of the table selector.
-
In the Export Management panel, tick the boxes of the tables you wish to export and then click Export Checked when you are finished.
If you wish to export all of the tables in the panel, click the Export All button instead. There is no need to select individual tables in this case.
If you wish to export a newly defined table, click Export at the bottom of the Export Properties panel after specifying export details.
Setting up quick exports
Steps:
-
In the Prepare window, click on the drop-down arrow located to the right of a table you wish to export to display its context menu and then select Export Table from the options that display.
Alternatively, you can select this table in the Export window, right-click on your mouse and then select Export Table.
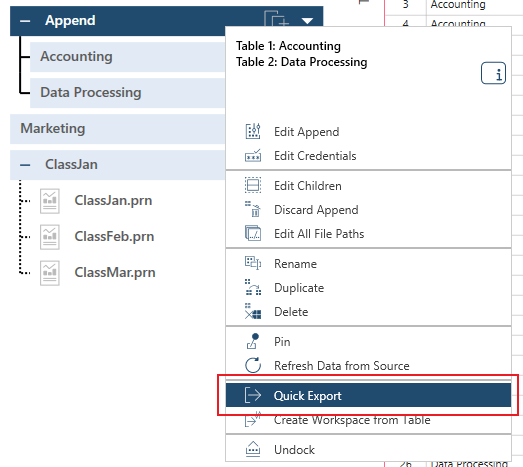
The Select an Export Type dialog displays.
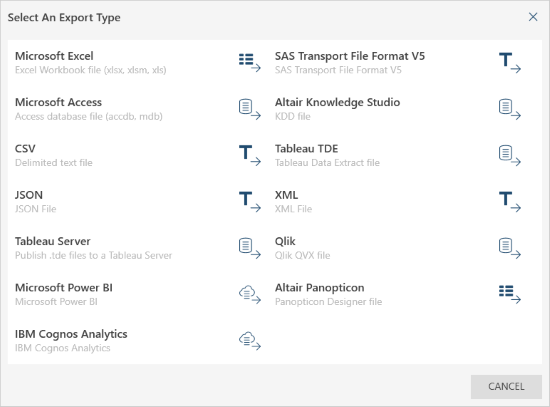
-
Choose a file type to which your table should be exported.
Doing so displays an Export Properties dialog.
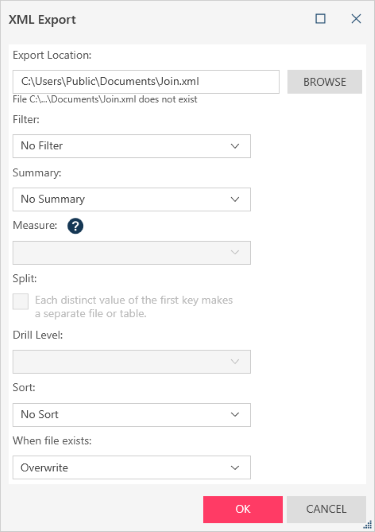
-
Modify the properties of your export using the table provided above as a guide and then click OK when you are finished.
Tracking export results
The export results display in a panel located to the right of the Export window. Although hidden by default, this panel is automatically launched when an export operation is completed.
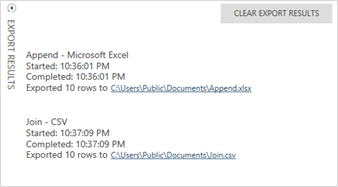
You can erase all export results from this panel by clicking on the Clear Export Results button located at the top right-hand corner of the panel.
Canceling export operations
You can cancel an export operation from the Export Results panel provided that the operation has not yet been completed.
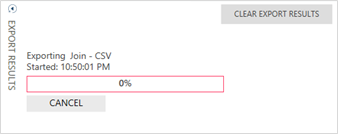
Click the Cancel button provided to cancel a non-completed export operation.
Viewing export results
To view the exported file, click on the export link provided in the Export Results panel. A file browser pointing to the location of the exported file displays.
Notes: Appending to .qvx Files
-
The export columns are matched to the existing columns in the file based on the column name and the type of data
-
For numeric columns, the existing file’s decimal precision is used
-
If no columns were matched, the export aborts and informs the user in the export results.
-
If some, but not all, columns were matched the export result includes a line indicating how many columns were matched (i.e. "8 of the 10 export columns were matched and appended to the file.")
-
If all columns are matched successfully, no additional information is added to the export results.
Note: Exporting .qvx changes:
-
When creating the numeric columns for the file, the decimal precision is obtained from the column’s format.
-
-
If the information can be obtained from the column's format, the .qvx file’s column is set to the correct precision
-
Otherwise, no formatting is specified for the column. This tells QlikView/QlikSense to display the information as it thinks best.
-
Related links