Working with Alignments in Expert Engine Mode
When a PDF report contains numerous instances of different font sizes, for example, the Simple engine mode may be unable to perform the necessary adjustments to produce a well-aligned report.

For such cases, you can switch to the Expert engine mode and perform manual adjustments.
The Expert engine mode focuses on producing text that is vertically aligned into columns as consistently as possible by providing manual control over the alignment of closely positioned groups of text. This mode can be used when the settings available under the Simple engine mode are insufficient to produce a well-aligned report (e.g., the PDF file contains numerous instances of different font sizes throughout its pages). The following table describes the properties that can be modified under this mode.
|
Property |
Description |
|
Auto Adjust |
This button sets default values for Stretch, Text Merge, and Alignment Snap based on the structure of the current page. It also generates left and right alignments for vertically aligned groups of text. Note that unlike in Simple mode, when this property is selected, it is applied only to the current page of the PDF report being viewed. When the dropdown to the right of this button is selected, the option Force Left is made available. This setting removes all previously generated alignments from the PDF and creates new ones that are aligned to the left. |
|
Add L |
This button adds a left alignment to the report. |
|
Add R |
This button adds a right alignment to the report. |
|
Delete |
This button deletes a selected alignment. |
|
Clear All |
This button clears all alignments in the report. |
|
Stretch |
As in Simple mode, this setting controls how the page width of the original PDF is translated into a monospaced text file. Increasing the value for this setting will increase the width of the document and pull text groups farther apart. |
|
Text Merge |
This setting controls the amount of space allowed between text before they merge together. Increasing the value for this setting will position text fragments more closely with each other. |
|
Alignment Snap |
This setting controls how far to the left and right an alignment can reach to "grab" other text. Increasing the value for this setting will pull the text toward more distant alignment groups. |
|
Undo |
This setting reverses (undoes) a change applied to the report. |
|
Redo |
This setting reverses (redoes) an undone change applied to the report. |
Note that because the Simple and Expert engine modes are completely different, the layouts and behaviors between these modes will vary significantly. Thus, no similarity between modes should be expected.
When Expert mode is initially enabled, Data Prep Studio automatically produces a set of "optimized" vertical alignments, each of which are marked either L (for left alignments) or R (for right alignments).
Hovering over any alignment highlights it gray and changes your cursor to a double-headed arrow  . These alignments can be adjusted to refine the text alignment further.
Using the Force Left Command
Selecting Auto Adjust > Force Left clears all right alignments and adjusts the text so that they are left-aligned.
Moving Alignments Manually
If Auto Adjust > Force Left is unable to align the text in a satisfactory manner, other manual adjustments may be applied.
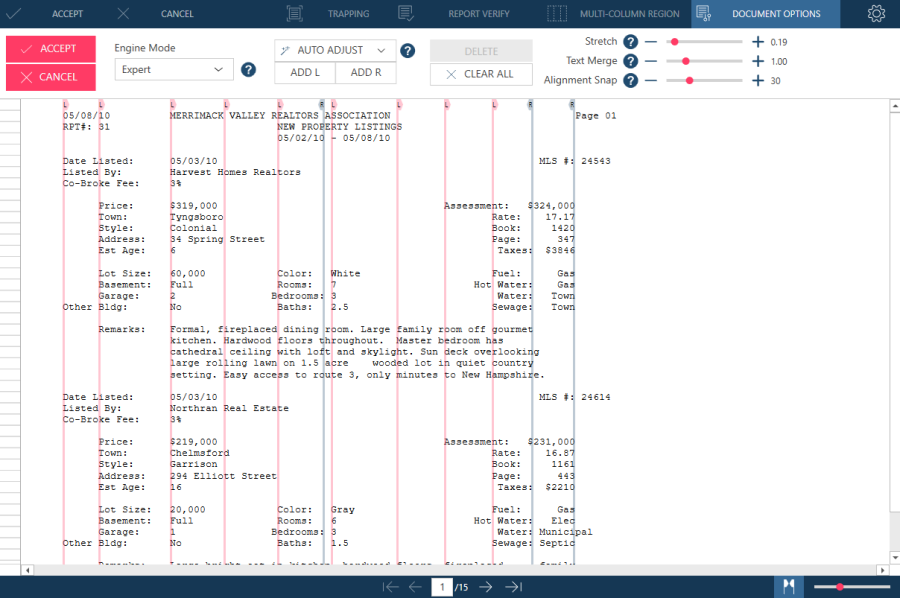
For example, note the lack of alignment in the text below.
To adjust an alignment, click on the alignment of interest. When a right (R) alignment is selected, the text aligned with this alignment is highlighted in blue. On the other hand, when a left (L) alignment is selected, the text aligned with this alignment is highlighted in red. Use your keyboard's left or right key to move the alignment left or right, respectively, as necessary. You can also use your mouse to grab an alignment and drag it to your desired location. Note that because alignments of the same type at exactly the same location are not meaningful, an alignment cannot be moved to the same position as another alignment of the same type. However, you can add both a left and right alignment to the same position. You can undo or redo alignment changes by clicking the Undo and Redo buttons, respectively.
Text fragments aligned to a specific alignment are highlighted together to form a group.
Adding New Alignments
If you require a new alignment, click the point in the report in which this alignment must be added so that a vertical yellow line appears. Select Add L or Add R to add a left or right alignment, respectively, as necessary.
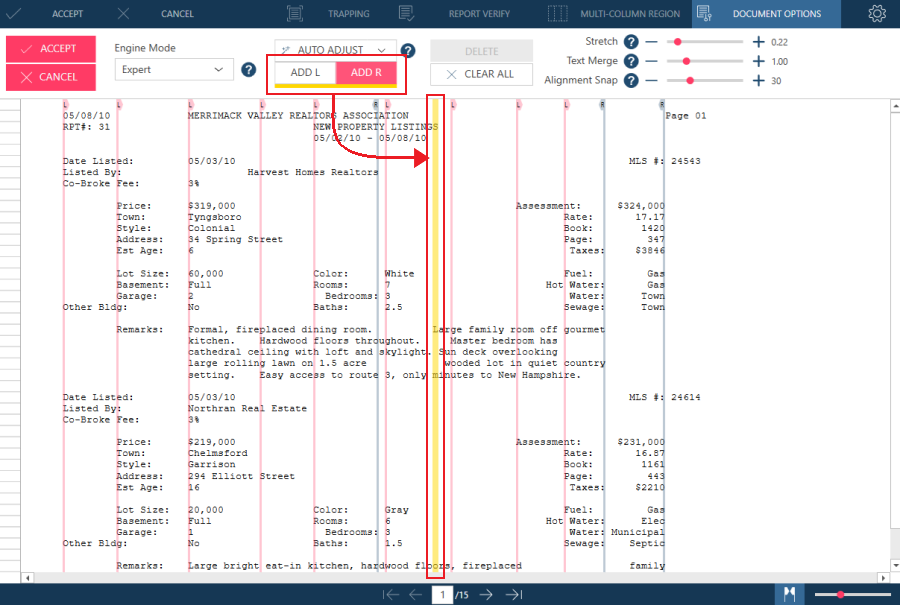
Alternatively, you can hover over the position in the report in which you wish to add an alignment, right-click on your mouse, and then select Create Left/Right Alignment Here.
Deleting Alignments
If a vertical alignment is unnecessary, select it and then click Delete.
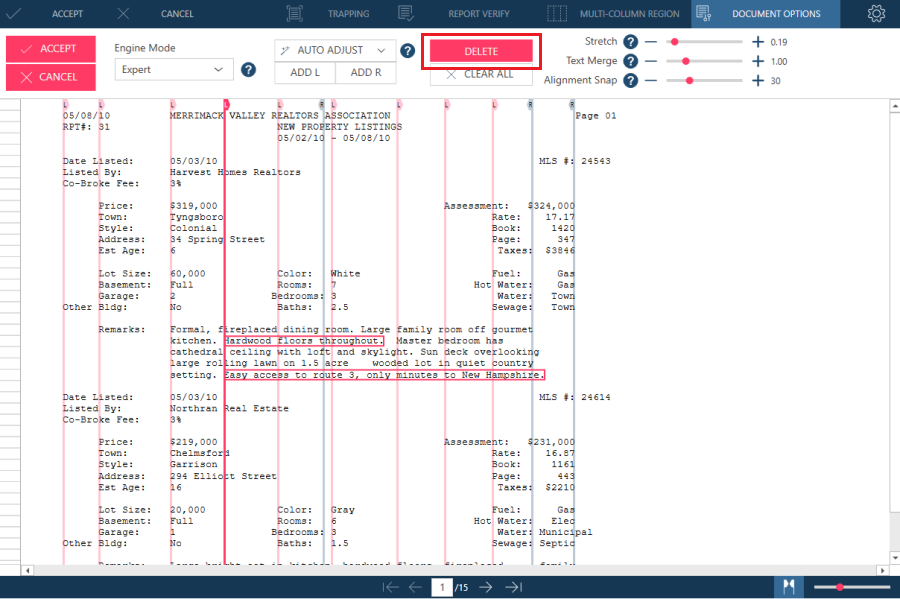
Alternatively, you can right-click on the alignment and select Delete from the options that display.
If you wish to delete all alignments and start over, select Clear All. Note that because this change is irreversible, care must be exercised when deciding to clear all alignments established for the document.
Changing Alignment Types
If you wish to change a left alignment to a right one or vice versa, right-click on the alignment and select Swap alignment side (L/R).
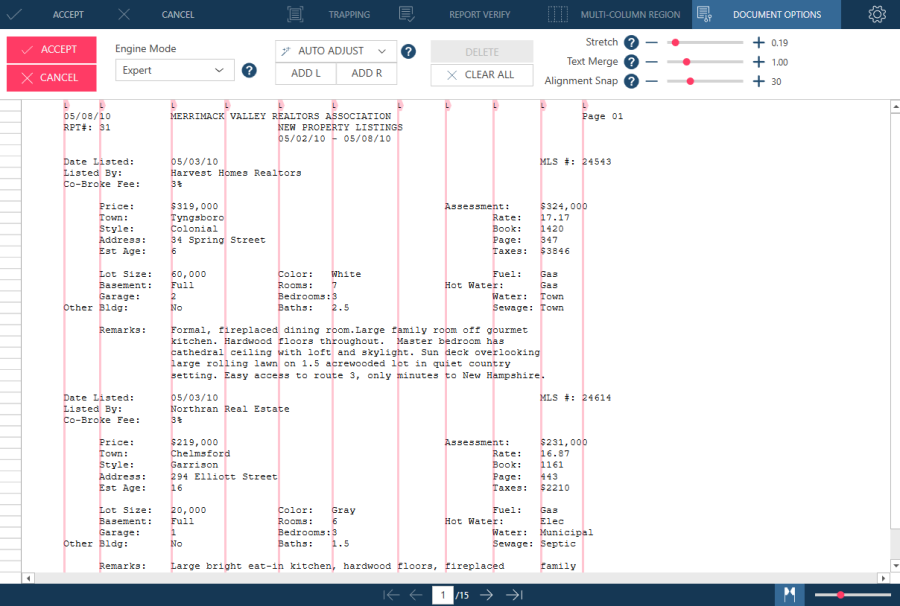
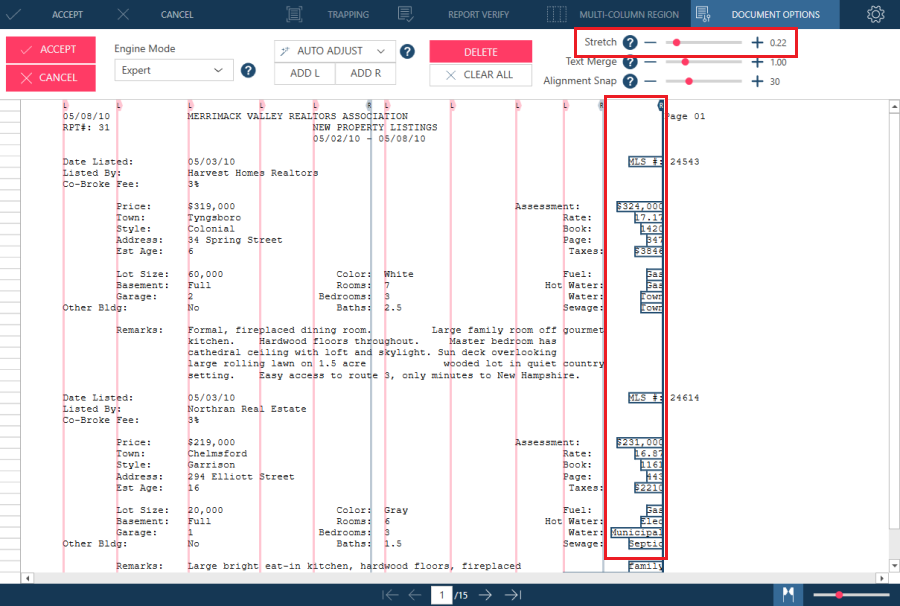
Using the Stretch Property
Text spaced too closely together can lead to difficulties in implementing manual adjustments. Stretch can be used to pull the text farther apart to address this issue. In the figure below, note how adjusting the Stretch setting enables the alignment of all values in the right-most part of the report.
Using the Text Merge Property
The property Text Merge specifies how closely text fragments should be brought together to form groups or sentences. The default value for this property is 1.
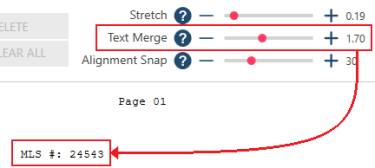
In this example, a small Text Merge value is used. The space between MLS and #: is fairly large because the merging of text is reduced.
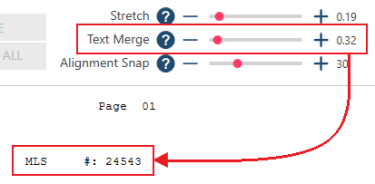
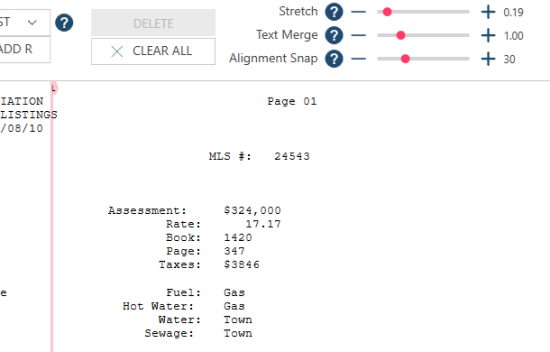
In this example, a large Text Merge value is used. Compared with the previous example, the space between MLS and #: is reduced because the merging of text is increased.
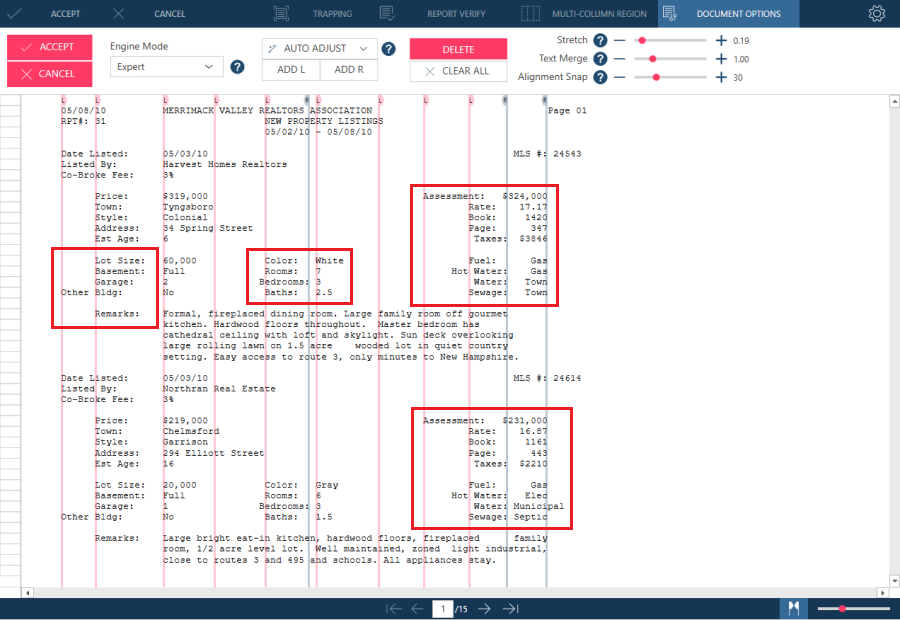
Using the Alignment Snap Property
The property Alignment Snap controls the distance, both to the left and right, an alignment can reach to grab text to align with it. Higher values for this property instruct the application to pull text farther away from an alignment toward it.
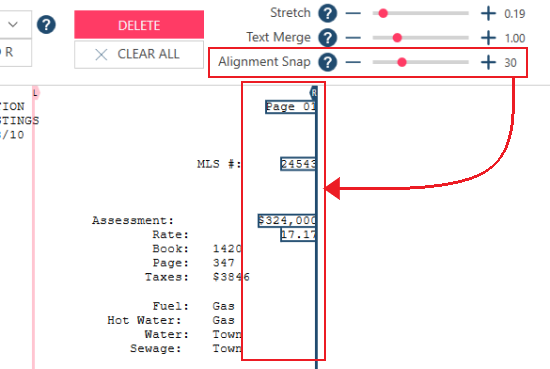
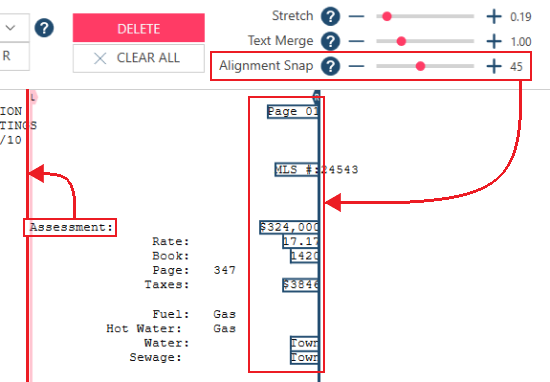
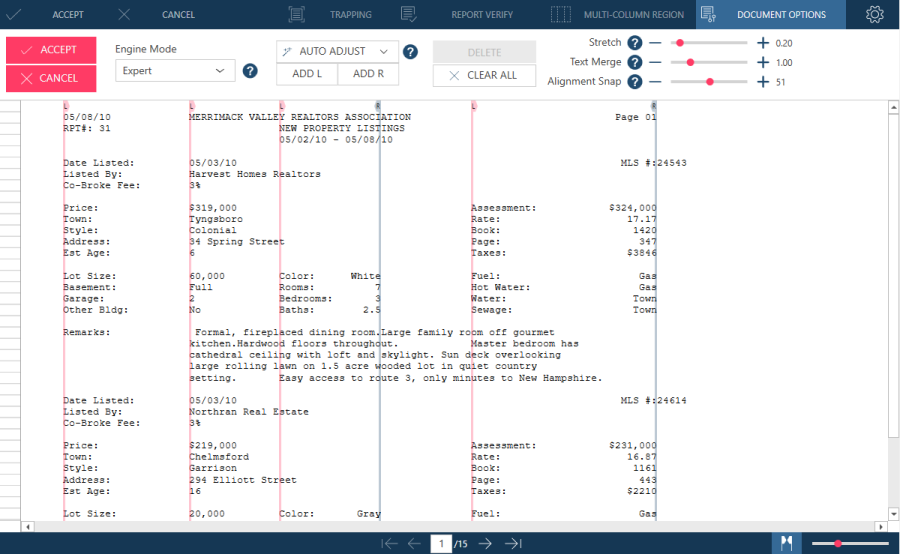
Take the following image as an example. Here, an existing left alignment is positioned to the left of the word Assessment. No right alignments exist.
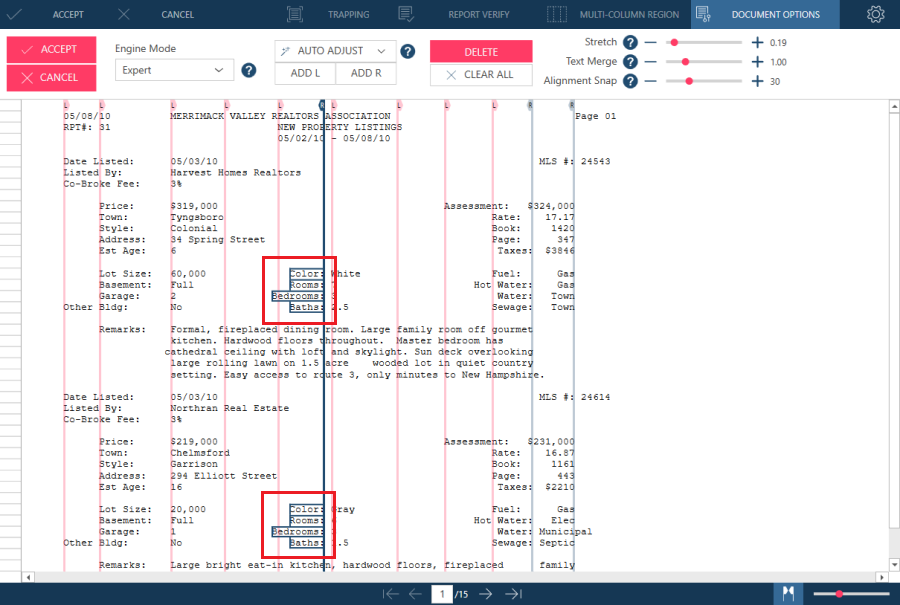
If the default Alignment Snap value (i.e., 30) is maintained and a right alignment is added immediately after Page 01, other groups of text close to the new alignment are pulled to it.
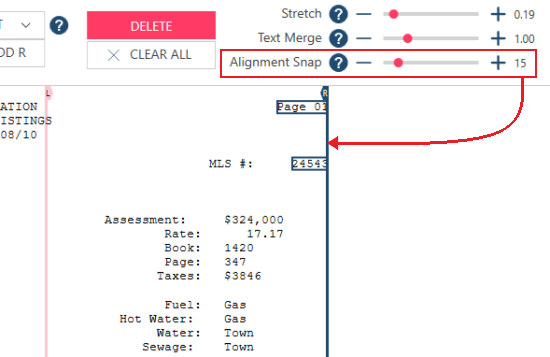
Using a lower value for this setting (e.g., 15) pulls only two lines of text to the right alignment as other values are considered too far from it.
Using a higher value for this setting (e.g., 45) pulls more lines of text toward the right alignment. Note also how the word Assessment: is pulled toward the existing left alignment, which is expected as the Alignment Snap property pulls text toward the nearest alignment, regardless of its type.
Once a text fragment has been pulled to an alignment, no other fragments can be pulled to the same alignment even if a larger Alignment Snap value is used.
The examples above highlight the necessity of carefully considering how you wish to align the text in your PDF report. In most cases, a combination of these settings will be necessary to produce a properly aligned report, thereby facilitating the efficient creation of traps and templates in Report Design.
Related Links
- Customizing PDF Import Options
- Working with Alignments in Simple Engine Mode
- The Report Design Window
- Creating Templates
© 2025 Altair Engineering Inc. All Rights Reserved.