Into Parts from Right...
Description
Starts from the right and splits a column into two more columns, depending on a separator (split delimiter) you define. The separator may be a single character or substring.
When a split delimiter is specified, Data Prep Studio automatically scans the values in the column starting from the left and presents the column count (i.e., how many columns are produced by the given split delimiter) and split limit (i.e., the maximum number of occurrences of the split delimiter the values in the column contain). Thus, when a column containing the values "4-ZDMZ-64617", "M2K-44762", and "ENTPD 4110" is split using a dash (-) as a split delimiter, the column count and split limit are updated with the values 3 and 2, respectively. Note that because the split operation starts from the right, the rows of the last (rightmost) column will always be filled (assuming that the original column does not contain missing values). The rest of the columns may or may not be filled, depending on whether the split delimiter exists in the values considered. As shown in the dialog below, the leftmost and middle columns for ENTPD 4110 as well as the leftmost column for M2K-44762 are empty.
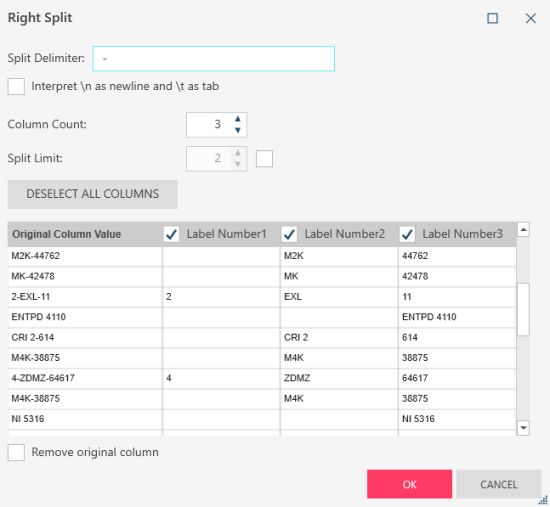
You can modify the column count and split limit by specifying your desired values for these fields. Continuing from the example above, if the column count is reduced to 2 and the split limit of 2 is retained, the split operation for 4-ZDMZ-64617 will yield two columns: one containing the value ZDMZ and the other containing the value 64617. If, instead, the split limit is set to 1 and the column count of 3 is retained, the split operation will yield three columns: the first containing a null value and the second and third containing the values 4-ZDMZ and 64617, respectively.
By default, all columns resulting from the split operation are added to the resulting table. However, in some cases, not all columns resulting from the split operation are useful to you. You can select specific columns to add to the table by clicking the Deselect All Columns button and then selecting which specific columns you wish to bring into the table instead.
Input/Output Data Type
|
Input |
Output |
|
text |
text |
Example
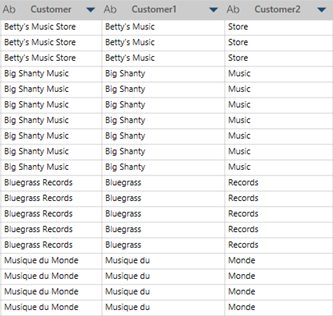
In this example, Customer is the original column. We split the column into 2 columns (i.e., Customer1 and Customer2) from the left using a space as the separator and a split limit of 1 (i.e., split the value at the first occurrence of the delimiter).
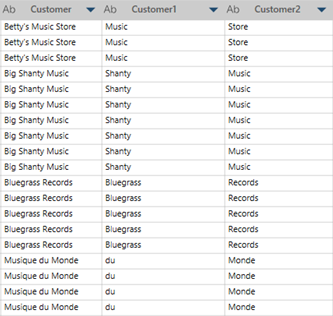
In this example, Customer is the original column. We split the column into 2 columns (i.e., Customer1 and Customer2) from the right using a space as the separator and a split limit of 2 (i.e., split the value at the first two occurrences of the delimiter). Note how, compared with the example above, the values in Customer 1 appear "truncated." If we had specified a column count of 3, the complete value of the Customer column would display over three columns. In this case, rows corresponding to Bluegrass Records will be empty in the first column (Customer 1).
© 2025 Altair Engineering Inc. All Rights Reserved.