Modifying Field Names in Summaries in Data Prep Studio
When Data Prep Studio builds a summary, it assigns the row, column, and measure field names as column titles in the summary matrix. You may use these names or you may modify the column titles to provide more descriptive names.
Note that when modifying field names in a Summary display, you are, in fact, only modifying their labels. As such, the Add/Edit Summary dialog will continue to show the original names of the source fields, but the Summary display will show the updated labels.
Modifying row field names
-
Select the summary with Row field names you wish to modify and then click Edit Summary.
The Edit Summary dialog displays.
-
Click on the
 Edit icon located the to left of a row field you wish to rename.
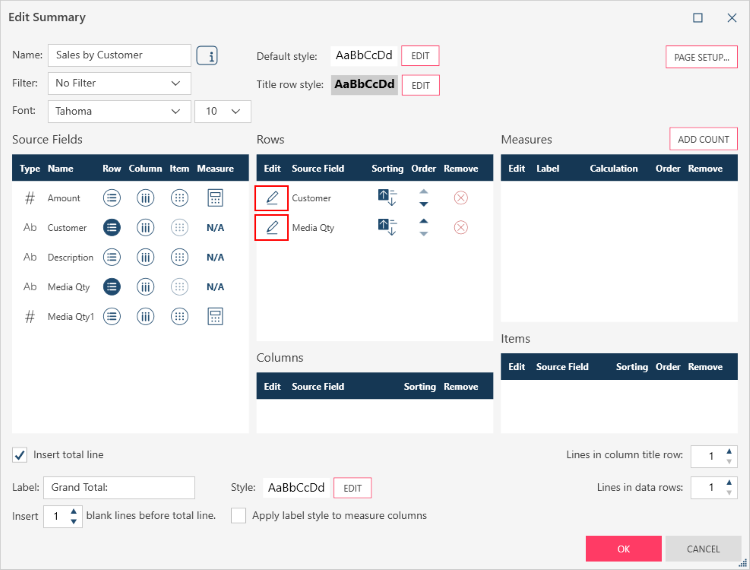
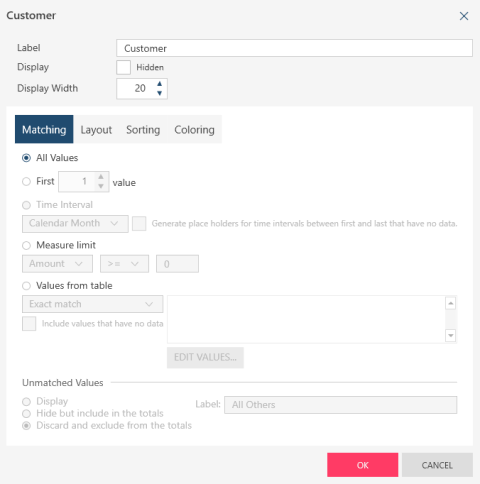
The Row Field Properties dialog displays.
-
Replace the name indicated in the Label field with a new field name.
-
Click OK to close the Field Properties dialog and then click OK on the Edit Summary dialog.
Your summary displays with the new Row field name you specified.

Modifying measure field names
-
Select the summary with measure field names you wish to modify and then click Edit Summary.
The Edit Summary dialog displays.
-
Click on the
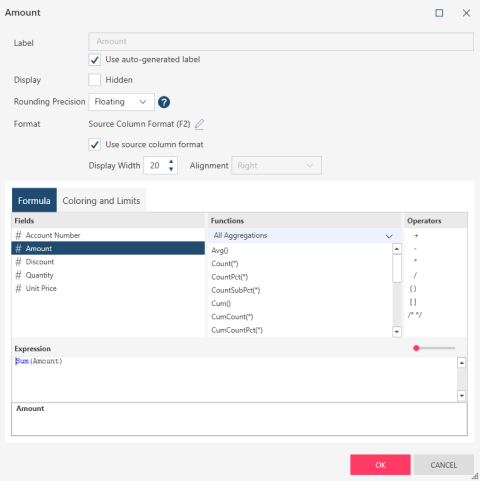
Edit icon located the to left of a measure field you wish to rename. The Measure Field Properties dialog displays.
-
Clear the box labeled Use auto-generated label. (Note that when this option is unticked, the text is set to the field name, and the name of the first field is used when the formula contains a compound expression.)
-
Replace the name indicated in the Label field with a new field name.
-
You can modify the other properties of the measure field, namely, the display setting, number of decimal places of accuracy, and the format of the measure field. These settings are described as follows:
-
In the Display field, tick the box labeled Hidden if you want the corresponding measure field hidden. A hidden measure may still be used for sorting purposes. Even though a measure column is hidden, the presence of the measure itself will generally still have some effect; for instance, blank lines and/or subtotal lines specified for a hidden measure will still produce rows in the summary. Note: Hidden columns do not get exported.
-
From the drop-down available in the Rounding Precision field, choose the number of decimal places of accuracy. Selecting a number from 0 to 9 rounds to the decimal precision specified and limits the numeric data range to 15 digits. Selecting Floating sets the precision to the full numeric range (i.e., ± 5.1 × 10^-324 to ± 1.7 × 10^308).
-
Modify the format of the measure field (i.e., Numeric, Financial, Currency, Percent, Scientific, and Custom) using the Format drop-down. Select Use source column format if you want to apply the original column format of the measure field.
-
Modify the display width and column alignment using the controls provided.
-
-
If you wish to modify the calculation applied to this measure field, enter a new calculation (e.g., any arbitrary expression involving addition, subtraction, multiplication, and division of values of numeric columns) into the Expression box.
-
You can also modify the settings for the coloring and limits applied to the measure field by clicking the Coloring and Limits tab.
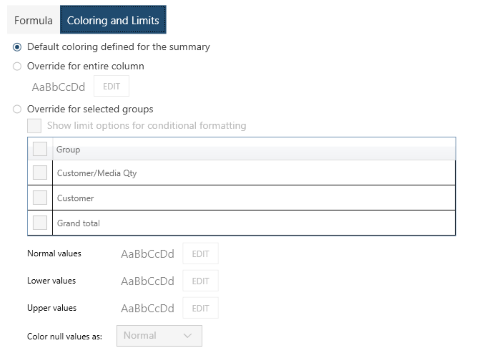
The available settings are described as follows:
-
Default coloring defined for the summary: Select this option to use the defaults that have been defined in the Edit Summary dialog.
-
Override for entire column: If you click on this option, a color sample initially displays. Click Edit beside the preview box to display the Color Properties dialog then use the dialog to set the text color, fill color, pattern style and pattern color.
-
Override for selected groups: Select this option to override the defaults and define colors for specific groups. If you click on this option, a list of groups displays. Select the groups you wish to color and then click Edit beside the Normal values preview box to display the Color Properties dialog. Use the dialog that displays to set the text color, fill color, pattern style and pattern color. Also, select values for Color null values as to set the color for null value fields.
-
If you wish to define colors for conditional formatting, click Show limit options for conditional formatting. The screen will provide text boxes for entering the Lower and Upper limits for each group. Select the groups you wish to color and then enter the lower limit and upper limit values. Click the right arrow beside Normal values, Lower values, and Upper values preview boxes to display the Color Properties dialog. Use the dialog that displays to set the text color, fill color, pattern style and pattern color. Also, select values for Color null values as to set the color for null value fields.
-
-
Click OK to close the Field Properties dialog and then click OK on the Edit Summary dialog.
Your summary displays with the new Measure field name you specified. The field should also be formatted following the coloring and limits settings in the previous step.
Modifying column field names
When a row field’s values are displayed across the top of the summary matrix (i.e., when you specify Column fields), the column titles are based upon the key field values. These titles are generated dynamically each time the summary is recalculated (as it may include more or fewer key field values). Data Prep Studio does not allow you to modify the titles for Column fields, otherwise your changes would be lost when the summary is recalculated.
Modifying item field names
-
Select the summary with Item field names you wish to modify and then click Edit Summary.
The Edit Summary dialog displays.
-
Click on the
Edit icon located the to left of an item field you wish to rename. The Item Field Properties dialog displays.
-
Replace the name indicated in the Label field with a new field name.
-
Click OK to close the Field Properties dialog and then click OK on the Edit Summary dialog.
© 2025 Altair Engineering Inc. All Rights Reserved.