File Reconciliation
When a workspace is saved, Data Prep Studio remembers the paths of all of the file-based tables you opened and uses these paths to reconstruct a workspace when opened. Thus, when you remove a table used in a workspace from its location or change its name and then load the workspace, the following error displays.
Data Prep Studio provides a convenient means to reconcile such issues.
Setting file paths to locate missing files in a Monarch project
When a project is moved between drives or workstations, Data Prep Studio implements a simple search process to locate missing files. If, for example, a project file is opened from C:\Users\Public\Public Documents\Projects and the model file saved in the project is located in D:\Data\Models, the application attempts to combine these paths and search for the missing files in the following places:
-
C:\Users\Public\Public Documents\Data
-
C:\Users\Public\Public Documents\Models
-
C:\Users\Public\Public Documents
-
C:\Users\Public\Public Documents\Projects
-
C:\Data\Models
-
C:\Data\Projects
-
C:\Data
If the application finds the missing file in one of these folders, the project opens as expected. If the model actually existed in C:\Users\Public\Model_Archive, it would not be found. This search strategy prevents Data Prep Studio from recursively searching for folder after folder and potentially timing out or freezing.
If, despite this strategy, the missing report or model file cannot be found, the Monarch Report/Model Error dialog displays.
Use the Browse button in the Monarch Report Error dialog to launch the Open dialog (for local files) or cloud browser (for cloud-based files) to locate the folder in which the missing/renamed model or report file resides. If the required file is located in this folder, the project opens as usual in a new or existing workspace, depending on how you choose to load the project in Data Prep Studio. If the required file is not located in the specified folder, follow the steps in Locating missing files in a workspace below to find it.
Note that Data Prep Studio remembers the last file path specified in the Monarch Report Error dialog. Thus, the path you last specified in this dialog is reflected in subsequent instances the dialog is displayed.
Locating missing files in a workspace
-
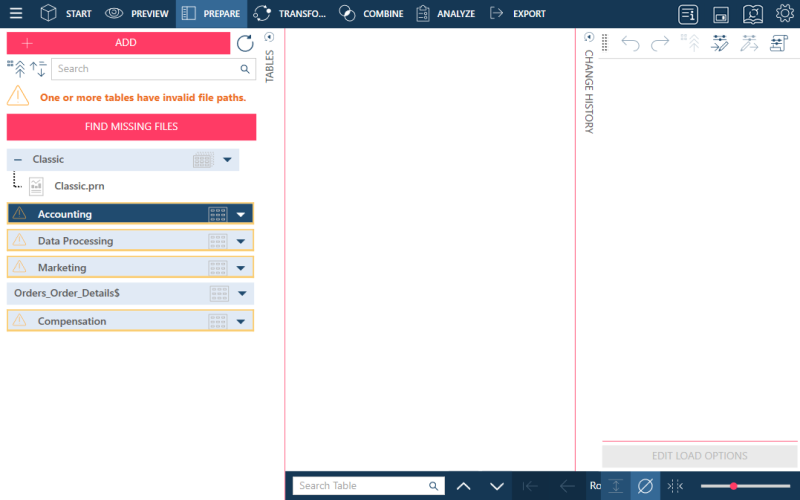
Click on the Find Missing Files button provided below the error message in the table selector. Doing so launches the Missing Files dialog.
-
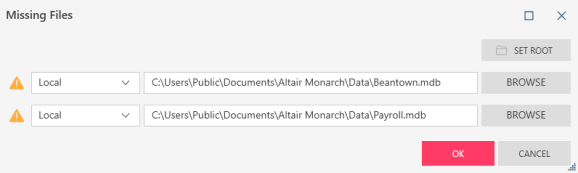
Click the Browse button on this dialog to launch the Open dialog, which you can use to locate the missing/renamed file(s). If the file is located in a cloud-based source (e.g., HTTP, HTTPS, FTP, SFTP, Amazon S3, Google Cloud Storage), a cloud browser displays. By default, the directory last used for the specific provider displays. You can set a root folder from which to obtain the missing data sources by clicking on the Set Root button. Note that if a missing file is not located in this root folder, you will need to use the Browse button (Open dialog or cloud browser) to locate the file. In addition, selecting a file updates the provider's last used directory.
-
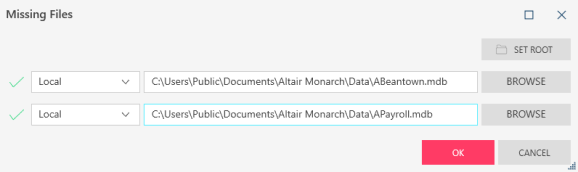
When a file path has been reconciled or when the table is replaced with the renamed one, a checkmark displays to the left of the file path. Click OK to close the dialog and load the workspace correctly.
Notes:
-
All load plans using the same file path are updated automatically when the incorrect file path is corrected via the Missing Files dialog.
-
Tables missing from individual load plans can be reconciled by clicking on the drop-down arrow located to the right of the table name and selecting Edit File Path. In this case, Note #1 does not apply.
Replacing missing tables in a workspace with tables from the Library
Missing tables may also be replaced with a table in the Library.
-
Click on the drop-down arrow located to the right of the table name and select Swap with Library Table. The Library dialog displays.
-
Select the replacement table from the list that displays and then click Load Selected.
Notes:
-
The Local Library stores the file paths of tables in a local environment. Thus, if the original table is actually missing, you cannot use the same table in the Local Library to replace it.
Replacing tables in the Library
You can replace tables in the Local Library for easier access in future work.
-
Click on the Open Library
 icon located at the upper right-hand corner of the Data Prep Studio Screen.
 -
In the Local tab, tick the box of the table you'd like to replace so that it is selected.
-
In the Actions column adjacent to the table, click the Edit icon to display a menu.
-
Select Edit File Path from the options shown.
-
In the Edit File Path dialog that displays, click the Browse button to launch an Open dialog and then navigate to the location of the replacement table.
-
Select the table and then click Open.
The path of the replacement table displays in the field provided.
-
Click OK on the Edit File Path dialog when you are finished.
© 2025 Altair Engineering Inc. All Rights Reserved.