
Use Global Hook
For properties which are applied at the same value to every node in a model, like global properties, the global hook should be used.
-
Open the global_inputs folder.
Inside the training_files folder, there are seven .h3d files named run__000X_m_1_fillet_cantilever.h3d and seven .json files named run__000X_m_1_fillet_cantilever.json. Each .json file contains exactly two material properties, Young’s modulus and Poisson ratio with different values. It is necessary to have consistent labels and number of properties across all the samples.
Figure 1. Global Property Inputs 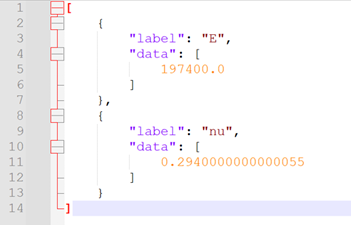
- Open HyperMesh.
- From the menu bar, click to open the PhysicsAI ribbon.
-
Create a new project called global_inputs.
-
From the
PhysicsAI ribbon, select the Create
Project tool.
Figure 2. 
The Create Project dialog opens.
-
From the
PhysicsAI ribbon, select the Create
Project tool.
- Copy the global_inputs_hook.py file into the _hooks folder inside the project folder.
-
Create a new dataset using all seven samples and name it Beam.
-
From the
PhysicsAI ribbon, select the Create
Dataset tool.
Figure 3. 
The Create Dataset dialog opens. -
For File System, click
 and navigate to
the training_files folder.
Note: The E and nu labels are selectable inputs to the training.
and navigate to
the training_files folder.
Note: The E and nu labels are selectable inputs to the training. -
Select and transfer all of the
.h3d
files.
Figure 4. 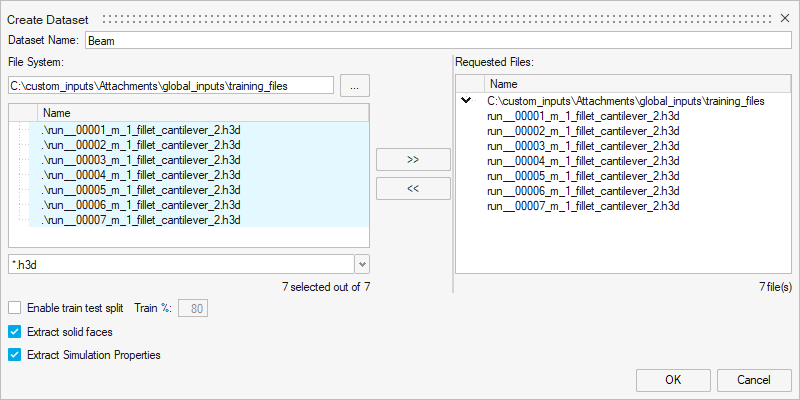
-
From the
PhysicsAI ribbon, select the Create
Dataset tool.
-
Train the model.
-
From the
PhysicsAI ribbon, select the Train an
ML Model tool.
Figure 5. 
The Train Model dialog opens. -
Click
Train.
Figure 6. Global Property Inputs 
The Model Training dialog opens.Tip: Once the status changes to Running, you can click Show Log view the training logs.
-
From the
PhysicsAI ribbon, select the Train an
ML Model tool.
-
Test the model.
-
From the
PhysicsAI ribbon, select the Test ML
Model tool.
Figure 7. 
The Test Model dialog opens. -
In the Datasets area, select Beam and click
OK.
Figure 8. 
The Model Testing dialog opens. -
In the Model Testing dialog, select
Displacement, and click Display
File to view the results in the modeling window.
Figure 9. 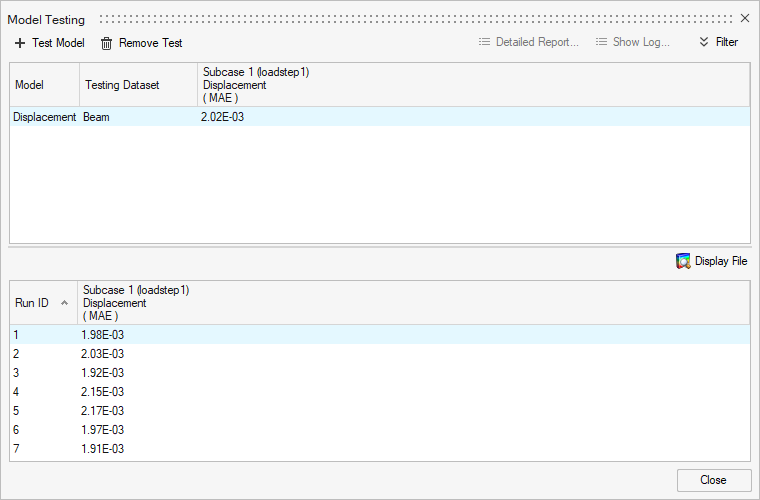
New samples can be generated by copying and renaming one or more training files. Ensure that the associated .json files are also present with different values of E and nu while creating the test dataset. -
From the
PhysicsAI ribbon, select the Test ML
Model tool.
-
Once the testing is complete, set the model to active.
Important: Setting a model as active will checkout a stacking license until the model is deactivated.
-
From the
PhysicsAI ribbon, select the Manage ML
Models tool.
Figure 10. 
The Model Training dialog opens.
-
From the
PhysicsAI ribbon, select the Manage ML
Models tool.