There are many ways to insert blocks into a diagram. Once a block is in a diagram, if you hover the pointer over the block, a pop-up window appears with a brief description of the block.
To insert a diagram into an existing diagram, use File > Add or the embed block.
To insert a block from the Blocks, Digital Power, eDrives, Embedded, Imported Blocks, or OpenVision
1. Choose Blocks, Digital Power, eDrives, Embedded, Imported Blocks, or OpenVision from the menu bar.
2. Select a block category.
3. Select a block.
The menu closes and a rectangular marquee appears with the pointer anchored in the upper left corner of the marquee.
4. Point to the location in the work area where you want to insert the block and click.
To insert a block from the toolbar
Many blocks are contained in floating toolbars. You control the display of floating toolbars using View > Tool Bar.
1. Click the desired block toolbar button.
A shimmering, rectangular box appears with the pointer anchored in the upper left corner of the box.
2. Point to the location in the work area where you want to insert the block and click.
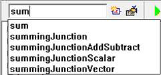
To insert a block from the Add/Locate toolbar button
1. In the toolbar, start to type the block name in the Add/Locate text box. As you type, a list of matching blocks appears in the drop-down menu.
2. Do one of the following:
•Double-click the desired block name from the list of blocks.
•Select the desired block name in the list of blocks and then click  .
.
A rectangular marquee appears with the pointer anchored to the upper left corner of the marquee.
3. Point to the location in the work area where you want to insert the block and click.
To insert a block from the Blocks and Diagram Browser windowpane
1. In the Blocks and Diagram Browser windowpane, click the plus sign in front of Blocks, Digital Power, eDrives, Embedded, or OpenVision to see all the block categories.
2. Expand the appropriate block category by clicking the plus sign in front of the category.
3. Drag the desired block into the work area.