Target Category: Arduino, Cortex M3, Delfino, F280x, F281X, Linux Raspberry Pi, MSP430, Piccolo, STM32
Target Sub-Category: I2C
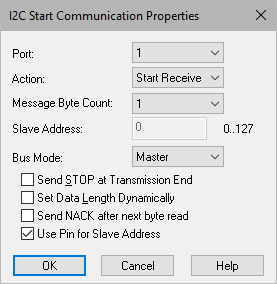
Description: The I2C Start Communication block is used to start sending the current contents of the queue.
Use the appropriate I2C Config blocks to configure the unit.
Action: Lets you choose between starting to send and starting to receive data.
Bus Mode: Lets you choose between master and slave mode. When the target device is Arduino and Bus Mode is set to Slave, you must encapsulate the slave response block logic in a compound block and enable the I2C Receive/Transmit interrupt. Examples are under Examples > Embedded > Arduino > I2C.
Message Byte Count: Specifies the number of bytes to send or receive before the STOP signal (if checked) is sent.
Port: Specifies the address. Click here for Arduino pin mapping. Click here for Raspberry Pi pin mapping.
Send NACK after next byte read: Sends a Not Acknowledged signal at the end of the data packet transmission. This parameter is available only for devices that support it.
Send STOP at Transmission End: Sends a STOP signal at the end of the transmission.
Set Data Length Dynamically: When activated, overrides the Message Byte Count parameter and adds a Data Length input pin to the block to dynamically control the data length. This parameter is available only when Bus Mode is set to Master.
Slave Address: Specifies the address of the slave to be written to or read from using 7-bit addressing.
Use Pin for Slave Address: Adds an input connector to I2C Start Communication block that lets you select the slave address via blocks in the diagram.