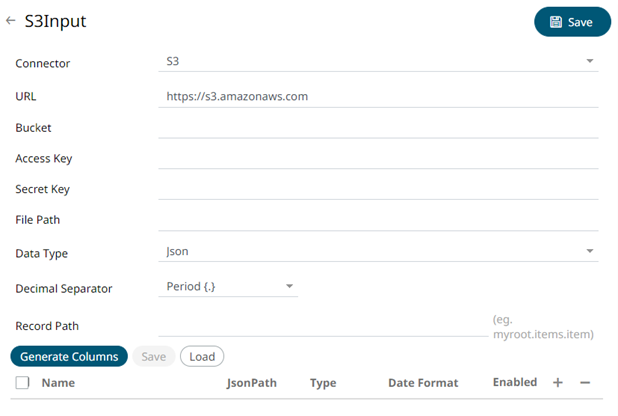
Creating Amazon S3 Input Data Source
The S3 connector allows for retrieval of the file from an S3 storage location. This connector allows JSON/XML/Text/Excel files to be read from the S3 storage. This connector will work with any S3 compliant storage providers.
Steps:
1. In the New Data Source page, select Input > S3 in the Connector drop-down list.

2. Enter the following information:
|
Property |
Description |
|
URL |
URL where the S3 bucket can be accessed. Default is https://s3.amazonaws.com. |
|
Bucket |
S3 bucket where the file resides. |
|
Access Key |
Access key to your S3 service account. |
|
Secret Key |
Secret key to your S3 service account. To
test the connection, click If |
|
File Path |
Path of the on the S3 bucket. |
3. Select the Data Type.
4. Select either the period (.) or comma (,) as the Decimal Separator.
|
NOTE |
Prepend 'default:' for the elements falling under default namespace. |
5. Click  to the fetch the schema based on the
connection details. Consequently, the list of columns with the data
type found from inspecting the first ‘n’ rows of the input data source
is populated and the Save button is enabled.
6. You can also opt to load or save a copy of the column definition.
7. You can also opt to click  to
add columns to the S3 connection that represent sections of the message.
Then enter or select:
|
Property |
Description |
|
Name |
The column name of the source schema. |
|
JsonPath/Column Index/XPath |
The JsonPath/Column Index/XPath of the source schema. |
|
Type |
The data type of the column. Can be a Text, Numeric, or Time |
|
Date Format |
The format when the data type is Time. |
|
Enabled |
Determines whether the message field should be processed. |
|
NOTE |
To parse and format times with higher than millisecond precision, the format string needs to end with a period followed by sequence of upper case S. There can be no additional characters following them. For example: yyyy-MM-dd HH:mm:ss.SSSSSS |
To
delete a column, check its  or
all the column entries, check the topmost
  ,
then click
  .
.
8. Click . The
new data source is added in the Data
Sources list.


 .
. displays, ensure
the