


|
Creating DolphinDB - Streaming Input Data Source
The DolphinDB streaming connector allows you to connect and subscribe streaming data using DolphinDB Java Streaming API.
Steps:
1. On the New Data Source page, select DolphinDB – Streaming Beta in the Connector drop-down list.
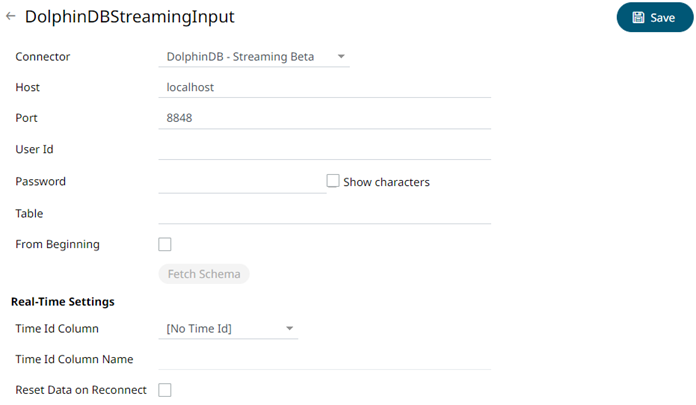
2. Enter the following information:
|
Property |
Description |
|
Host |
DolphinDB - Streaming host address. |
|
Port |
DolphinDB - Streaming host port. Default is 8848. |
|
User Id |
The user Id that will be used to connect to the DolphinDB - Streaming service. |
|
Password |
The password to connect to the DolphinDB - Streaming service. Check the Show Characters box to display the entered password characters. |
|
Table |
Table to subscribe against. |
3. Check the From Beginning box to subscribe from the beginning to the latest messages.
If un-checked, you will only be subscribed to the latest messages.
4. Click  to retrieve the schema of the
configured subscription.
to retrieve the schema of the
configured subscription.
This populates the Id Column with the set of columns from the schema of type sym and the text array such as Character/Boolean/GUID, etc. The selected Id Column can be used to select a key column to manage data updates and inserts.
NOTE: Every message definition needs a text column to be defined as the Id column. By default, only the latest data will be loaded into memory.
Furthermore, a streaming time series window can be generated by creating a compound key with the Id Column, plus a separately specified Time ID column. This Time ID column can be from the source dataset, or alternatively automatically generated.
If the Time Id column is selected, then a scrolling time window can be specified.

For Automatic Time Id, define the Time Id Column Name.
As new data arrives from the subscription, new time slices will automatically be added, and old ones will be deleted.
If a new Id is received, a new row is added to the in-memory data set representing the DolphinDB - Streaming topic subscription. While if an existing ID is received, an existing row is updated.
5. Modify the Real-time settings if further changes are required.
6. Click  . The new data source is added in the
Data Sources pane.
. The new data source is added in the
Data Sources pane.