Connector Dialog for NetSuite
Enter values into the dialog box to connect and fetch data from your NetSuite data source.
| Connection Tab | |
| Fill out the fields below to initiate a successful connection. Bold fields are required. Other fields are optional but you may need to consult your data source administrator for other field values you need to enter to connect. |
|
|
Field |
Description |
|
Account ID |
Enter the Account ID. Use this value, along with your User ID and Password, to authenticate yourself to NetSuite. |
|
Authentication Type |
Select the authentication type: token-based (TokenBased) or regular authentication (Basic). The default value is TokenBased. |
|
Consumer Key |
Specify a Consumer Key and Consumer Secret, which are private keys generated when creating an app in a NetSuite account in the Setup > Integration > Integration Management > Manage Integrations > New tab. Check the Token-based Authentication box to get a Consumer Key and Consumer Secret. |
|
Consumer Secret |
|
|
Token ID |
Enter your NetSuite Token ID. |
|
Token Secret |
Enter your NetSuite Token Secret. |
|
TEST CONNECTION |
Click to initiate a connection and test the values you have entered. If there are errors, messages will be displayed beside this button. Note: You can right-click on an error message to display a Copy button. Select the button to copy the error message. |
| Tables and Views Tab | |
|
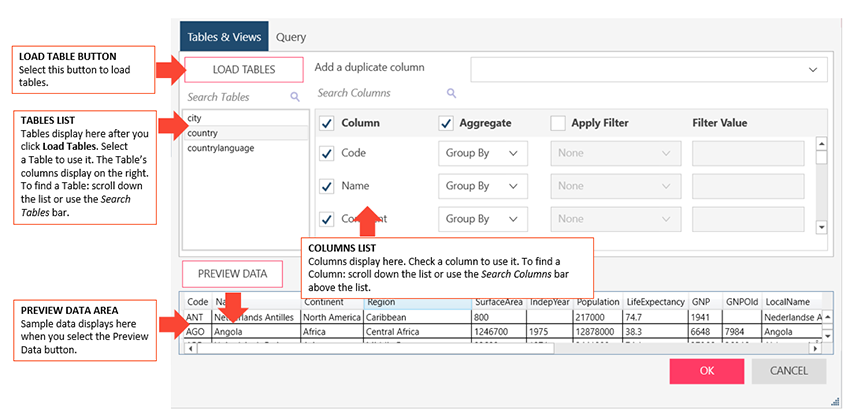
Tables and Views Section |
Allows you to load, and then select, the tables from your database by manually selecting from a list. To load tables and views via search and select:
Note: If you wish to add a duplicate column, select this column from the Add a duplicate column drop-down list provided.
To select a column: Check the boxes beside the columns you want to use. If you want to use all columns check the Column box on the header.
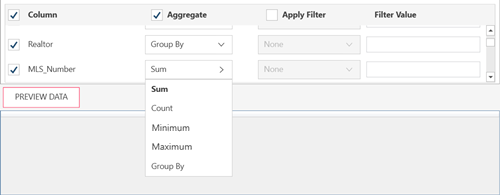
To aggregate columns:
If the data returned are to be aggregated, check the Aggregate box on the header, then select the aggregation method you want to use for each column. The following aggregation methods are possible for each data type:
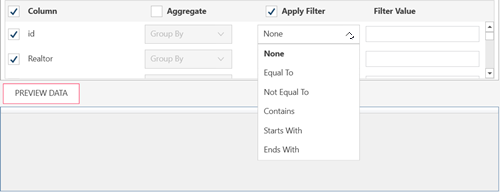
To filter columns:
If the data returned are to be filtered, check the Apply Filter on the header. Then, for each column, select a filter method from the filter drop down and then enter the filter value in the Filter Value box. Note that some data sources require case-sensitive filter values. Refer to this list to check which data sources have case-sensitive filters. To load tables and views using an SQL Query, select the Query tab |
|
Preview Data |
Click to fetch data using the credentials and criteria you have specified. This allows you to confirm your connection, ensure you have connected to the correct table, check your query, and verify the information that will be loaded. Notes:
|
| Query Tab | |
|
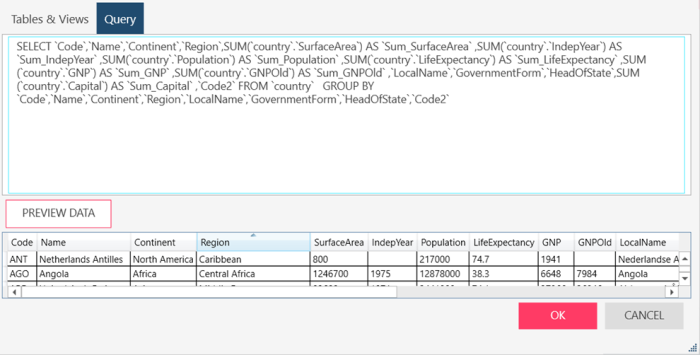
Query |
Allows you to load, and then select, the tables from your database by entering a SQL Statement. If you already selected Tables and Views, this box is updated to show the corresponding SELECT * FROM TABLE query.
If you want to define the query, enter the SELECT, EXEC, and/or WITH statements to execute. Notes
|
|
Preview Data |
Click to fetch data using the credentials and criteria you have specified. This allows you to confirm your connection, ensure you have connected to the correct table, check your query, and verify the information that will be loaded. Notes:
|

(c) 2023 Altair Engineering Inc. All Rights Reserved.