|
Connector Dialog for NetSuite
Enter values into the dialog box to connect and fetch data from your NetSuite data source.
Options
|
Field |
Description |
|
Account ID |
The company account your Username is associated with on NetSuite. |
|
Role ID |
The InternalId of the role that will be used to log in to NetSuite. Leave this empty to use the user's default role. |
|
Authentication Type |
Select one of the following:
You will be asked to enter additional authentication information depending on the Authentication Type you select.
|
|
Basic Authentication Fields (these only display if you select Basic authentication type) |
|
|
User ID |
The ID of the NetSuite account. |
|
Password |
A valid Password required to log-on to NetSuite. This password must match the User ID above. NOTE: Connections made to NetSuite version 2020.2 via username/password authentication may yield the following error: "User/password authentication has been discontinued by NetSuite as of the 2020.2 version." In this case, either switch to OAuth- or token-based authentication or specify a lower version as an other connection property (e.g., "Version=2020_1"). |
|
OAuth Authentication Fields (these only display if you select OAuth authentication type) |
|
|
Client ID |
The client ID assigned when you registered your application with an OAuth authorization server. |
|
Client Secret |
The client secret assigned when you registered your application with an OAuth authorization server. |
|
Access Token |
The access token for connecting using OAuth. |
|
Access Token Secret |
The OAuth access token secret for connecting using OAuth. |
|
Netsuite Medtadata Folder |
A path to a directory to download metadata files from NetSuite. Set this for best performance. |
|
Other Connection Options |
Connection options required to connect to the data source. If you need multiple string connection options, separate these by a semi-colon. However, you can only enter up to a maximum of 512 characters into this text box. Available options and valid values are discussed here. |
|
Use Sandbox |
Check this box if you would like to use the sandbox instance of your NetSuite account. |
|
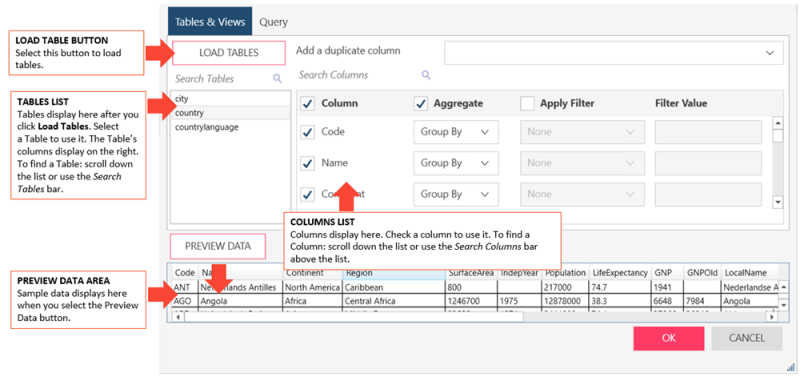
Tables and Views Section |
Allows you to load, and then select, the tables from your database by manually selecting from a list. To load tables and views via search and select:
Note: If you wish to add a duplicate column, select this column from the Add a duplicate column drop-down list provided.
To select a column: Check the boxes beside the columns you want to use. If you want to use all columns check the Column box on the header.
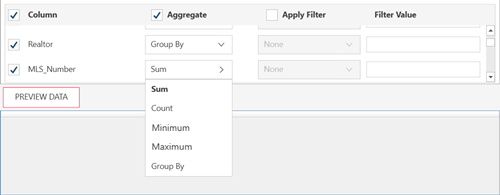
To aggregate columns:
If the data returned are to be aggregated, check the Aggregate box on the header, then select the aggregation method you want to use for each column. The following aggregation methods are possible for each data type:
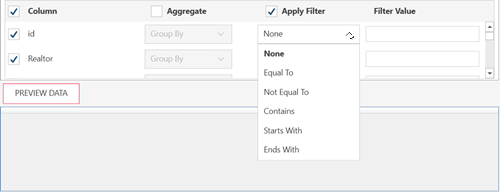
To filter columns:
If the data returned are to be filtered, check the Apply Filter on the header. Then, for each column, select a filter method from the filter drop down and then enter the filter value in the Filter Value box. Note that some data sources require case-sensitive filter values. Refer to this list to check which data sources have case-sensitive filters. To load tables and views using an SQL Query, select the Query tab |
|
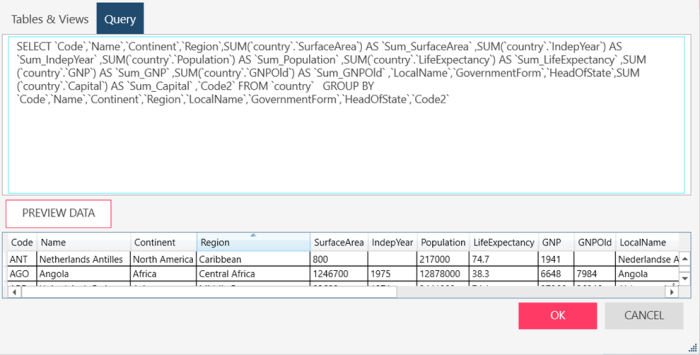
Query |
Allows you to load, and then select, the tables from your database by entering a SQL Statement. If you already selected Tables and Views, this box is updated to show the corresponding SELECT * FROM TABLE query.
If you want to define the query, enter the SELECT, EXEC, and/or WITH statements to execute. Notes
|
|
Preview Data |
Click to fetch data using the credentials and criteria you have specified. This allows you to confirm your connection, ensure you have connected to the correct table, check your query, and verify the information that will be loaded. Notes:
|