


|
Creating WebSocket Input Data Source
The WebSocket connector is very similar to the Stream Simulator connector, except that rather than looping through a file, it would either connect through web sockets, long polling, or repeatedly poll an external URL for new records to process.
Steps:
1. In the New Data Source page, select Input > WebSocket in the Connector drop-down list.
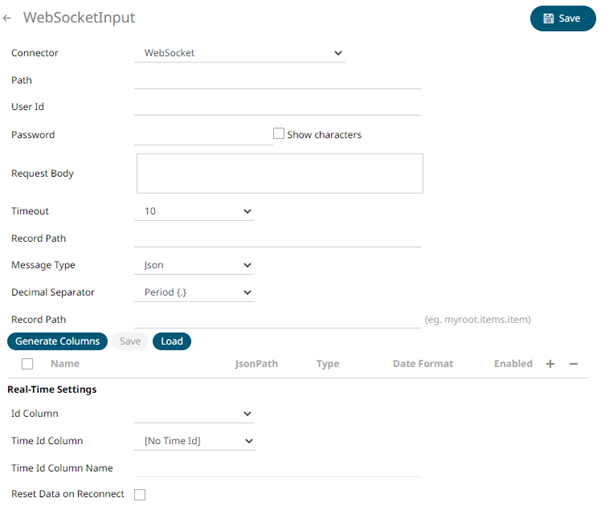
2. Enter the connection details:
|
Property |
Description |
|
Path |
The path to which the WebSocket server will respond to. |
|
Proxy Server URI |
he HTTP Proxy setting that will allow the WebSocket connector to reach the endpoint |
|
User ID |
The User ID that will be used to connect to the WebSocket server. |
|
Password |
The password that will be used to connect to the WebSocket server. Check the Show Characters box to display the entered characters. |
|
Request Body |
For both the HTTP and ws:// POST requests sent to the WebSocket server. |
|
Timeout |
The length of time to wait for the server response (10 to 300). Default is 10. |
3. Select the Message Type.
4. Select either the period (.) or comma (,) as the Decimal Separator.
|
NOTE |
Prepend 'default:' for the elements falling under default namespace.
|
5. Click  to
the fetch the schema based on the connection details. Consequently,
the list of columns with the data type found from inspecting the first
‘n’ rows of the input data source is populated and the Save button
is enabled.
to
the fetch the schema based on the connection details. Consequently,
the list of columns with the data type found from inspecting the first
‘n’ rows of the input data source is populated and the Save button
is enabled.
6. You can also opt to load or save a copy of the column definition.
7. You can opt to click
 to add columns to the WebSocket
connection that represent sections of the message. Then enter or select:
to add columns to the WebSocket
connection that represent sections of the message. Then enter or select:
|
Property |
Description |
|
Name |
The column name of the source schema. |
|
JsonPath/Text Column Index/XPath |
The JsonPath/Text Column Index/XPath of the source schema. |
|
Type |
The data type of the column. Can be a Text, Numeric, or Time |
|
Date Format |
The format when the data type is Time. |
|
Filter |
Defined parameters that can be used as filter. |
|
Enabled |
Determines whether the message field should be processed. |
|
NOTE |
To parse and format times with higher than millisecond precision, the format string needs to end with a period followed by sequence of lower case Fs. There can be no additional characters following them. For example: yyyy-MM-dd HH:mm:ss.ffffff
|
8. If the Type is selected as Text, it will be listed in the Id Column drop-down list box and can be used to select a key column to manage data updates and inserts.
Note: Every message definition needs a text column to be defined as the ID column. By default, only the latest data will be loaded into memory.
Furthermore, a streaming time series window can be generated by creating a compound key with the Id Column, plus a separately specified Time ID column. This Time ID column can be from the source dataset, or alternatively automatically generated.
If the Time Id column is selected, then a scrolling time window can be specified.

For Automatic Time Id, define the Time Id Column Name.
As new data arrives from the subscription, new time slices will automatically be added, and old ones will be deleted.
If a new ID is received, a new row is added to the in-memory data set representing the WebSocket topic subscription. While if an existing ID is received, an existing row is updated.
9.. Check the Reset Data on Reconnect box to flush out the stale data and reload data after reconnection.
10. Click  . The
new data source is added in the Data Sources list.
. The
new data source is added in the Data Sources list.