If you want to add a custom dialog box to a DLL, you must compile and link the code manually.
Nowadays, most languages have a Project Build facility that automates the process of building an executable or DLL. We recommend using Microsoft Visual Studio (v6 or higher). Refer to the documentation for the application language you are using for specific instructions.
To build a custom DLL with Microsoft Visual Studio v2012
1. Invoke Microsoft Visual Studio.
2. Choose File > New to create a new project workspace.
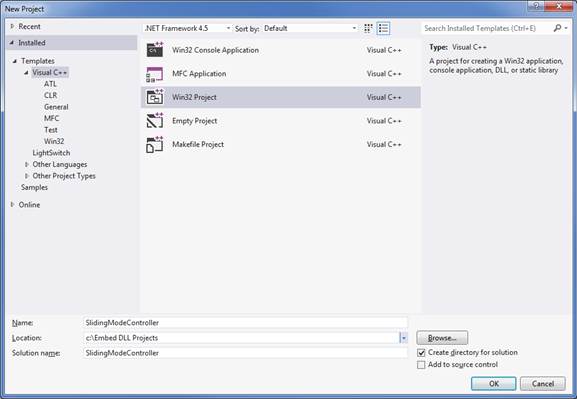
3. In the left windowpane, select Visual C++. In the right windowpane, select Win32 Project. Then enter the project name and location in the text boxes at the bottom of the window. We recommend activating the Create directory for solution parameter. When you do so, the Solution Name defaults to the project name.

4. Press OK.
The Win32 Application Wizard starts.
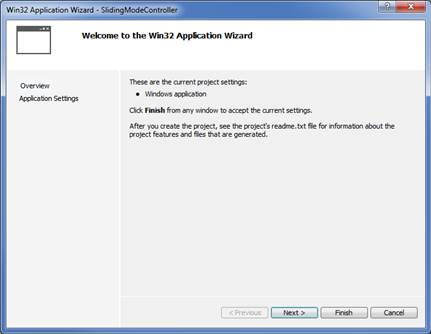
5. Press Next.
The Application Setting window appears.
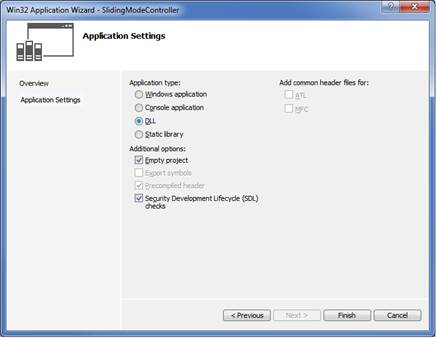
6. Do the following:
•Under Application Types, select DLL.
•Under Additional Options, select Empty Project.
•Click Finish.
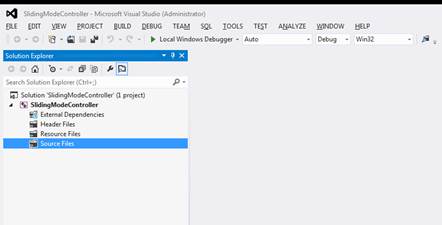
7. The Solution Explorer window appears.
8. Before proceeding, open Windows Explorer and copy the custom C or Embed-generated C file to your newly created project location.
9. Go back to the Solution Explorer window.
10. Right-click Source Files. Then click Add > Existing Item.
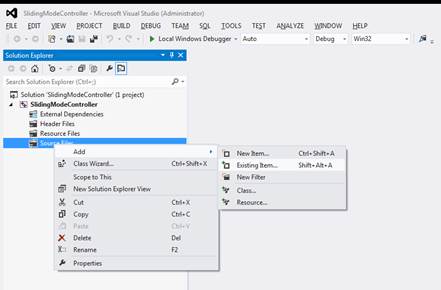
11. Select your custom C or Embed-generated C file and press Add.
12. Right-click the Project Name and select Add > Existing Item.
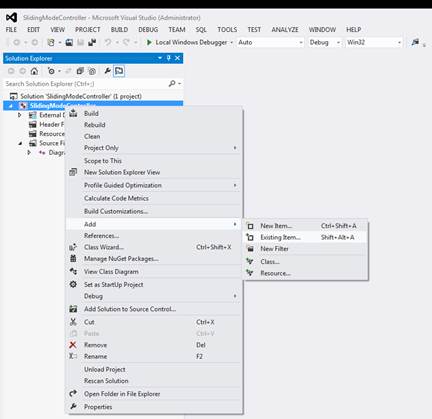
13. Insert the following:
•\<install-directory>\CG\LIB\CGDLL32.LIB
•\<install-directory>\VSDK\LIB\VISSIM32.LIB
Note: To specify file names, enter the full pathname, including drive specification for CGDLL32.lib and VISSIM32.lib.
14. Choose Build > Properties to establish the settings for the build.
15. In the Properties Pages dialog box, do the following:
•Click Configuration Properties > C/C++ > General.
•Select Additional Include Directories; then in the corresponding cell, enter \<install-directory>\VSDK\INCLUDE; \<install-directory>\CG\INCLUDE
Note: To specify directory names, enter the full pathname, including the drive specification for the INCLUDE directories.
•Click OK.
16. Choose Build > Build Solution to build the project.