Saving A Workspace
Your workspace includes:
-
The tables you have loaded
-
The join definitions you have created
-
The transform operations you have carried out
A workspace does not include tables currently open in your Preview window.
You can save your workspace anytime, and you can load this again to continue preparing your data.
Note that the delimited text importer has been updated in Monarch Complete version 2020.1. Thus, workspaces containing this new importer will be rendered unusable in older versions of the software. A version compatibility warning displays before the workspace is saved to alert you of this potential issue.
Saving workspaces
Steps:
-
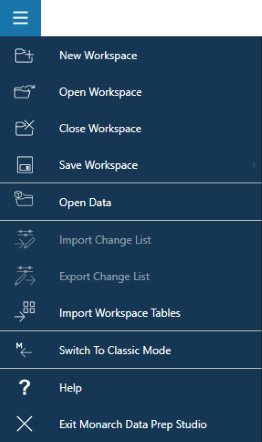
Select the Application Menu icon on the upper right corner of the window you are in:

-
Select Save Workspace, and then select a save option:
-
Save the workspace to your computer.
-
Enter the path and the workspace name.
-
Save the workspace to your computer, but using a different name.
-
Enter the path and the new workspace name.
-
Save the workspace to you computer, with a password.
-
Enter the path and the workspace name. Afterwards, also enter a password.
-
Save the workspace to your computer, but using a different name and with a password.
-
Enter the path and the new workspace name. Afterwards, also enter a password.
-
Save the workspace to the Knowledge Hub Library.
-
Enter the workspace and data source. Refer to the next section for details.
-
Saving workspaces to Knowledge Hub
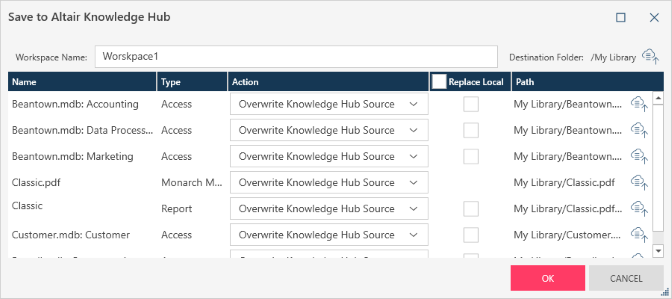
When you save to Knowledge Hub, you are asked to set the path for the workspace as well as all sources used.

Using the Save to Altair Knowledge Hub dialog box:
-
Enter the workspace name.
-
Set the workspace destination folder. Click on the Browse
 icon to select a folder from the Knowledge Hub Library in which
to save the workspace.
For each data source:
-
Define how the data source is saved.
-
You can select to overwrite the source on the Knowledge Hub server, create a new instance of the data source on the Knowledge Hub server, or use the existing source on the Knowledge Hub server.
-
Tick the Replace Local checkbox if you wish to use the table to replace the local source.
-
Set the destination folder and data source. Click on the Browse
 icon to select a folder and data source on the Knowledge Hub
Library. If you opted to create a new table in Knowledge Hub,
you must also provide a name for this table.
Note that as of this release, saving a workspace to the Knowledge Hub library from DPS fails when the data source used is from Knowledge Hub (Use Knowledge Hub Source option). This problem is a known issue.


